
Best Gas-Powered Tillers to Buy in July 2026
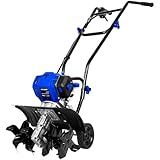
BILT HARD 46cc 4-Cycle 1.9HP Gas Powered Tiller Cultivator - 16" Heavy-Duty Steel Tines Rototiller, Adjustable Wheels & Cushioned Handle Grips for Plowing, Tilling, Weeding in Garden, Farm
-
POWERFUL 46CC ENGINE: 1,400W PEAK, EFFICIENT, LOW NOISE & EMISSIONS.
-
EFFICIENT 16 CUTTING: 6 BLADES & 4 TINES FOR SUPERIOR SEEDBED PREP.
-
INTUITIVE ONE-HAND CONTROL: EASY OPERATION WITH ERGONOMIC DESIGN.


63cc Gas Garden Cultivator with 2 Wheels, 4-Stroke Gas Powered Garden Tiller, 13.78'' Width 1.97-5.90'' Depth, for Lawn, Garden Loosening and Weeding
-
BOOST EFFICIENCY BY 50% WITH A POWERFUL 1.6KW ENGINE & 13.78 WIDTH.
-
MILITARY-GRADE BLADES LAST 3X LONGER-DURABLE FOR HEAVY-DUTY TASKS.
-
ERGONOMIC DESIGN & CORDLESS EASE MAKE IT USER-FRIENDLY FOR ALL!
Earthquake 31635 MC33 Mini Tiller Cultivator, Powerful 33cc 2-Cycle Viper Engine, Gear Drive Transmission, Height Adjustable Wheels, 5 Year Warranty,Red
- VERSATILE DESIGN FOR EFFICIENT WEEDING AND AERATING SOIL!
- ON-BOARD WHEELS FOR EASY TRANSPORT AND PRECISE DEPTH CONTROL.
- POWERFUL VIPER ENGINE ENSURES EFFECTIVE GARDENING FOR ANY SIZE!
SPLENDOR Gas Powered Tiller 4 Cycle Engine 212CC Working Width Adjustable 13in-22in-33.5in
-
POWERFUL 7HP ENGINE: EFFORTLESSLY CULTIVATE SOIL WITH ROBUST PERFORMANCE.
-
ADJUSTABLE WIDTH: TACKLE ANY TERRAIN WITH THREE WORKING WIDTH OPTIONS.
-
ERGONOMIC DESIGN: COMFORTABLE HANDLING WITH FORWARD AND REVERSE SPEEDS.
BFDIEEM 4-Stroke 63CC Gas Powered Tiller Cultivator Garden Yard Rototiller Tilling Tool Gas Tiller- Ideal for Garden, Lawn, Soil Cultivation, Weed & Digging
- BOOST PRODUCTIVITY WITH A POWERFUL 1.6KW, 8500-9000RPM ENGINE.
- DURABLE MATERIALS ENSURE LONG-LASTING PERFORMANCE AND RELIABILITY.
- CONVENIENT DESIGN FEATURES EASY MOBILITY AND QUICK ONE-CLICK START.
Mantis 7940 4-Cycle Tiller Cultivator Powered by Honda – Lightweight, Powerful and Compact - No Fuel Mix, Sure-Grip Handles – Built To Be Durable and Dependable
-
EFFICIENT TILLING: HONDA ENGINE DELIVERS TWICE THE SPEED FOR BETTER RESULTS.
-
BUILT TO LAST: PROUDLY MADE IN THE USA WITH A ROBUST 2-YEAR WARRANTY.
-
LIGHTWEIGHT & EASY: WEIGHS ONLY 24 LBS FOR EFFORTLESS MANEUVERABILITY.
Starting a gas-powered tiller involves a series of steps to ensure a successful startup. Here's a breakdown of how to start a gas-powered tiller:
- Preparation: Check the fuel level: Ensure there is enough gas in the tiller's fuel tank. Check the oil level: Verify that the tiller has enough oil for proper operation. Inspect the spark plug: Ensure that the spark plug is clean and properly connected. Engage the safety features: Make sure the tiller's safety features are engaged, such as the engine kill switch and safety shield.
- Positioning: Set up a clear work area: Ensure there are no obstacles or debris near the tiller. Place the tiller on level ground: Position the tiller on a flat, stable surface for stability during startup.
- Prime the engine: Locate the primer bulb: Usually, the primer bulb is located on the carburetor or fuel tank. Press the primer bulb: Depress the primer bulb several times to move fuel into the carburetor. This helps the engine start easier.
- Set the choke: Locate the choke lever or knob: It is usually near the engine or carburetor. Adjust the choke: Set the choke to the "Start" or "On" position. This enriches the fuel mixture during startup.
- Start the engine: Locate the starter cord: It is usually near the engine or at the rear of the tiller. Pull the starter cord: Grasp the handle firmly and pull the cord briskly in a smooth motion. This will engage the engine.
- Warm up the engine: Let the engine idle: Allow the engine to run at a low speed for a couple of minutes to warm up. Gradually disengage the choke: As the engine warms up, gradually move the choke lever or knob to the "Run" or "Off" position.
- Adjust throttle and engage the tines: Increase the throttle speed: Gradually adjust the throttle to increase the engine speed. Engage the tines: Once the engine is running smoothly, engage the tiller's tines by engaging the appropriate lever or switch.
Remember to always consult your specific gas-powered tiller's manual for detailed instructions as starting procedures may vary based on the model and manufacturer.
How to level the ground after tilling with a gas-powered tiller?
After tilling a garden with a gas-powered tiller, there are a few steps you can follow to level the ground:
- Allow the soil to settle: After tilling, the soil may be loose and uneven. Give it some time to settle for a day or two before proceeding with leveling.
- Remove large debris: Walk over the tilled area and remove any remaining rocks, sticks, or large clumps of soil. This will help create a more even surface.
- Use a garden rake: Starting from one end of the tilled area, use a garden rake to gently distribute the soil evenly. Rake in one direction, moving forward, and gradually work your way to the opposite end. This will help smooth out any bumps or unevenness in the soil.
- Fill in low areas: If there are any noticeable low spots, use additional soil to fill them in. Level the filled area with the rake to match the surrounding soil.
- Tamp the soil: After raking, lightly tamp the soil down using a hand tamp or the backside of a garden rake. This will help compact the soil and create a more uniform surface.
- Water and let it settle: Watering the leveled area and allowing it to settle can help further compact the soil. After watering, wait for a day or two and observe if any low areas reappear. If necessary, add more soil and repeat the process of leveling and tamping.
- Repeat the leveling process: If the ground still appears uneven, repeat the raking, filling, and tamping process until you achieve the desired levelness.
By following these steps, you can effectively level the ground after tilling with a gas-powered tiller and prepare it for planting or other gardening activities.
What types of attachments are available for a gas tiller?
There are various types of attachments available for a gas tiller, including:
- Tilling attachments: These are the most common attachments for gas tillers. They are designed to break up and cultivate the soil, making it suitable for planting. Tilling attachments come in different widths and can be adjusted according to the desired tillage depth.
- Furrower attachments: Furrowers are used to create furrows or trenches in the soil for planting seeds or bulbs. They can be adjusted to create different widths and depths of furrows.
- Cultivator attachments: Cultivators are used for shallow cultivation, mainly to aerate and loosen the top layer of soil without disturbing the deeper layers. They are beneficial for weeding, mixing in soil amendments, and preparing small areas for planting.
- Dethatcher attachments: Dethatchers are used to remove thatch, which is a layer of dead grass, roots, and debris that accumulates on the surface of the soil. They help promote healthier lawns by improving air circulation, water penetration, and nutrient absorption.
- Edger attachments: Edgers are used to create clean and defined edges along driveways, sidewalks, and garden beds. They help maintain a neat and manicured appearance for your lawn and garden.
- Border attachments: Border attachments are designed to create clean and decorative edges along flower beds, pathways, and other landscaping features. They give a professional finish to landscape borders and prevent the grass from encroaching into the garden.
- Plow attachments: Plows are used to dig trenches, create planting rows, or move soil or gravel. They are useful for various landscaping tasks, including trenching for irrigation lines, creating raised beds, and general earthmoving.
Note that the availability of these attachments may vary depending on the specific brand and model of the gas tiller. It's always recommended to check with the manufacturer or authorized dealers for the compatible attachments for your gas tiller.
How to add fuel to a gas tiller?
To add fuel to a gas tiller, follow these steps:
- Choose the correct type of fuel: Check the manufacturer's instructions or the label on the tiller to determine the type of fuel recommended for your specific model. Generally, tillers require a gasoline-oil mixture for 2-stroke engines, or straight unleaded gasoline for 4-stroke engines.
- Safety precautions: Make sure the tiller is turned off and the engine is cooled down before adding fuel. Find a well-ventilated area away from any open flames, sparks, or sources of heat.
- Access the fuel tank: Locate the fuel tank on your tiller. It is usually located near the engine and may be covered by a cap.
- Open the fuel tank: Unscrew or unclip the fuel tank cap to access the tank.
- Mix fuel (if needed): If your tiller has a 2-stroke engine, you may need to mix fuel and oil in the correct ratio before adding it to the tank. Refer to the manufacturer's instructions or the oil container for the appropriate ratio. Mix the fuel and oil in a separate fuel container and stir well.
- Fill the tank: Use a funnel if necessary to prevent spills. Slowly pour the fuel into the tank, being careful not to overfill it. Leave some space for the fuel to expand, as it will do so with temperature changes.
- Secure the fuel tank: Screw the cap back on tightly or clip it in place to ensure a secure seal.
- Clean up any spills: Wipe away any spilled fuel from the tank and surrounding areas. Fuel spills can be flammable and should be cleaned up immediately.
- Start the tiller: Once the fuel tank is filled, you can start the tiller according to the manufacturer's instructions. Pull the starter cord or engage the ignition switch to begin the engine.
Always refer to the specific instructions provided by the tiller manufacturer to ensure you are following the correct fueling procedure for your particular model.
How to start a gas-powered tiller?
To start a gas-powered tiller, follow these steps:
- Check the fuel: Ensure the tiller has enough fuel by checking the gas tank and filling it up if necessary. It's recommended to use fresh, unleaded gasoline to avoid any ignition or performance issues.
- Set the choke: Locate the choke lever or knob on the tiller, usually found near the engine. Move it to the "Full" or "Choke" position. This helps to enrich the fuel-air mixture during startup.
- Priming the carburetor (if applicable): Some tillers have a primer bulb or button to prime the carburetor. If your tiller has one, press it a few times to help fuel reach the carburetor and make starting easier.
- Check safety mechanisms: Ensure that any safety mechanisms, such as dead-man switches or handles, are in the proper position for starting the tiller. These mechanisms are designed to prevent accidental startup in unsafe conditions.
- Place the tiller on a stable surface: Position the tiller on a level and stable surface, ensuring it won't tip or roll during startup.
- Set the throttle: Adjust the throttle lever or knob to the desired starting position. Many tillers have a "Start" or "Run" setting for initial startup.
- Engage the clutch: If your tiller has a clutch, make sure it is disengaged or in the "Neutral" position for starting.
- Start the engine: Locate the starter grip or cord, usually located on the side of the engine or on top. Firmly grasp the grip and give it a quick and smooth pull to start the engine. If the tiller has an electric start feature, simply press the ignition button or turn the key instead.
- Adjust the choke and throttle: Once the engine starts, let it run for a few moments to warm up. Gradually move the choke lever from the "Full" or "Choke" position to the "Half" or "Open" position as the engine warms up. Adjust the throttle lever to the appropriate operating speed based on your tilling needs.
- Begin tilling: Once the tiller is running smoothly and at the desired throttle setting, you can begin using it for tilling or cultivating your desired area. Be sure to read and follow the manufacturer's instructions and safety guidelines throughout the entire process.
What safety precautions should be taken while using a gas tiller?
When using a gas tiller, it is important to follow these safety precautions:
- Read and understand the manufacturer's instruction manual before operating the gas tiller. Familiarize yourself with the controls, safety features, and recommended operation procedures.
- Wear appropriate personal protective equipment (PPE), including safety glasses or goggles, hearing protection, gloves, long pants, and sturdy closed-toe shoes.
- Ensure the gas tiller is on a stable and level surface before starting it. Do not operate the tiller on steep or uneven terrain.
- Before starting the gas tiller, check for any visible damage, loose parts, leaking fuel, or other issues. Ensure all nuts, bolts, and fasteners are properly tightened.
- Avoid wearing loose clothing or jewelry that can get caught in moving parts, such as the tines or engine.
- Keep bystanders, pets, and children at a safe distance from the working area. It is recommended to maintain a minimum distance of 50 feet.
- Always start the tiller outdoors in a well-ventilated area. Never operate it in an enclosed space, such as a garage or shed, due to the risk of carbon monoxide poisoning.
- Use both hands to grip the handles of the tiller securely and maintain good balance while operating it.
- Do not operate the gas tiller with excessive speed. Follow the recommended operating speed and use the tiller at a steady pace to maintain control.
- Be cautious when tilling near underground utilities, such as gas lines, electrical wires, or water pipes. Contact the relevant utility companies before digging to identify and mark the location of any buried lines.
- Avoid overreaching or standing directly over the tines while the tiller is running. Keep a safe distance, and never use your feet to stabilize the tiller.
- If the tiller becomes clogged or jammed, shut off the engine and wait for all moving parts to come to a complete stop before attempting to clear the jam or debris.
- After using the gas tiller, turn off the engine and allow it to cool before refueling. Store the tiller in a safe and well-ventilated location, away from any potential sources of ignition.
Remember, safety should always be a top priority when operating any machinery or power tools.
How does a gas-powered tiller work?
A gas-powered tiller works by utilizing the power generated by a small gasoline engine to rotate a set of tines or blades. Here is a basic overview of its workings:
- Engine: The tiller is powered by a small gasoline engine, typically with a capacity ranging from 2 to 8 horsepower. This engine is equipped with a fuel tank, a carburetor, and a spark plug.
- Fuel and ignition: The tiller operator fills the fuel tank with gasoline, which is then drawn into the carburetor. The carburetor mixes the fuel with air to create a combustible mixture that is delivered to the engine cylinder. The spark plug ignites this mixture, generating the power for the tiller to operate.
- Transmission: The engine's power is transmitted to the tines through a mechanism called the transmission. The transmission consists of a series of gears and belts or chains that transfer the power from the engine to the tines.
- Tines: The tines are the blades attached to the rotating shafts of the tiller. They are typically arranged in a spinning drum or wheel configuration. As the engine drives the tines, they rotate rapidly, breaking up the soil.
- Depth control: Many gas-powered tillers allow the operator to adjust the depth at which the tines penetrate the ground. This is typically achieved by modifying the position of the wheels or adjusting a depth control lever.
- Handlebars: The tiller features handlebars that allow the operator to guide and control the machine. The handlebars usually include throttle controls, which adjust the engine speed, and clutch controls, which engage or disengage the tines.
When operating the gas-powered tiller, the operator pushes it forward as the rotating tines turn into the ground. The tines agitate and break up the soil in the process, making it easier to prepare the soil for gardening or landscaping purposes.