
Best Garden Tillers to Buy in July 2026
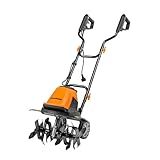
LawnMaster TE1016M Electric Tiller 12-Amp, 16-Inch
- MAX 16 CUTTING WIDTH & 9 DEPTH FOR EFFICIENT TILLING.
- DURABLE 6 RUST-RESISTANT STEEL BLADES TACKLE TOUGH TERRAIN.
- USER-FRIENDLY ADJUSTABLE TRANSIT WHEEL WITH 3 HEIGHT OPTIONS.


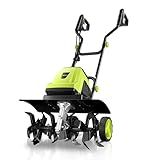
YERYORK Tiller Cultivator, 15-Amp 18-Inch Width 9-Inch Depth Corded Electric Tiller 24 Durable Steel Tines Gardening Tiller with Adjustable Wheels Foldable Handle for Easy Soil Cultivation
- POWERFUL 15-AMP MOTOR: EFFORTLESSLY TACKLE TOUGH SOIL CONDITIONS.
- 18-INCH CUTTING WIDTH: MAXIMIZE EFFICIENCY FOR BIGGER GARDEN JOBS.
- COMPACT DESIGN: EASY STORAGE WITH FOLDABLE HANDLES FOR TIGHT SPACES.
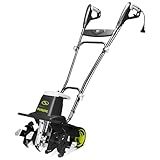
Sun Joe Electric Garden Tiller Cultivator, Steel Tines, 12 Amp, 16 Inch, Black - Heavy-Duty Gardening Machine & Equipment for Gardens, Lawns & Yards, TJ603E
-
EFFICIENT SOIL PREP: TILLS 16” WIDE, 8” DEEP FOR OPTIMAL GARDENING.
-
ECO-FRIENDLY OPERATION: ELECTRIC DESIGN MEANS NO GAS OR OIL NEEDED.
-
DURABLE CONSTRUCTION: FEATURES 6 RUST-PROOF STEEL TINES FOR LONGEVITY.
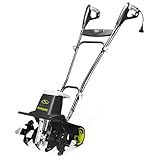
Sun Joe Electric Corded Garden Tiller & Cultivator, Steel Tines, 13.5 Amp, 16 Inch, Black - Heavy Duty Gardening Machine Equipment for Lawn, Yard, & Grass, TJ604E
- EFFORTLESSLY TILL 16 WIDE AND 8 DEEP WITH A 13.5-AMP MOTOR.
- LONG-LASTING PERFORMANCE WITH 6 RUST-PROOF, STEEL-ANGLED TINES.
- COMPACT DESIGN WITH FOLDING HANDLE FOR EASY STORAGE AND TRANSPORT.
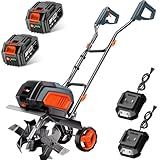
Cordless Electric Tiller Garden Cultivator TaskStar 40V Power Tiller Total 5000mAhx2 Battery Powered Rototiller 14" Width 9"Depth Tiller for Gardening,Dynamical Brushless Motor Enable Smooth Workflow
- POWERFUL 40V BRUSHLESS MOTOR: EFFORTLESSLY CULTIVATES SOIL IN 30 MINS.
- DUAL 5.0AH BATTERIES: ENJOY 80 MINS OF CONTINUOUS CORDLESS OPERATION.
- COMPACT & PORTABLE DESIGN: EASILY FOLD AND STORE FOR CONVENIENT USE.
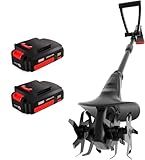
MZK 20V Cordless Tiller Cultivator with Steel Tines,8-inch Wide Battery Powered Garden Cultivator, 360RPM Electric Tiller for Lawn/Gardening/Soil Cultivation(2 * 2AH Battery&Charger Included),TC08D01
- CORDLESS FREEDOM: TACKLE ANY GARDEN TASK WITHOUT TANGLED CORDS!
- LIGHTWEIGHT & ERGONOMIC: REDUCE FATIGUE AND EASILY MANEUVER ANYWHERE!
- EFFICIENT CULTIVATION: PREPARE SOIL QUICKLY WITH 24 POWERFUL STEEL TINES!
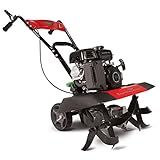
Earthquake 20015 Versa 2-in-1 Tiller Cultivator with a 99cc 4-Cycle Viper Engine, 2-in-1 Front Tine Tiller and Cultivator, Removable Side Shields and Outer Tines
- POWERFUL 99CC VIPER ENGINE FOR EFFICIENT TILLING PERFORMANCE.
- ADJUSTABLE TILLING WIDTH FROM 11 TO 21 FOR VERSATILE USE.
- EASY TRANSPORT WITH ONBOARD WHEELS AND ADJUSTABLE HANDLE HEIGHT.
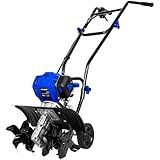
BILT HARD 46cc 4-Cycle 1.9HP Gas Powered Tiller Cultivator - 16" Heavy-Duty Steel Tines Rototiller, Adjustable Wheels & Cushioned Handle Grips for Plowing, Tilling, Weeding in Garden, Farm
-
46CC 4-STROKE ENGINE: EFFORTLESS POWER AND ECO-FRIENDLY OPERATION.
-
16 WIDTH & 8 DEPTH: EFFICIENTLY CREATES A SUPERIOR SEEDBED TEXTURE.
-
EASY ONE-HAND CONTROL: HASSLE-FREE OPERATION FOR ULTIMATE MANEUVERABILITY.
Using a tiller on hard ground can be challenging, but with the right techniques, it can be done effectively. Here's a step-by-step guide on how to use a tiller on hard ground:
- Prepare the area: Before using a tiller on hard ground, clear the area of any debris like rocks, sticks, or large clumps of soil. This will prevent damage to the tiller blades and ensure smooth operation.
- Wet the ground: If the hard ground is dry and compacted, it helps to moisten it slightly. Watering the area the day before tilling can soften the soil and make it easier to work with. Avoid overwatering, as excessively wet soil can become muddy and challenging to till.
- Adjust the tiller depth: Most tillers have adjustable depth settings. Set the depth lever according to how deep you want to penetrate the hard ground. For hard ground, it is best to start with a shallower depth and gradually increase if necessary.
- Start the tiller: Refer to the tiller's user manual to learn how to start it safely. Typically, you'll need to pull the starter cord or press a button while holding down a safety lever. Make sure to follow all safety instructions and wear appropriate protective gear such as gloves and goggles.
- Walk slowly: When tilling hard ground, it's important to walk behind the tiller at a slow and steady pace. Avoid rushing or forcing the tiller through the soil, as this can strain the machine and potentially damage it.
- Let the tiller do the work: Allow the tiller's blades to penetrate into the hard ground and break it up. Don't try to force the tiller deeper into the soil, as this can lead to clogging or damage. The tiller's rotating tines will gradually break up the compacted soil.
- Use multiple passes: If the ground is extremely hard, it may require multiple passes to thoroughly till the area. After the initial pass, examine the tilled soil to determine if it needs further tilling. Repeat the process until the desired depth and consistency are achieved.
- Maintain a steady rhythm: Keep a steady rhythm while operating the tiller to maintain consistent tilling depth and prevent uneven results. Move the tiller in straight lines, overlapping slightly with each pass to ensure even soil preparation.
- Clean and store the tiller: Once you've finished tilling the hard ground, turn off the tiller and clean it properly. Remove any accumulated debris from the blades and the body. Read the user manual for specific instructions on cleaning and maintenance. Store the tiller in a safe and dry place until its next use.
Remember, using a tiller on hard ground requires patience and careful operation. Following these steps will help you achieve effective tilling results while minimizing the risk of damaging the tiller.
What is the best soil moisture level for tilling hard ground with a tiller?
The ideal soil moisture level for tilling hard ground with a tiller is typically moist but not too wet or too dry. Aim for soil that is damp enough to easily break apart when squeezed, but not so wet that it sticks to your hands or forms clumps. This moisture range allows the tiller's tines to penetrate the soil more effectively and loosen it without causing excess compaction. If the ground is too dry, it may be challenging for the tiller to break up the soil, while excessively wet soil can become compacted or clumpy, making it difficult to till properly.
How to improve soil quality using a tiller on hard ground?
Improving soil quality on hard ground using a tiller can be a challenging task, but with the right techniques and equipment, it can be accomplished. Here are some steps to follow:
- Prepare the area: Remove any large rocks, debris, or vegetation from the area where you plan to till. This will help prevent damage to the tiller and ensure a more effective tilling process.
- Wet the ground: If the ground is extremely hard and compacted, it can be helpful to wet it a day or two before tilling. Watering the area will soften the ground and make it easier to till.
- Start with shallow passes: Begin tilling with shallow passes, gradually increasing the depth as the soil becomes looser. This prevents stalling or damaging the tiller when dealing with extremely hard ground.
- Adjust the tiller depth: Adjust the depth of the tiller based on your soil type and condition. Generally, a depth of 4-6 inches is suitable for most gardening purposes. Avoid exceeding this depth as it may lead to more significant soil disruption and damage.
- Use the right attachments: Depending on the condition of the soil and your specific needs, different tiller attachments can be used to enhance the process. For example, if the soil is heavily compacted, a heavy-duty or deep-tilling attachment may be more effective.
- Add organic matter: Incorporating organic matter such as compost, well-rotted manure, or peat moss into the soil is essential for improving its quality. Spread the organic matter evenly over the tilled area and use the tiller to incorporate it into the soil.
- Repeat the process: Soil improvement is not a one-time task. After tilling and adding organic matter, it is beneficial to repeat the process periodically to continue to break up compacted soil and integrate organic matter deeper into the ground.
- Test and adjust the soil: Once the tilling process is complete, perform a soil test to assess its nutrient levels and pH. Based on the results, you may need to add additional amendments like lime or fertilizer to optimize the soil's fertility.
Remember, tilling alone may not be enough to improve soil quality in the long run. Implementing practices like cover cropping, mulching, and avoiding excessive tillage can also help maintain and enhance soil health over time.
How to choose the right size tiller for hard ground?
Choosing the right size tiller for hard ground involves considering factors such as the size of the area to be tilled, the hardness of the ground, and the type of tiller.
- Determine the size of the area: Measure the size of the area you need to till. This will help you determine the tiller's width or tilling path you need. Smaller tillers are typically around 9-12 inches wide, medium-sized tillers range from 14-20 inches, and larger tillers can be wider than 20 inches.
- Assess the hardness of the ground: If the ground is very hard, compacted, or rocky, you may need a more powerful and heavy-duty tiller. Hard ground can require a tiller with more horsepower or a larger engine to effectively break through.
- Consider the type of tiller: There are three main types of tillers: front-tine, rear-tine, and garden cultivators. Front-tine tillers are suitable for small to medium-sized gardens and moderately hard ground. Rear-tine tillers are more powerful and suitable for larger areas and tougher soil conditions. Cultivators are lighter and designed for loosening topsoil in small garden beds.
- Compare tiller features: Look for tillers with adjustable tilling depth, as hard ground may require deeper tilling. Consider the tiller's weight and maneuverability, as heavier tillers tend to be more effective for harder ground but can be more difficult to handle.
- Seek professional advice: If you are unsure about the right tiller size for your specific needs, consult a professional at a garden center or contact a reputable manufacturer for guidance.
Ultimately, the right size tiller for hard ground will depend on the specific conditions of your garden, your budget, and your physical abilities.
How to use a tiller on hard ground?
Using a tiller on hard ground can be more challenging than on softer soil, but it is still possible to achieve good results with the right approach. Here is a step-by-step guide on using a tiller on hard ground:
- Prepare the area: Remove any large rocks, debris, or grass from the ground. Turn off any sprinkler systems and mark any underground utility lines to avoid damaging them.
- Water the ground: Moistening the hard ground a day or two before tilling will help soften it and make it easier to work with. However, ensure that it is not overly wet to avoid compacting it further.
- Adjust your tiller: Set the tilling depth to a shallower position than usual, as hard ground can be more resistant to penetration. Adjust the tine speed and any other settings according to the manufacturer's instructions for your specific tiller model.
- Safety precautions: Wear sturdy boots, safety goggles, and gloves to protect yourself from any flying debris or accidental injuries.
- Start tiller and position it: Carefully start the tiller according to the manufacturer's instructions. Position the tiller at the edge of the area you want to till, holding it firmly to maintain control.
- Engage the tines: Slowly engage the tines into the ground by lowering the handle as you move forward. The tiller's power will do most of the work, but you may need to apply some downward pressure to help it dig into the hard ground.
- Maintain a slow and steady pace: Move the tiller forward at a slow and controlled speed, allowing the tines to break up the hard ground. Avoid rushing or forcing the tiller, as this can cause damage or increase the risk of injury.
- Overlap each pass: To ensure complete and even tilling, overlap each pass by a few inches. This will help to break up any missed areas and provide a more uniform result.
- Repeat if necessary: Depending on the hardness of the ground, you may need to make multiple passes over the same area to thoroughly till it. Adjust the tilling depth gradually to go deeper with each pass, if desired.
- Finish and level the ground: Once you have tilled the entire area, turn off the tiller and inspect the soil. Remove any remaining debris and use a rake or garden fork to level the ground, breaking up any large clumps.
Remember to always follow the safety guidelines and instructions provided by the manufacturer for your specific tiller model.