
Best Soil Leveling Tools to Buy in July 2026
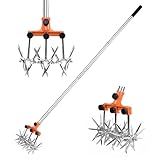
BARAYSTUS Rotary Cultivator Garden Rotary Tiller Adjustable Stainless Steel Poles Hand Tiller for Soil Mixing or Reseeding Grass Lawn Tiller Total Length 57 Inch
- EFFORTLESS GARDENING WITH ADJUSTABLE HANDLE AND LIGHTWEIGHT DESIGN.
- DURABLE RUST-RESISTANT CONSTRUCTION ENSURES LONG-LASTING PERFORMANCE.
- ERGONOMIC GRIP AND CHANGEABLE BLADES FOR VERSATILE CULTIVATING TASKS.


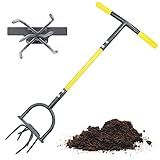
Jardineer Hand Tiller Cultivator, Twist Tiller Garden Claw Heavy Duty, Manual Soil Tiller for Flower Box and Raised Bed
- ANTI-SLIP FOOT PLATE MAXIMIZES FORCE, REDUCING STRAIN FOR SENIORS.
- RAZOR-SHARP TINES CRUSH SOIL EFFORTLESSLY FOR EASY AERATION.
- PROMOTES HEALTHY PLANTS BY AERATING SOIL FOR BETTER WATER FLOW.

BARAYSTUS Rotary Garden Tool, Adjustable Hand Tiller, Long Handle Cultivator for Aerating, Weeding, Planting and Mixing Soil or Reseeding Grass
-
UNIQUE STAR-SHAPED HEAD FOR EFFORTLESS SOIL TILLING!
-
DURABLE STAINLESS STEEL DESIGN ENSURES LONG-LASTING USE!
-
ADJUSTABLE HANDLE FOR COMFORT, REDUCING BACK STRAIN!
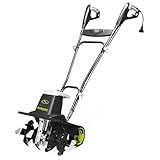
Sun Joe Corded Electric Garden Tiller & Cultivator with Steel Tines, 16 Inch, 13.5-Amp Motor - Heavy-Duty Tilling Machine for Lawn, Yard, and Gardening Care, TJ604E
-
POWERFUL 13.5-AMP MOTOR FOR EFFORTLESS SOIL CULTIVATION.
-
CULTIVATES UP TO 16 WIDE AND 8 DEEP FOR SPEEDY GARDENING.
-
DURABLE STEEL TINES ENSURE LONG-LASTING PEAK PERFORMANCE.
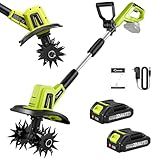
Saker 22V Cordless Electric Garden Tiller Cultivator, Lightweight Rototiller for Gardening, 9-Inch Tilling Width, 6.3-Inch Depth for Soil Preparation, Weeding, and Gardening 2 Batteries SK-TC18B
- CORDLESS DESIGN: TACKLE ANY GARDEN HASSLE-FREE, ANYWHERE, ANYTIME!
- POWERFUL TILLING: 360RPM MOTOR AND 9-INCH WIDTH FOR EFFICIENT SOIL PREP!
- ERGONOMIC & SAFE: LIGHTWEIGHT, COMFY HANDLE, PLUS DUAL SAFETY FEATURES!
YHINGG Gas Rototiller Cover Waterproof Oxford Cloth Rear Tine Tiller Cover Tiller Accessories Tear-Resistant 46Lx22Wx17H(front)
- UNIVERSAL FIT: DESIGNED TO FIT MOST ROTOTILLERS-46X22X41/17 SIZES.
- ULTIMATE WEATHER PROTECTION: WATERPROOF, UV-RESISTANT, WINDPROOF FABRIC.
- SECURE & CONVENIENT STORAGE: EASY TO CLEAN AND FOLD FOR COMPACT STORAGE.
Leveling the soil after tilling with a garden tiller is an essential step in preparing the ground for planting. It helps create an even and smooth surface that promotes proper drainage and encourages healthy plant growth. Here are some steps to follow to level the soil:
- Begin by removing any large rocks, debris, or clumps of soil from the tilled area. This will make the leveling process easier.
- Use a garden rake to spread the soil evenly across the tilled area. Start by pushing the rake forward, pulling the soil from the higher spots towards the lower areas. Continue raking until the soil is distributed evenly.
- Level the soil further by using a garden leveling rake, also known as a landscaping rake. This specific rake usually has a long handle and flat, wide, and flexible tines. With this rake, go over the tilled area in a back-and-forth motion, gently pushing down on any higher areas and pulling up any lower spots.
- Pay particular attention to any noticeable indentations or mounds in the soil and focus on leveling those areas specifically. Repeat the raking process until the entire tilled area is leveled.
- To ensure a smooth and even surface, use a hand tamp or a lawn roller to lightly compact the soil. This extra step helps create a more stable foundation for your plants and seeds.
- Finally, check the soil level by eye and by walking over it. If you notice any remaining unevenness or depressions, continue to rake and level until the entire area is appropriately leveled.
Remember, achieving a perfectly level surface is not always necessary or practical for gardening. It's more important to ensure a relatively smooth and evenly distributed soil that offers proper drainage for your plants.
What is the role of organic matter in leveling the soil?
Organic matter plays a crucial role in leveling the soil through several mechanisms:
- Soil structure improvement: Organic matter improves soil structure by binding soil particles together, creating granular aggregates that allow for better water infiltration and aeration. This helps to level uneven or compacted soil by reducing surface runoff and making the soil more porous and less prone to erosion.
- Water absorption and retention: Organic matter can absorb and retain water in the soil, facilitating even distribution of moisture. This reduces the occurrence of waterlogged or dry areas, helping to smooth out soil moisture levels and consequently level the soil surface.
- Nutrient availability: Organic matter functions as a nutrient reservoir, releasing essential elements as it decomposes. These nutrients are vital for plant growth and can promote uniform vegetation across the soil surface. An even distribution of vegetation can contribute to leveling the soil by preventing erosion and reducing surface irregularities.
- Reducing compaction: Organic matter contributes to reducing soil compaction by enhancing the soil's resilience and reducing its susceptibility to compaction. This helps to level the soil by preventing the formation of compacted layers that can lead to uneven surfaces.
- Microbial activity stimulation: Organic matter provides a food source for soil microorganisms, promoting their growth and activity. Microorganisms contribute to soil structure improvement, nutrient cycling, and other soil processes. By enhancing microbial activity, organic matter helps to level the soil by promoting the breakdown of uneven surface debris and promoting overall soil health.
Overall, organic matter plays a critical role in leveling the soil by improving soil structure, enhancing water absorption and retention, providing essential nutrients, reducing compaction, and stimulating microbial activity.
How to create a levelled area suitable for planting after tilling?
Creating a levelled area suitable for planting after tilling involves a few key steps. Here is a step-by-step guide to help you:
- Clear the area: Remove any rocks, debris, or large vegetation from the area using a rake, shovel, or wheelbarrow. This will ensure a clear space for levelling.
- Till the soil: Use a rotary tiller or a garden fork to loosen the soil in the designated area. This will help break up compacted soil and create a better planting environment.
- Remove big clumps: After tilling, inspect the soil for any large clumps. Break these clumps apart with a garden rake or use a garden roller to smooth them out.
- Level the soil: Use a long, straight board or a leveler tool to check for uneven spots. Move the soil around to fill in any depressions or low areas. Rake the soil gently to create an even and smooth surface.
- Check for drainage: Ensure the levelled area has proper drainage. If the soil tends to retain water, you may need to amend it with organic matter such as compost or sand.
- Test the pH and nutrient levels: Use a soil testing kit to check the pH and nutrient levels of the soil. Adjust these levels accordingly by adding the recommended organic or chemical amendments.
- Compact the soil: Use a lawn roller, hand tamper, or your feet to gently compact the soil. This will create a firm planting surface.
- Add organic matter: Spread a layer of compost or aged manure over the levelled area. This will enhance the soil structure, provide additional nutrients, and improve water retention.
- Allow the soil to settle: Water the area lightly to help settle the soil and eliminate any air pockets. Leave the area undisturbed for a few days to allow the soil to naturally settle.
- Final levelling: Once the soil has settled, make a final check for any uneven spots. Smooth out the surface using a rake or garden roller if necessary.
After completing these steps, your levelled area should be suitable for planting. Remember to follow proper planting techniques and provide regular care to ensure successful growth of your plants.
What is the role of earthworms in leveling soil fertility?
Earthworms play a crucial role in improving and leveling soil fertility through various processes:
- Soil structure improvement: Earthworms burrow through the soil, creating tunnels and channels. This burrowing action helps to aerate the soil, allowing better water infiltration and root penetration. The tunnels also help to break up compacted soil, improving its structure and allowing nutrients to move more freely.
- Nutrient cycling: Earthworms consume large amounts of organic matter, such as dead plant material and animal waste. As they digest this organic matter, they excrete nutrient-rich castings. These castings, also known as worm excrement, are highly concentrated in nutrients like nitrogen, phosphorus, and potassium. The castings are deposited in the soil, enriching it with these essential nutrients.
- Decomposition and humus formation: Earthworms accelerate the decomposition of organic matter by breaking it down into smaller particles. This makes it easier for microorganisms to decompose the organic matter further. These microorganisms, along with earthworms, contribute to the formation of humus-a dark, crumbly substance that holds moisture and nutrients, helping to improve soil structure and fertility.
- pH regulation: Earthworm activity can help regulate soil pH levels. The digestive processes of earthworms create a slightly alkaline environment in the gut, which can neutralize acidic soil conditions. By depositing alkaline-rich castings, earthworms can moderate soil pH levels, making it more suitable for plant growth.
Overall, earthworms are considered ecosystem engineers, as their activities help create a healthier and more fertile soil environment. They enhance soil structure, recycle nutrients, facilitate decomposition, and regulate pH levels-contributing to the leveling of soil fertility.
How to address drainage issues while leveling the soil?
Addressing drainage issues while leveling the soil is an important step to ensure that water flows properly on the property. Here are some steps to follow:
- Assess the drainage problem: Identify the areas on your property where water tends to accumulate or where it doesn't drain properly. This could be due to low areas, poor soil composition, compacted soil, or other reasons.
- Plan the grading: Determine the desired slope of the soil to facilitate proper drainage. The ideal slope is generally 1% to 2% away from buildings or structures, meaning that the ground should slope downward by approximately 1 to 2 inches over every 10 feet.
- Level the soil: Use a grading rake, shovel, or heavy equipment like a bobcat or tractor to level the soil. Remove any high spots or mounds and redistribute the soil to fill in any low areas. Make sure to compact the soil lightly to provide stability and prevent future settling.
- Create drainage channels: If necessary, dig shallow drainage channels or swales to redirect waterflow away from problem areas. These channels should slope downward, leading the water to a suitable drainage outlet such as a natural watercourse, a dry well, or a storm drainage system.
- Improve soil structure: If the soil has poor drainage due to high clay content or compaction, consider incorporating organic matter such as compost or peat moss into the soil. This helps improve the soil structure, allowing for better drainage.
- Consider drain tiles or French drains: In severe cases where the soil is consistently waterlogged, installing drain tiles or French drains may be necessary. These systems involve burying perforated pipes surrounded by gravel to collect and redirect water away from the property.
- Plant suitable vegetation: Once the soil is leveled and drainage issues are addressed, consider planting grass, groundcover, or other suitable vegetation that helps absorb excess water. The plants' root systems can aid in preventing soil erosion and improving drainage.
- Monitor and maintain: Regularly inspect the property to ensure that drainage continues to function as intended. Remove any debris or blockages in the drainage channels or outlets, and address any new areas where water tends to accumulate.
If the drainage issues are extensive or complex, it may be advisable to consult with a professional landscaper, engineer, or drainage specialist for a more detailed assessment and solutions.