
Best Garden Tillers to Buy in July 2026
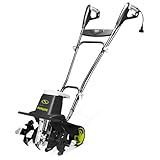
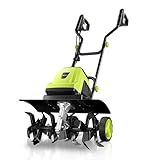
Sun Joe Electric Corded Garden Tiller & Cultivator, Steel Tines, 13.5 Amp, 16 Inch, Black - Heavy Duty Gardening Machine Equipment for Lawn, Yard, & Grass, TJ604E
-
POWERFUL 13.5-AMP MOTOR: TILLS 16 WIDE & 8 DEEP EFFICIENTLY!
-
DURABLE STEEL TINES: LONG-LASTING RUST-PROOF PERFORMANCE GUARANTEED!
-
COMPACT DESIGN: EASY STORAGE & TRANSPORT FOR SMALL GARDENS!


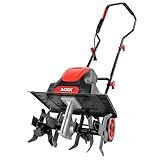
MZK 16-Inch 13.5-Amp Corded Electric Tiller/Cultivator, 8-inch tillling Depth with Adjustable Wheels, Foldable Electric Rototiller for Lawn/Yard/Garden Soil Digging,TC16A08
- POWERFUL 13.5-AMP MOTOR FOR EFFICIENT TILLING AND SOIL PREP.
- 6 RUST-RESISTANT BLADES & 24 TINES FOR VERSATILE SOIL CULTIVATION.
- LIGHTWEIGHT, ERGONOMIC DESIGN FOR EASY MANEUVERABILITY AND COMFORT.

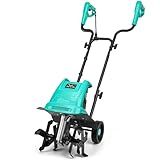
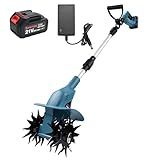
MZK 20V Cordless Tiller Cultivator with Steel Tines,8-inch Wide Battery Powered Garden Cultivator, 360RPM Electric Tiller for Lawn/Gardening/Soil Cultivation(2 * 2AH Battery&Charger Included),TC08D01
- CORDLESS CONVENIENCE: USE THE MZK TILLER ANYWHERE, ANYTIME!
- LIGHTWEIGHT DESIGN: ERGONOMIC HANDLE MINIMIZES FATIGUE WHILE WORKING.
- EFFICIENT CULTIVATION: 24 STEEL TINES FOR QUICK, EFFORTLESS SOIL PREP!
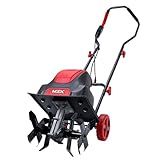
IncwBo Electric Rototiller Garden Tiller 12 Inch Tilling Width 8-Inch Electric Tiller 10.5 Amp Tiller Cultivator for Garden Yard
- POWERFUL TILLING: 10.5-AMP MOTOR WITH 12 WIDTH & 8 DEPTH.
- DURABLE BLADES: 4 RUST-RESISTANT BLADES FOR LONG-LASTING PERFORMANCE.
- USER-FRIENDLY SPURS: CONTROL SOIL PENETRATION AND REDUCE FATIGUE.
Alloyman 20V Cordless Tiller Cultivator, 360RPM Electric Garden Tiller, with 2 * 2.0Ah Batteries & Charger, 9In Tilling Width and 6.6In Depth Garden Rototiller for Lawn/Gardening/Soil Cultivation
-
CORDLESS DESIGN FOR ULTIMATE FREEDOM: TACKLE ANY AREA, ANYTIME!
-
POWERFUL 360RPM FOR FAST CULTIVATION: QUICK RESULTS WITH DURABLE TINES.
-
USER-FRIENDLY ERGONOMIC BUILD: LIGHTWEIGHT AND ADJUSTABLE FOR ALL AGES!
YERYORK Tiller Cultivator, 15-Amp 18-Inch Width 9-Inch Depth Corded Electric Tiller 24 Durable Steel Tines Gardening Tiller with Adjustable Wheels Foldable Handle for Easy Soil Cultivation
-
POWERFUL 15-AMP MOTOR FOR EFFORTLESS SOIL BREAKING.
-
18-INCH CUTTING WIDTH ENSURES FAST, EFFICIENT TILLING.
-
COMPACT, FOLDABLE DESIGN FOR EASY STORAGE ANYWHERE.
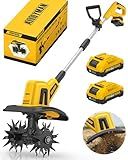
21v Cordless Tiller, 8-Inch Wide 4.0 Ah Battery Powered Garden Cultivator, Cultivator with Steel Tines and Battery Capacity Display, Rototiller for Lawn/Gardening/Soil Cultivation (Blue) by Shintyool
-
PERFECT GIFT FOR ANYONE: IDEAL FOR GARDENING LOVERS AND FAMILY!
-
CORDLESS & CONVENIENT: CULTIVATE ANYWHERE WITHOUT TANGLED CORDS!
-
SAFETY FIRST: DESIGNED FOR MAXIMUM USER SAFETY DURING OPERATION!
MZK 12-Inch 10.5 Amp Corded Electric Tiller/Cultivator for Gardening, 8-inch tillling Depth with Adjustable Wheels, Electric Garden Rototiller for Lawn/Yard/Garden Soil Digging,TC12A03
-
POWERFUL 10-AMP MOTOR: SMOOTH & FAST TILLING WITH 430 RPM EFFICIENCY.
-
EASY PLUG & PLAY OPERATION: MINIMAL MAINTENANCE, HASSLE-FREE GARDENING.
-
VERSATILE FOR ALL TASKS: PERFECT FOR BEDS, ORCHARDS, AND LAWN MAINTENANCE.
Using a garden tiller is a practical and efficient way to prepare soil for planting. To get started, choose the appropriate size and type of tiller for your specific needs and the size of your garden. Once you have the right tiller, follow these steps:
- Clear the area: Begin by removing any weeds, rocks, or other debris from the area you plan to till. This will prevent the tiller from getting clogged or damaged during operation.
- Moisten the soil: If the soil is too dry, it can be difficult for the tiller to work effectively. Lightly moisten the soil a day or two before tilling to achieve the desired level of moisture.
- Adjust the depth: Most modern tillers come with adjustable settings to control the tilling depth. Set the depth according to your desired planting depth and the type of plants you plan to grow.
- Start the tiller: Follow the manufacturer's instructions to start your tiller. Usually, this involves pulling a cord or pressing a button. Make sure the tiller is on a flat surface before starting the engine.
- Begin tilling: Begin with a straight line and slowly walk the tiller forward. Allow the tines or blades of the tiller to dig into the soil as you go. Keep a firm grip on the handles and maintain a steady pace to ensure even tilling.
- Overlap each pass: To ensure thorough soil preparation, overlap each pass by a few inches. This will create an even and consistent texture throughout the tilled area.
- Repeat if necessary: For compacted or heavily textured soil, you may need to make multiple passes over the same area to achieve the desired level of tilth. Be cautious and avoid excessive tilling, as it can lead to soil compaction over time.
- Remove any debris: As you till, keep an eye out for any rocks, roots, or other large pieces of debris that may interfere with planting. Remove them by hand to ensure a clear planting surface.
- Final touches: Once you have finished tilling, smooth out the soil surface using a rake or garden fork, removing any remaining debris or clumps. This will create an ideal environment for planting.
Remember to always prioritize safety when operating a garden tiller. Wear appropriate protective gear, such as gloves, sturdy shoes, and safety glasses. Follow the manufacturer's guidelines and consult the tiller's user manual for specific instructions and maintenance tips.
What is the role of tines in a garden tiller, and how to maintain them?
The tines in a garden tiller play a critical role in breaking up the soil, preparing it for planting, and cultivating the garden. They are the blades that rotate and dig into the ground, digging up weeds, loosening compacted soil, and helping to mix in organic matter.
To maintain the tines in a garden tiller, the following steps can be followed:
- Clean the tines after each use to remove any built-up soil or debris. Use a brush or a pressure washer to clean the tines thoroughly.
- Inspect the tines for any signs of damage such as bent or dull blades. Replace any damaged or worn-out tines to ensure effective performance.
- Lubricate the tines periodically to prevent rust and ensure smooth rotation. Apply a light coating of oil or grease to the tines and pivot joints.
- Sharpen the tines if they become dull. Use a file or a grinder to sharpen the blades, following the manufacturer's guidelines for the correct angle and sharpening technique.
- Adjust the tines' depth according to the desired soil cultivation. Many garden tillers have adjustable depth settings that allow you to control how deep the tines dig into the soil.
- Store the tiller in a dry and secure location to prevent corrosion and damage to the tines. Cover the tiller or keep it in a shed when not in use.
By following these maintenance tips, the tines in a garden tiller can remain in good condition, ensuring optimal performance and durability.
How to adjust the tilling depth on a garden tiller?
Adjusting the tilling depth on a garden tiller can vary depending on the make and model of the machine. However, here are some general steps to adjust the tilling depth:
- Start by consulting the owner's manual for your specific tiller to find the location of the tilling depth adjustment mechanism. This could be a lever, a knob, or some other type of control.
- Place the tiller on a flat surface and ensure it is turned off and not running.
- Locate the adjustment control. It is usually located near the rear or front of the tiller and may have markings indicating the depth settings.
- Depending on the type of adjustment control, you may need to loosen a lock nut or release a lever before making any changes.
- Once the adjustment control is loosened or released, you can manually adjust the tilling depth. This is typically done by raising or lowering the tines, which are the metal blades located at the bottom of the tiller.
- Gradually adjust the tilling depth according to your needs. If you want to till deeper, lower the tines further into the ground. If you want a shallower tilling depth, raise the tines higher.
- After making the necessary adjustments, secure the adjustment control by tightening the lock nut or engaging the lever.
- Double-check the tilling depth by starting the tiller briefly and observing the tines' position in the soil. Make further adjustments if necessary.
- Remember to always consult the owner's manual for your specific garden tiller model for detailed instructions and safety precautions.
Note: The specific steps and mechanism for adjusting the tilling depth may vary for different tiller models. It is essential to refer to the owner's manual or contact the manufacturer if you have any doubts or questions about adjusting the tilling depth on your specific tiller.
What is the ideal width of the tilled area for planting?
The ideal width of the tilled area for planting depends on the specific crop being planted and the planting method used. However, in general, a typical recommended width for tilling area for planting is around 30 inches to 36 inches (76 cm to 91 cm). This width allows for proper spacing between plants, good air circulation, and ease of access for maintenance and harvesting. Nonetheless, it is important to consider the specific requirements of the crop being planted and any recommended planting guidelines provided by experts or agricultural institutions.