Best Bulb Planters to Buy in July 2026
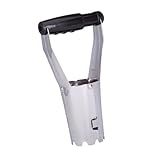
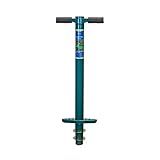
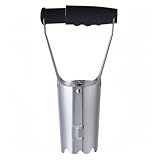
Edward Tools Bulb Planter - Bend Free Tool for Planting Bulbs, Depth Marker for More consistent Planting Tulips, Daffodils, Dahlias (Assorted)
- QUICK PLANTING WITH AUTOMATIC SOIL RELEASE MECHANISM.
- DURABLE REINFORCED STEEL FOR EASY DIGGING IN TOUGH SOILS.
- DEPTH MARKER ENSURES CONSISTENT PLANTING FOR PERFECT BULBS.


Garden Weasel Bulb Planter - Long Handle | Annuals, Ground Cover, Vegetables, Spring and Fall Bulbs | Sod Cutter, Remover, and Plugger, Grass Planter, Bulb Planting Tool | 91350
-
EFFORTLESS PLANTING: STEP ON THE PLATE-QUICKLY DIG WITHOUT BENDING!
-
TOP-SELLING QUALITY: TRUSTED DESIGN ENSURES UNMATCHED PLANTING PERFORMANCE.
-
LIFETIME GUARANTEE: BUY WITH CONFIDENCE, BACKED BY OUR HASSLE-FREE PROMISE.
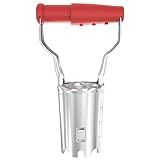
Colwelt Bulb Planter Tool Long Handle, Serrated Base Gardening Bulb Transplanter with Soft Grip, Heavy Duty Long Handled Bulb Planter Sod Plugger for Digging Holes to Plant Tulips, Iris, Daffodils
-
EFFORTLESS PLANTING: STEP, TWIST, AND PULL FOR QUICK, EASY PLANTING.
-
ERGONOMIC DESIGN: LONG HANDLE ALLOWS PLANTING WITHOUT BENDING OVER.
-
DURABLE & RELIABLE: HEAVY-DUTY, RUST-RESISTANT STEEL FOR LASTING USE.
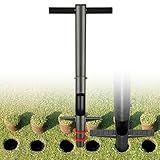
ProPlugger 5-in-1 Planting Tool - Sod Plugger, Bulb and Flower Planter
-
EFFORTLESSLY PLANT WITH NO BENDING, PERFECT FOR SENIORS AND ARTHRITIS.
-
DIG CONSISTENT 2, 4, AND 6 HOLES WITH INCLUDED DEPTH RINGS.
-
VERSATILE TOOL FOR BULBS, PLUGS, WEEDING, AND FERTILIZING TASKS!
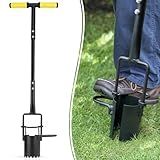
Bulb Planter Tool, 33.5 inch Long Handle Garden Sod Plugger to Dig Hole, Heavy Duty Metal Garden Tools for Soil Test Planting or Weeding Spring Flowers Bulbs,Bedding Plants,Tulips, Lilies, Potato
-
ERGONOMIC DESIGN REDUCES FATIGUE FOR HEALTHIER, LONGER PLANTING SESSIONS.
-
FOOT PEDAL FEATURE BOOSTS PLANTING SPEED AND SAVES TIME & ENERGY.
-
DURABLE, RUST-RESISTANT TOOL ENSURES LONG-LASTING PERFORMANCE IN TOUGH SOILS.
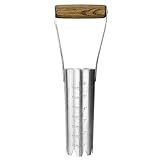
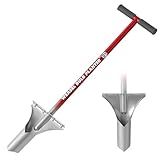
Haliaeetus Bulb Planter Tool, 6 inches Depth Mark Hand Bulb Planter, Non-Bending Stainless Steel Bulb Planter Digger, Garden Bulb Transplanter with Comfortable Wood Handle for Planting Tulip, Daffodil
-
PLANT 150 BULBS/HOUR: CUT PLANTING TIME DRASTICALLY!
-
BUILT-IN DEPTH MARKINGS: ENSURE CONSISTENT PLANTING DEPTH!
-
DURABLE STAINLESS STEEL: RESISTS BENDING FOR LASTING USE!
FLORA GUARD Bulb Planter with Depth Markers - Automatic Soil Releasing Seed Bulb Transplanter for Planting/Digging Tulips, Daffodils, Dahlias and More
- ERGONOMIC, DURABLE DESIGN ENSURES COMFORT AND LONG-LASTING USE.
- EFFORTLESSLY EJECT SOIL WITH INNOVATIVE AUTOMATIC RELEASE MECHANISM.
- VERSATILE TOOL FOR BULBS, SEEDLINGS, AND SMALL PLANTS-PLANT WITH EASE!
Toresano Bulb Planter, Bulbs Transplanter Designed for Automatic Soil Release with Depth Marker for Dgging Holes and Planting Tool for Tulips, Daffodils, Dahlias
-
DURABLE STEEL DESIGN: REINFORCED CONSTRUCTION PREVENTS BENDING, EVEN IN TOUGH SOIL.
-
PRECISION PLANTING: DEPTH SCALE ENSURES ACCURATE AND UNIFORM PLANTING EVERY TIME.
-
EFFICIENT & PORTABLE: FAST SOIL RELEASE AND LIGHTWEIGHT FOR HASSLE-FREE GARDENING.
The bulb planter is a gardening tool designed specifically for planting flower bulbs. It consists of a long metal cylinder with a round or pointed tip and a handle on top. The cylindrical shape of the bulb planter allows for easy insertion into the soil, making bulb planting quicker and more efficient.
To use a bulb planter in different types of soil, follow these steps:
- Prepare the soil: Prior to using the bulb planter, ensure that the soil is well-tilled, free from weeds, and amended with organic matter if necessary. This will create a loose and fertile environment for bulb growth.
- Choose the right type of bulb planter: Bulb planters come in various sizes, so select one based on the bulb size and soil type. For harder soils, a bulb planter with a pointed tip is preferable, while a round-tip planter is suitable for softer soils.
- Mark the spots: Decide where you want to plant your bulbs, and mark the spots with small stakes or markers. This will help you accurately position the bulb planter.
- Insert the bulb planter: Position the bulb planter directly above the marked spot. Firmly grip the handle and press the pointed tip or rounded edge of the planter into the soil. Apply downward pressure while twisting the planter slightly into the ground, allowing it to penetrate the soil.
- Extract a plug of soil: Once the bulb planter is securely inserted, push down on the handle, using your body weight if needed, to remove a plug of soil from the ground. The depth of the plug should be determined by the bulb's planting instructions.
- Place the bulb: Drop a bulb into the hole created by the bulb planter, ensuring it is positioned with the roots facing downwards. Some bulb planters also have a small release mechanism that allows you to release the plug of soil back into the hole, covering the bulb.
- Repeat the process: Move on to the next marked spot, repeating steps 4 to 6 until all bulbs are planted.
- Cover and water: After all the bulbs are planted, gently replace the soil plugs over the holes. Press them down lightly to ensure good soil-to-bulb contact. Finally, water the newly planted bulbs thoroughly to settle the soil and provide essential moisture.
By following these steps, you can effectively use a bulb planter in various types of soil to ensure proper planting depth and position for your flower bulbs.
What is the ideal soil moisture level for using a bulb planter?
The ideal soil moisture level for using a bulb planter is moist but not waterlogged. The soil should be slightly damp to allow for easy digging and planting, but not excessively saturated. This ensures that the bulb planter can easily penetrate the soil and create the desired hole for planting the bulbs. Additionally, moist soil provides a favorable environment for bulb growth and establishment.
How to handle different types of bulbs when using a bulb planter?
When using a bulb planter, it's important to handle different types of bulbs carefully to ensure proper planting and growth. Here are some general guidelines for handling different types of bulbs:
- Daffodils and Tulips:
- Daffodils and tulips are larger bulbs that should be planted about 6-8 inches deep.
- Hold the bulb by its base or the lower, pointed end.
- Position the bulb with the pointed end facing upwards before placing it into the ground using the bulb planter.
- Small Bulbs like Crocus or Snowdrops:
- Small bulbs like crocus or snowdrops can be planted shallower, usually around 2-3 inches deep.
- Hold these bulbs by their sides and be gentle to avoid damaging them.
- Place the bulb into the soil with the pointed end facing up.
- Alliums and other Large Bulbs:
- Larger bulbs like alliums can be planted at a depth of 4-6 inches.
- Handle them by their base or bottom part.
- Place the bulb in the ground with the tip facing up.
- Bulb Clusters:
- Some bulbs grow in clusters or groups. Examples include grape hyacinths or muscari.
- Handle these clusters carefully to prevent separating the bulbs.
- Place the entire cluster into the planting hole and ensure the bulbs are right side up.
- Bulbs with Shoots or Greens:
- Some bulbs may already have shoots or green growth emerging when purchased.
- Be cautious when handling these as the shoots are delicate.
- Gently place the bulb into the ground with the shoots above the surface, taking care not to break or damage them.
Overall, the key is to handle bulbs with care and ensure they are planted at the correct depth and orientation. Following these guidelines will help promote healthy growth and successful blooming.
How to ensure consistent depth for bulb plantings with a bulb planter?
To ensure consistent depth for bulb plantings with a bulb planter, you can follow these steps:
- Choose the right size of bulb planter: Select a bulb planter that matches the size of the bulbs you are planting. Some bulb planters come with adjustable depth settings, so consider one of these if you have various bulb sizes.
- Prepare the soil: Ensure the soil is loose and well-drained. Remove any debris or rocks that might interfere with the bulb planter's digging process.
- Mark the planting spots: Use a measuring tape or a stake to mark the desired spacing and location for each bulb. This will help you keep track and ensure consistent depth.
- Insert the bulb planter: Place the bulb planter on the marked spot and gently push it into the soil. Twist the planter back and forth slightly to create a hole.
- Remove the soil plug: Lift the bulb planter slightly, and the soil plug should come out with it. Set the soil plug aside for later use.
- Place the bulb: Drop the bulb into the hole, with the pointed end facing up. Ensure it rests at the bottom of the hole.
- Reinsert the soil plug: Carefully place the soil plug back into the hole, covering the bulb completely. Press it down lightly to ensure good soil contact.
- Repeat: Repeat the process for each bulb, making sure to maintain consistent spacing and depth.
- Water and Mulch: After planting all the bulbs, water the area thoroughly. Then, apply a layer of mulch to retain moisture and regulate soil temperature.
By following these steps, you can use a bulb planter effectively to achieve consistent depth for your bulb plantings, promoting even growth and overall aesthetics in your garden.
What is the advantage of using a bulb planter over hand-digging holes?
The advantage of using a bulb planter over hand-digging holes include:
- Efficiency: Bulb planters are designed to efficiently and quickly dig holes of uniform size and depth. This saves time and effort compared to manually digging individual holes.
- Consistency: A bulb planter ensures that each hole is of the same size and depth, which is important for uniform planting. This consistency promotes even growth and a neater appearance in the garden.
- Proper Depth: Bulb planters often have depth indicators, allowing you to dig the holes at the correct depth, which is crucial for the successful growth of bulbs. Hand-digging holes may result in inconsistent depths, potentially leading to uneven growth or poor flowering.
- Reduced Strain: Using a bulb planter reduces strain on your back and knees, as you don't need to repeatedly bend over or kneel to dig individual holes. This can be particularly beneficial for those with physical limitations or back problems.
- Neatness: Bulb planters create clean, cylindrical holes, preventing the soil from crumbling or collapsing around the bulbs. This can help ensure better soil-to-bulb contact, nutrient uptake, and root establishment.
Overall, bulb planters offer convenience, efficiency, and consistency, making them a preferred tool for planting bulbs, especially when dealing with large quantities.
What is the proper depth for planting bulbs using a bulb planter?
The proper depth for planting bulbs using a bulb planter typically depends on the specific type of bulb. As a general guideline, most bulbs should be planted at a depth that is three times their diameter. However, certain bulbs may have specific depth requirements, so it is important to follow the instructions provided by the bulb's packaging or supplier.