
Best Garden Tillers to Buy in July 2026
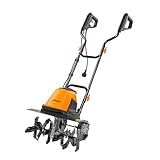
LawnMaster TE1016M Electric Tiller 12-Amp, 16-Inch
- MAX 16-INCH CUT & 9-INCH DEPTH FOR EFFICIENT TILLING.
- DURABLE RUST-RESISTANT STEEL BLADES TACKLE TOUGH TERRAIN.
- TWO-STAGE GEARBOX WITH ANTI-CLOCK CLUTCH FOR BETTER CONTROL.


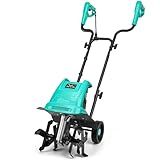
YERYORK Tiller Cultivator, 15-Amp 18-Inch Width 9-Inch Depth Corded Electric Tiller 24 Durable Steel Tines Gardening Tiller with Adjustable Wheels Foldable Handle for Easy Soil Cultivation
-
POWER THROUGH TOUGH SOIL WITH A HIGH-PERFORMANCE 15-AMP MOTOR.
-
18-INCH CUTTING WIDTH FOR FAST, EFFICIENT TILLING OF LARGE AREAS.
-
CUSTOM DEPTH CONTROL FOR TAILORED TILLING AND EASY STORAGE SOLUTIONS.
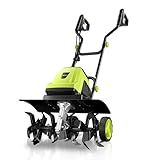
Sun Joe Electric Garden Tiller Cultivator, Steel Tines, 12 Amp, 16 Inch, Black - Heavy-Duty Gardening Machine & Equipment for Gardens, Lawns & Yards, TJ603E
-
EFFICIENT SOIL PREP WITH ADJUSTABLE DEPTH FOR OPTIMAL CONTROL.
-
LOW-MAINTENANCE ELECTRIC POWER FOR ECO-FRIENDLY OPERATION.
-
DURABLE STEEL TINES FOR LONG-LASTING TILLING PERFORMANCE.
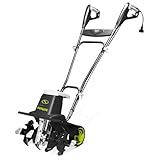
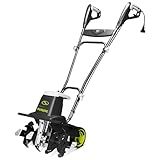
Sun Joe Electric Corded Garden Tiller & Cultivator, Steel Tines, 13.5 Amp, 16 Inch, Black - Heavy Duty Gardening Machine Equipment for Lawn, Yard, & Grass, TJ604E
- TILLS 16 WIDE & 8 DEEP FOR EFFICIENT LAWN AND GARDEN PREPARATION.
- RUST-PROOF STEEL TINES ENSURE DURABILITY AND LONG-LASTING PERFORMANCE.
- COMPACT DESIGN WITH FOLDING HANDLE FOR EASY STORAGE AND TRANSPORT.
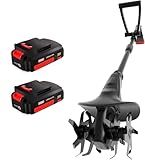
Cordless Electric Tiller Garden Cultivator TaskStar 40V Power Tiller Total 5000mAhx2 Battery Powered Rototiller 14" Width 9"Depth Tiller for Gardening,Dynamical Brushless Motor Enable Smooth Workflow
- POWERFUL 40V MOTOR: EFFORTLESSLY BREAK DENSE SOIL IN JUST 30 MINS.
- CORDLESS FREEDOM: DUAL BATTERIES OFFER HASSLE-FREE OPERATION ANYWHERE.
- VERSATILE & COMPACT: PERFECT FOR VARIOUS TERRAINS AND SMALL GARDENS.
MZK 20V Cordless Tiller Cultivator with Steel Tines,8-inch Wide Battery Powered Garden Cultivator, 360RPM Electric Tiller for Lawn/Gardening/Soil Cultivation(2 * 2AH Battery&Charger Included),TC08D01
- CORDLESS FREEDOM: TACKLE YOUR GARDEN ANYWHERE WITH RECHARGEABLE CONVENIENCE.
- LIGHTWEIGHT COMFORT: ERGONOMIC HANDLE REDUCES FATIGUE FOR EFFORTLESS USE.
- EFFICIENT CULTIVATION: 24 STEEL TINES MAKE SOIL PREPARATION QUICK AND EASY!
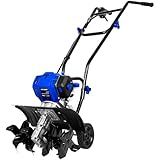
Earthquake 20015 Versa 2-in-1 Tiller Cultivator with a 99cc 4-Cycle Viper Engine, 2-in-1 Front Tine Tiller and Cultivator, Removable Side Shields and Outer Tines
- POWERFUL 99CC VIPER ENGINE FOR EFFICIENT TILLING PERFORMANCE.
- ADJUSTABLE TILLING WIDTH (11-21 INCHES) FOR VERSATILE GARDENING.
- EASY TRANSPORT WITH ONBOARD WHEELS AND TOOL-LESS ADJUSTMENTS.
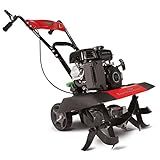
BILT HARD 46cc 4-Cycle 1.9HP Gas Powered Tiller Cultivator - 16" Heavy-Duty Steel Tines Rototiller, Adjustable Wheels & Cushioned Handle Grips for Plowing, Tilling, Weeding in Garden, Farm
- POWERFUL 46CC ENGINE: 1,400W PEAK POWER FOR EFFICIENT SOIL BREAKING.
- EFFORTLESS CONTROL: ONE-HAND OPERATION WITH ERGONOMIC DUAL-GRIP HANDLE.
- EASY STORAGE: FOLDABLE HANDLES AND QUICK START FOR SEAMLESS USE.
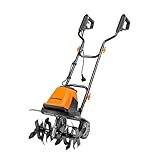
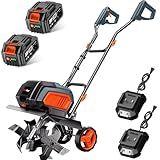
LawnMaster TE1318W1 Corded Electric Tiller 13.5-Amp 18-Inch Orange
- POWERFUL CULTIVATION: 6 RUST-RESISTANT BLADES AT 380 RPM FOR TOUGH TERRAIN.
- VERSATILE TILLING: 18” WIDTH & 9” DEPTH FOR MEDIUM TO LARGE GARDENS.
- ECO-FRIENDLY & COMPACT: GAS-FREE OPERATION WITH FOLDABLE DESIGN.
IncwBo Electric Rototiller Garden Tiller 12 Inch Tilling Width 8-Inch Electric Tiller 10.5 Amp Tiller Cultivator for Garden Yard
-
POWERFUL 10.5-AMP MOTOR FOR DEEP TILLING UP TO 8 INCHES.
-
DURABLE RUST-RESISTANT BLADES TILLING 12 INCHES WIDE EFFORTLESSLY.
-
UNIQUE SPUR FEATURE FOR BETTER CONTROL AND REDUCED FATIGUE.
Using a tiller in your garden can save you time and effort when it comes to preparing the soil for planting. Here are some general guidelines on how to use a tiller effectively:
- Choose the right type of tiller: There are various types of tillers available, including front-tine tillers, rear-tine tillers, and mini-tillers. Consider the size of your garden and the type of soil you have to determine the most suitable tiller for your needs.
- Clear the area: Remove any large rocks, debris, or plants from the garden area before starting. This will prevent damage to the tiller and ensure a smooth tilling process.
- Adjust the depth: Many tillers allow you to adjust the tilling depth. Set the depth based on the type of plants you'll be growing and the condition of the soil. Generally, a depth of 6 to 8 inches is suitable for most vegetable gardens.
- Start the tiller: Familiarize yourself with the controls and safety features of the tiller. Follow the manufacturer's instructions on starting the tiller engine, whether it is a pull-start or electric start. Wear appropriate protective gear like gloves and safety glasses.
- Begin tilling: Stand behind the tiller with a firm grip on the handles. Slowly lower the tines into the soil while keeping a steady pace. Allow the tiller to do the work and avoid putting excessive pressure on it. Let the tiller move forward on its own, while you guide it.
- Work in rows: Divide your garden into rows and work on one row at a time, moving the tiller from one side to the other. Overlapping each pass by about 6 inches will ensure even soil tilling throughout the garden.
- Keep an eye out for obstacles: Watch out for any roots, underground cables, or irrigation lines that could get tangled or damaged. Work around them carefully or manually remove them if necessary.
- Address any compacted areas: If you come across compacted soil, work the tiller over those areas multiple times to break up the soil and improve its texture.
- Avoid over-tilling: Tilling excessively can disrupt the soil structure and harm beneficial organisms. Once the soil is adequately loosened, avoid over-tilling by doing occasional deep tilling and relying more on shallow tilling.
- Clean up and maintenance: Once you're done tilling, turn off the tiller engine and clean any clumps of soil or plants stuck in the tines. Store the tiller in a clean and dry location, and maintain it according to the manufacturer's instructions for optimal performance.
Remember to always prioritize safety when using a tiller and follow the recommended guidelines from the manufacturer. Happy tilling!
What is the recommended method for tilling between rows of existing plants?
When tilling between rows of existing plants, it is important to take caution not to damage the root systems of the plants. Here is a recommended method for tilling between rows:
- Determine the spacing between the rows: Measure the exact distance between the rows that you want to till. This will help you operate the tiller more precisely.
- Adjust the tiller's tine width: Most tillers have an adjustable tine width. Set the tines to a narrower width than the spacing between your plant rows. This will enable you to till the area between the rows without disturbing the plants.
- Start at one end: Begin tilling at one end of the row and slowly move forward. Hold the tiller's handles firmly and let the machine do the work. Take small, steady steps to maintain control and minimize the risk of accidentally hitting the plants.
- Avoid going too deep: Adjust the depth of the tines to a shallow setting to only disturb the top layer of soil. This will prevent damage to the plant roots that may extend deeper.
- Work in a forward-backward motion: Move the tiller forward as you till between the rows, and then back up in the same path, slightly overlapping with the previous pass. This way, you'll ensure the entire area between the rows is tilled uniformly.
- Take extra care near plants: When you approach the plants, slow down and tilt the tiller slightly to the side to avoid hitting the stems or leaves. Be mindful of the delicate parts of the plants and adjust the tiller's angle accordingly.
- Remove weeds and debris: Once you have tilled between the rows, use a rake or your hands to remove any weeds or debris that were brought to the surface. This will allow the plants to have better access to water and nutrients.
By following these steps, you can safely and effectively till between rows of plants while minimizing potential harm to the existing vegetation.
How to choose the right tiller for your garden?
Choosing the right tiller for your garden depends on several factors. Here are some considerations to keep in mind when selecting a tiller:
- Size of your garden: Consider the size of your garden or the area you will be tilling. If you have a small garden, a compact or mini tiller may be sufficient. For larger areas, you may need a larger rear-tine or front-tine tiller.
- Soil type: Different soil types require different types of tillers. If you have loose, sandy soil, a lighter and smaller tiller may be suitable. However, if you have heavy, compacted clay soil, a more powerful tiller with larger tines may be necessary.
- Tilling depth and width: Determine the depth and width of tilling you require. Rear-tine tillers usually offer deeper and wider tilling capabilities compared to front-tine or mini tillers.
- Power source: Decide whether you want a gas-powered, electric, or manual tiller. Gas tillers offer more power and mobility, but they require maintenance and produce noise and emissions. Electric tillers are quieter and low-maintenance, but they may have limited power and require access to an outlet. Manual tillers are environmentally friendly and quiet, but they require more physical effort.
- Maneuverability: Consider the maneuverability of the tiller, especially if you have tight spaces or obstacles in your garden. Rear-tine tillers are often bulkier and less maneuverable compared to front-tine or mini tillers.
- Budget: Set a budget for your tiller purchase. Tiller prices can vary significantly depending on the brand, size, and features. Determine your budget range and look for tillers within that range.
- Reviews and recommendations: Read reviews and seek recommendations from people who have used different tillers. Look for reliable brands with positive customer feedback to ensure quality and durability.
It's essential to assess your specific needs, the condition of your garden, and your personal preferences before making a decision. Researching and comparing different models will help you find the right tiller that suits your gardening requirements.
How to safely operate a tiller?
- Read the manual: Familiarize yourself with the specific model of tiller you will be operating by reading the manufacturer's manual. Pay attention to any safety warnings, operating instructions, and maintenance guidelines.
- Wear appropriate protective gear: Always wear closed-toe shoes, long pants, and safety goggles to protect your feet, legs, and eyes from any flying debris or potential accidents.
- Clear the area: Ensure that the work area is clear of any obstacles, large rocks, or debris that could get caught in the tiller or cause injury.
- Fueling the tiller: Before starting the tiller, ensure that it is fueled with the recommended type and quantity of fuel specified in the manual. Refuel the tiller in a cool, well-ventilated area and avoid smoking or any open flames nearby.
- Start the tiller on level ground: Place the tiller on a flat and even surface before starting the engine. Ensure that the tiller is secure and won't tip over.
- Starting the engine: Follow the specific starting instructions provided in the manual to start the tiller's engine. Most tillers have a recoil starter, so make sure you have a firm grip on the handle to avoid any injuries caused by kickback.
- Hold the tiller correctly: Use both hands to hold and control the tiller handles at all times. Maintain proper balance and a firm grip while operating.
- Adjust tines and depth: Set the tines at the appropriate depth for your specific task. This can be adjusted using the depth control lever or knob. Start with a shallow depth and gradually increase it as needed.
- Avoid rocky or hard surfaces: Do not till over rocks, tree roots, or other hard surface materials. This can damage the tiller tines or cause the machine to kickback. It is recommended to clear the area of such objects beforehand.
- Watch out for obstacles: Stay alert and look out for any obstacles, such as sprinkler heads, tree stumps, or hidden wires. Clear the area of these objects before starting the tilling process. Stop immediately if the tiller encounters an unexpected obstacle and remove it before continuing.
- Avoid excessive force: Do not force the tiller to move faster or dig deeper than its capabilities. Allow it to work at a comfortable pace and let the tines do the work.
- Shutting down the tiller: Once you have finished tilling, turn off the engine and allow it to cool down before refueling or performing any maintenance. Clean any debris from the tines and the tiller before storing it.
Always remember to follow the manufacturer's specific instructions for your tiller model and consult the manual or seek professional assistance if you have any doubts or issues during the operation.
What is the ideal time to use a tiller in the garden?
The ideal time to use a tiller in the garden is typically in early spring or late fall. These times are optimal because the soil is manageable and not too wet or too dry. It is important to avoid tilling when the soil is too wet as it can lead to compaction, and tilling when the soil is too dry can be challenging and result in clumpy soil. Additionally, tilling in the spring allows for the incorporation of compost or organic matter before planting, while tilling in the fall can help break up compacted soil and prepare it for winter.
What is the best way to deal with rocks or obstructions when tilling?
When dealing with rocks or obstructions while tilling, there are a few strategies you can follow:
- Clear the area: Before tilling, it's beneficial to manually remove any large rocks or debris from the area. This will reduce the chances of damaging your tiller and help ensure a smoother tilling process.
- Adjust the tilling depth: Most tillers provide options to adjust the tilling depth. If you encounter rocks or obstructions, reduce the tilling depth to avoid hitting them directly. This will help prevent damage to the tiller and maintain a steady operation.
- Till around rocks: If you encounter a large rock or obstruction that cannot be easily removed, it is best to till around it. Use the tiller to work the soil around the obstacle, creating a clear and even path for the rest of the tilling process.
- Use a rock picker: In cases where there are numerous smaller rocks in the soil, it might be beneficial to invest in a rock picker. This manual or mechanical tool allows you to gather and remove rocks from your tilling area effectively, minimizing the risk of damaging your tiller.
- Consider hand digging: If you come across a particularly large or immovable rock, it might be necessary to hand dig around it. By manually removing the soil surrounding the rock, you can avoid potential damage to your tiller and ensure smooth tilling in the surrounding areas.
Remember, safety is essential during tilling. Wear appropriate protective gear, inspect your tools regularly, and follow the manufacturer's guidelines for your specific tiller model.
What is the best strategy for tilling a small garden?
The best strategy for tilling a small garden can vary depending on various factors such as the soil type, the purpose of the garden, and personal preferences. However, here is a general strategy that can work well:
- Prepare the area: Clear the garden of any existing plants, debris, or rocks. Remove any weeds or unwanted vegetation to create a clean starting point.
- Test the soil: It's beneficial to assess the soil quality before tilling. Conduct a soil test to determine its pH level and nutrient content. This information will help you decide if any amendments are needed.
- Add organic matter: If the soil lacks organic matter or nutrients, consider incorporating compost, well-rotted manure, or other organic materials. Spreading a layer (about 2-4 inches) of organic matter over the top and mixing it into the soil during tilling will help enhance fertility, water retention, and overall soil quality.
- Choose the right tool: Select a suitable tillage tool for the job, such as a garden tiller, spade, or hand cultivator. For a small garden, a handheld tool or small electric tiller might be more practical compared to larger, gas-powered tillers.
- Begin tilling: Start tilling from one side of the garden, working your way towards the other side in a systematic manner. Ideally, make parallel passes, overlapping each pass slightly to ensure the entire area is thoroughly tilled. Follow the instructions provided by the tool's manufacturer for the best technique and depth.
- Avoid excessive tilling: Over-tilling can disrupt the soil structure and negatively affect beneficial microorganisms and earthworms. Aim for a depth of about 8-12 inches, or follow the specific recommendations for your plants.
- Smooth the surface: After tilling, rake the soil to level the surface and remove any big clumps or stones. Smoothing the soil will make it easier for planting, watering, and future maintenance.
- Consider mulching: Finally, consider adding a layer of organic mulch around your plants. Mulching helps to suppress weeds, conserve moisture, and improve soil temperature and health.
Remember, it's always helpful to observe the specific needs of the plants you intend to grow and adapt your tilling strategy accordingly.