
Best Garden Tilling Tools to Buy in July 2026
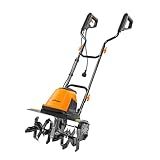
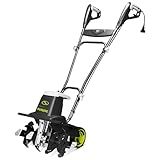
LawnMaster 13.5 Amp 18” Electric Tiller – TE1318M
-
POWERFUL EFFICIENCY: 6 RUST-RESISTANT BLADES AT 380 RPM TACKLE TOUGH TERRAIN.
-
VERSATILE TILLING: SWITCH BETWEEN 6 OR 4 TINES FOR ANY GARDEN SIZE.
-
ECO-FRIENDLY OPERATION: ENJOY GAS-FREE GARDENING WITH ZERO EMISSIONS.


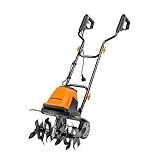
LawnMaster TE1216M Electric Tiller 12-Amp, 16-Inch
- MAX 16 CUTTING WIDTH WITH 9 DEPTH FOR EFFICIENT TILLING.
- 6 RUST-RESISTANT STEEL BLADES TACKLE THE TOUGHEST TERRAIN.
- ADJUSTABLE TRANSIT WHEEL FOR VERSATILE 3-POSITION SETUP.
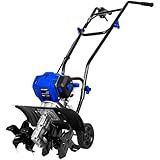
BILT HARD 46cc 4-Cycle 1.9HP Gas Powered Tiller Cultivator - 16" Heavy-Duty Steel Tines Rototiller, Adjustable Wheels & Cushioned Handle Grips for Plowing, Tilling, Weeding in Garden, Farm
-
POWERFUL 46CC ENGINE: 1,400W PEAK POWER FOR UNMATCHED SOIL PERFORMANCE.
-
EFFICIENT 16 WIDTH CUTTING: 6 BLADES AND 4 TINES FOR SUPERIOR SEEDBED PREP.
-
ONE-HAND CONTROL: ERGONOMIC DESIGN FOR EASY, HASSLE-FREE OPERATION.
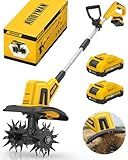
Alloyman 20V Cordless Tiller Cultivator, 360RPM Electric Garden Tiller, with 2 * 2.0Ah Batteries & Charger, 9In Tilling Width and 6.6In Depth Garden Rototiller for Lawn/Gardening/Soil Cultivation
- CORDLESS FLEXIBILITY: WORK ANYWHERE WITHOUT TANGLED CORDS OR OUTLETS.
- EFFICIENT CULTIVATION: TILLS 9'' WIDE, 6.6'' DEEP AT 360RPM-FAST RESULTS!
- SAFETY FIRST: DUAL SAFETY SWITCH FOR SECURE, WORRY-FREE OPERATION.
Sun Joe Corded Electric Garden Tiller & Cultivator with Steel Tines, 16 Inch, 12-Amp Motor - Heavy-Duty Tilling Machine for Lawn, Yard, and Gardening Care, TJ603E
- EFFICIENT SOIL PREP WITH 3-POSITION WHEEL ADJUSTMENT FOR CONTROL.
- ECO-FRIENDLY DESIGN: ELECTRIC POWER ELIMINATES GAS AND OIL HASSLES.
- DURABLE RUST-PROOF TINES EASILY TILL 16 WIDE AND 8 DEEP.
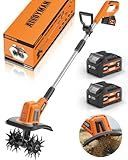
Alloyman 20V Cordless Tiller Cultivator, 360RPM Electric Garden Tiller, with 2 * 4.0Ah Batteries & Charger, 9In Tilling Width and 6.6In Depth Garden Rototiller for Lawn/Gardening/Soil Cultivation
-
CORDLESS FREEDOM: TACKLE HARD-TO-REACH SPOTS WITH EASE ANYTIME, ANYWHERE!
-
POWERFUL PERFORMANCE: CULTIVATE SOIL UP TO 9” WIDE & 6.6” DEEP IN SECONDS.
-
ERGONOMIC COMFORT: LIGHTWEIGHT DESIGN REDUCES FATIGUE FOR ALL GARDENING ENTHUSIASTS.
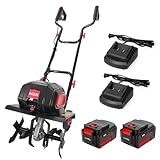
MZK 40V 12-inch Cordless Garden Tiller, 12In Width and 8.6In Depth Garden Rototiller,Battery Powered Garden Cultivator for Lawn/Gardening/Soil Cultivation(2 * 4.0Ah Battery&Charger Included),TC12D02
-
POWERFUL 16 TINES FOR EFFICIENT 14 TILLING DEPTH UP TO 8.6
-
DUAL 4.0AH BATTERIES FOR 35 MINUTES OF RELIABLE TILLING POWER
-
CORDLESS DESIGN FOR UNMATCHED MOBILITY AND EASE OF USE
Tilling a garden in the fall is an important step towards preparing the soil for spring planting. It helps improve the soil's texture, aerates it, and breaks up any compacted areas. The following are the steps involved in tilling a garden in the fall for spring planting:
- Clear the garden area: Remove any existing plants, weeds, and debris from the garden bed. This includes pulling out any remaining crops, cutting down plants, and removing weeds to prevent them from reseeding.
- Test the soil: Take a soil sample and have it tested to determine its pH level and nutrient content. This will help you identify any specific nutrients that may be lacking and need to be added in the fall.
- Add organic matter: Spread a layer of organic matter such as compost, aged manure, or shredded leaves over the garden bed. This will improve the soil structure, add nutrients, and increase the soil's moisture-holding capacity.
- Till the soil: Use a garden tiller or a garden fork to loosen the soil. Begin by working the tool into the soil around 8-12 inches deep. Start from one end and work your way towards the other, covering the entire garden bed. Break up any large clumps of soil and remove any rocks or roots that may hinder plant growth.
- Control weeds and pests: While tilling, make sure to remove any weed roots or underground pests you encounter. This will prevent them from regrowing or causing damage in the spring.
- Level the soil: Rake the soil evenly to create a smooth and level surface. This will facilitate planting and ensure proper water drainage.
- Cover the garden bed: To protect the freshly tilled soil from erosion and weed growth, consider covering it with a layer of organic mulch, straw, or black plastic. This will also help retain soil moisture and keep the soil temperature regulated throughout the winter.
By following these steps, you can till your garden in the fall to prepare it for spring planting. Remember to avoid working the soil when it is overly wet, as this can lead to soil compaction and damage to its structure.
What are some effective methods for weed control after tilling a garden?
After tilling a garden, it's important to continue controlling the growth of weeds to maintain the health and productivity of your plants. Here are some effective methods for weed control:
- Mulching: Apply a layer of organic mulch, such as straw, wood chips, or shredded leaves, around your plants. This will smother weed growth by blocking sunlight and preventing weed seeds from germinating.
- Hand-pulling: Regularly inspect your garden for weeds and pull them out by hand, ensuring you remove the entire plant, including the roots. It's important to do this before weeds have a chance to flower and produce more seeds.
- Hoeing: Use a hoe to cut off weeds just below the soil surface. This method is effective for larger areas and if done correctly, can sever weed roots from their food source and eventually kill them.
- Herbicides: If necessary, you can use herbicides to control weeds. However, it's important to choose a selective herbicide that targets only weeds and not your desirable plants. Follow the instructions and safety precautions mentioned on the herbicide packaging.
- Cover crops: Planting cover crops like clover, buckwheat, or winter rye during periods when you're not growing crops can help suppress weed growth. These cover crops compete with weeds for nutrients, space, and sunlight, hindering their growth.
- Weed barriers: Use landscape fabric or weed barriers in areas with heavy weed growth. These barriers can be placed on the soil surface and have holes cut for your plants, effectively blocking the sunlight required for weed germination.
Remember, consistent and proactive weed control measures are essential to prevent them from competing with your garden plants for nutrients, water, and sunlight.
What is the role of tillage in soil health for spring planting?
Tillage plays a significant role in soil health for spring planting by impacting several key factors:
- Seedbed Preparation: Tillage helps in creating a suitable seedbed by breaking up compacted soil, removing crop residues, and incorporating organic matter into the soil. This allows for better seed-to-soil contact, enhances water infiltration, and provides a favorable environment for seed germination and root development.
- Weed Control: By disturbing the soil, tillage can bury weed seeds or disrupt their growth, thus reducing the weed pressure. This helps in minimizing competition for nutrients, water, and sunlight between weeds and the planted crop, leading to improved crop growth and yield.
- Nutrient Availability: Tillage can facilitate nutrient cycling by incorporating organic matter into the soil. This helps release nutrients trapped in organic residues, making them available for plant uptake. Additionally, tillage can improve soil aeration and reduce compaction, which enhances root penetration and nutrient absorption by the crop.
- Soil Structure and Aggregate Stability: Proper tillage practices can promote good soil structure and aggregation. By breaking up compacted layers, tillage allows for improved pore space and water movement, reducing the risk of waterlogging and soil erosion. Well-structured soil with stable aggregates has a higher capacity to retain moisture and nutrients, enhancing overall soil health for spring planting.
- Pest and Disease Management: Some tillage practices, such as plowing, can help control certain pests and diseases by burying their overwintering structures or pathogens, reducing their survival. However, excessive tillage may disrupt the soil's natural biological balance, negatively affecting beneficial insects and microorganisms that play a role in pest and disease suppression.
It is essential to balance the benefits of tillage with its potential drawbacks, as excessive or improper tillage can lead to soil degradation, erosion, loss of organic matter, and compaction. Conservation tillage techniques, such as reduced or no-till, are increasingly employed to maintain soil health while reducing soil disturbance.
How to store and maintain tillers during the off-season?
Storing and maintaining tillers during the off-season is important to ensure their longevity and efficient performance. Here are some steps to follow:
- Clean the tiller: Thoroughly clean the tiller to remove any dirt, debris, and plant material. Use a brush or compressed air to clean hard-to-reach areas.
- Drain fuel and oil: Empty the fuel tank by running the tiller until it runs out of fuel. Remove the spark plug wire from the spark plug to prevent accidental engine starts. Drain the oil by removing the drain plug and letting it all flow out.
- Change the oil and filter: If the oil is due for a change, replace it with a fresh batch according to the manufacturer's instructions. Replace the oil filter if indicated.
- Remove the spark plug: Remove the spark plug and spray a small amount of oil or anti-corrosion spray into the cylinder. Pull the starter handle gently a few times to distribute the oil and protect the internal parts.
- Grease fittings and moving parts: Apply grease to any appropriate fittings and moving parts as recommended in the owner's manual. This will prevent rust and ensure smooth operation when the tiller is used again.
- Inspect and replace worn parts: Inspect all belts, blades, tines, and other parts for wear or damage. Replace any worn or damaged parts to avoid problems when using the tiller in the next season.
- Store in a dry location: Find a cool, dry place to store the tiller. Avoid damp areas to prevent rust and corrosion. If possible, cover the tiller with a tarp or protective cover to shield it from dust and moisture.
- Store the battery: If your tiller has a battery, disconnect it and store it separately in a cool, dry place. Make sure to periodically charge it to maintain its health.
- Regular maintenance: During the off-season, periodically check on your tiller and perform minor maintenance tasks such as checking fluid levels and ensuring that all parts are still in good condition.
By following these steps, you can ensure that your tiller is properly stored and maintained during the off-season, allowing it to work efficiently for years to come.
What are some examples of cover crops to plant after tilling in the fall?
Here are some examples of cover crops that are commonly planted after tilling in the fall:
- Winter Rye: Winter rye is a popular cover crop that is easy to grow and is highly effective in preventing soil erosion. It can be sown in late summer or early fall and provides good ground cover throughout the winter.
- Crimson Clover: Crimson clover is a nitrogen-fixing cover crop that adds nitrogen to the soil, improving fertility. It is known for its vibrant red flowers and can be sown in late summer or early fall.
- Hairy Vetch: Hairy vetch is a legume cover crop that fixes atmospheric nitrogen and improves soil fertility. It has deep roots that help in breaking up compacted soil. It can be sown in late summer or early fall.
- Austrian Winter Peas: Austrian winter peas are a legume cover crop that adds nitrogen to the soil. They have good frost tolerance and can be sown in late summer or early fall.
- Annual Ryegrass: Annual ryegrass is a quick-growing cover crop that provides good erosion control and weed suppression. It is often used to prevent soil erosion in the winter months. It can be sown in late summer or early fall.
- Oats: Oats are a fast-growing cover crop that helps with weed suppression and adds organic matter to the soil. They can be sown in late summer or early fall.
- Buckwheat: Buckwheat is a fast-growing cover crop that is known for its ability to suppress weeds and improve soil structure. It can be sown in late summer or early fall.
It's important to choose a cover crop that best suits the specific needs and conditions of your garden or farm.
How to level the soil after tilling in the fall?
Leveling the soil after tilling in the fall is an important step to ensure thorough preparation for the next growing season. Here are the steps to follow:
- Remove any large rocks, debris, or plant matter from the tilled soil. This can be done using a rake or shovel.
- Use a garden rake to gently spread out any clumps or piles of soil. Start from one end of the tilled area and work your way across, breaking up any large clumps and distributing the soil evenly.
- Walk over the entire area while paying attention to any uneven or low spots. If you feel any inconsistencies, use your rake to redistribute the soil accordingly.
- Use a garden roller to further flatten the soil. This helps to ensure a uniform surface and eliminates any remaining bumps or unevenness. Fill the roller with water or sand for added weight and roll it over the soil in different directions.
- Once the soil is leveled, water it thoroughly. This helps to settle the soil and identify any remaining low spots. If necessary, add additional soil to these areas and rake it in to achieve an even surface.
- Finally, let the soil rest over the winter months. The freezing and thawing cycles will further break down clumps and help to naturally level the soil.
By following these steps, you will have successfully leveled the soil after tilling, providing a smooth and even surface for planting in the spring.