
Best Garden Tillers to Buy in July 2026
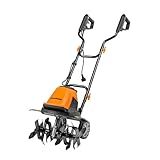
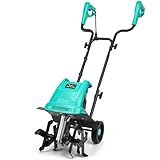
LawnMaster TE1016M Electric Tiller 12-Amp, 16-Inch
- MAX 16 CUTTING WIDTH & 9 DEPTH FOR EFFICIENT TILLING.
- 6 RUST-RESISTANT STEEL BLADES TACKLE TOUGH TERRAIN EFFORTLESSLY.
- ADJUSTABLE WHEELS FOR VERSATILE TRANSPORT AND EASY MANEUVERING.


Sun Joe Electric Garden Tiller Cultivator, Steel Tines, 12 Amp, 16 Inch, Black - Heavy-Duty Gardening Machine & Equipment for Gardens, Lawns & Yards, TJ603E
- EFFICIENT SOIL PREP: TILLS 16” WIDE & 8” DEEP FOR OPTIMAL GARDENING.
- ECO-FRIENDLY POWER: ELECTRIC DESIGN ELIMINATES GAS AND OIL EMISSIONS.
- DURABLE PERFORMANCE: SIX STEEL TINES ENSURE LONG-LASTING TILLING POWER.
YERYORK Tiller Cultivator, 15-Amp 18-Inch Width 9-Inch Depth Corded Electric Tiller 24 Durable Steel Tines Gardening Tiller with Adjustable Wheels Foldable Handle for Easy Soil Cultivation
- POWERFUL 15-AMP MOTOR: EASILY TACKLE TOUGH SOIL CONDITIONS WITH EASE!
- 18-INCH CUTTING WIDTH: COVER MORE GROUND EFFICIENTLY FOR BIGGER JOBS!
- COMPACT & FOLDABLE DESIGN: STORE EASILY IN SMALL SPACES WHEN NOT IN USE!
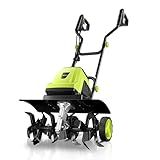
Sun Joe Electric Corded Garden Tiller & Cultivator, Steel Tines, 13.5 Amp, 16 Inch, Black - Heavy Duty Gardening Machine Equipment for Lawn, Yard, & Grass, TJ604E
- 13.5-AMP MOTOR TILLING 16 WIDE FOR EFFICIENT SOIL PREP.
- DURABLE RUST-PROOF STEEL TINES ENSURE LONG-LASTING PERFORMANCE.
- COMPACT DESIGN AND FOLDING HANDLE FOR EASY STORAGE AND TRANSPORT.
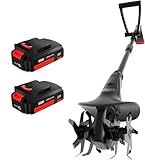
MZK 20V Cordless Tiller Cultivator with Steel Tines,8-inch Wide Battery Powered Garden Cultivator, 360RPM Electric Tiller for Lawn/Gardening/Soil Cultivation(2 * 2AH Battery&Charger Included),TC08D01
-
ENJOY CORDLESS FREEDOM: RECHARGEABLE AND CONVENIENT FOR ALL GARDENS!
-
LIGHTWEIGHT DESIGN: ERGONOMIC HANDLE MINIMIZES FATIGUE FOR EASY USE.
-
EFFICIENT SOIL CULTIVATION: 24 TINES STREAMLINE PLANTING IN JUST ONE PASS!
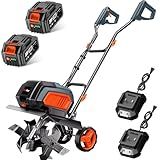
Cordless Electric Tiller Garden Cultivator TaskStar 40V Power Tiller Total 5000mAhx2 Battery Powered Rototiller 14" Width 9"Depth Tiller for Gardening,Dynamical Brushless Motor Enable Smooth Workflow
- POWERFUL 40V MOTOR EFFORTLESSLY BREAKS DENSE SOIL IN SECONDS!
- DUAL 5.0AH BATTERIES ENSURE LONG-LASTING, CORDLESS CULTIVATION.
- FOLDABLE DESIGN FOR EASY STORAGE AND TRANSPORT OF YOUR TILLER.

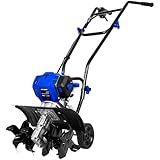
Earthquake 20015 Versa 2-in-1 Tiller Cultivator with a 99cc 4-Cycle Viper Engine, 2-in-1 Front Tine Tiller and Cultivator, Removable Side Shields and Outer Tines
- POWERFUL 99CC ENGINE FOR ROBUST TILLING PERFORMANCE.
- ADJUSTABLE TILLING WIDTH (11-21 INCHES) FOR VERSATILE USE.
- EASY TRANSPORT WITH ONBOARD WHEELS AND ADJUSTABLE HANDLEBARS.
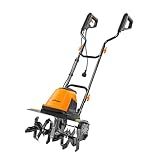
BILT HARD 46cc 4-Cycle 1.9HP Gas Powered Tiller Cultivator - 16" Heavy-Duty Steel Tines Rototiller, Adjustable Wheels & Cushioned Handle Grips for Plowing, Tilling, Weeding in Garden, Farm
-
POWERFUL 46CC ENGINE: 1,400W PEAK POWER FOR EFFORTLESS SOIL BREAKING.
-
EFFICIENT 16 WIDTH: TILLS DEEPLY AND UNIFORMLY FOR SUPERIOR SEEDBED PREP.
-
ONE-HAND CONTROL: EASY OPERATION WITH INTUITIVE CONTROLS FOR ANY TASK.
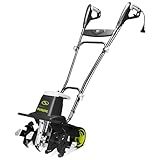
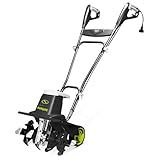
LawnMaster TE1318W1 Corded Electric Tiller 13.5-Amp 18-Inch Orange
-
EFFICIENT TILLING: 6 RUST-RESISTANT BLADES TACKLE TOUGH SOIL AT 380 RPM.
-
VERSATILE WIDTH OPTIONS: EASILY SWITCH BETWEEN 18 AND 12.6 TINES.
-
ECO-FRIENDLY OPERATION: NO GAS OR EMISSIONS, IDEAL FOR ECO-CONSCIOUS GARDENERS.
IncwBo Electric Rototiller Garden Tiller 12 Inch Tilling Width 8-Inch Electric Tiller 10.5 Amp Tiller Cultivator for Garden Yard
-
POWERFUL TILLING: 10.5-AMP MOTOR CUTS 12 WIDE & 8 DEEP EFFORTLESSLY!
-
DURABLE BLADES: 4 RUST-RESISTANT BLADES ENSURE LONG-LASTING PERFORMANCE.
-
ENHANCED CONTROL: UNIQUE SPUR MINIMIZES FATIGUE AND IMPROVES HANDLING.
Tilling clay soil effectively with a garden tiller can be a challenging task, but with the right techniques, it can be done successfully. Here are some tips on how to accomplish it:
- Soil Preparation: Before using a garden tiller, it's essential to prepare the soil. Remove any rocks, debris, or large clods of soil using a rake or shovel. This will prevent damage to the tiller and ensure a more even tilling process.
- Moisture Content: Check the moisture content of the clay soil. Tilling when it is too wet can lead to compacted clumps of soil, while tilling when it is too dry can create powdery dust. The ideal moisture level is when the soil is slightly moist but not overly soggy or sticky.
- Adjust Depth and Speed: Set the tiller to the desired depth, usually around 6-8 inches. Avoid tilling deeper than necessary as it can disrupt the soil structure. Start at a slower speed and gradually increase it to maintain control over the tiller.
- Overlapping Passes: Make overlapping passes while tilling the soil to ensure even coverage. This technique helps in breaking up compacted clay and loosening it effectively. Keep the tiller moving steadily without excessive force to avoid bogging down or causing any strain.
- Work in Sections: Divide your garden area into manageable sections and till one section at a time. This approach allows you to focus on thoroughly till each area without feeling overwhelmed or exhausted.
- Organic Matter: Incorporate organic matter into the clay soil during tilling to improve its structure and drainage. Adding compost, well-rotted manure, or other organic materials will help break up the clay and make it more workable over time.
- Post-Tilling: After tilling, avoid leaving the soil exposed to the elements, as clay soil is prone to drying out and forming a hard crust. Consider adding a layer of mulch, such as straw or wood chips, to help retain moisture and prevent erosion.
- Repeat the Process: Tilling clay soil can be an ongoing process, especially if it has not been previously tilled or has a high clay content. Regular tilling, combined with the addition of organic matter, will gradually improve the soil's structure and fertility.
Remember, each garden and soil type is unique, so it's essential to adjust your techniques based on your specific conditions. Experiment and adapt based on your observations to find the most effective tilling method for your clay soil.
How to test clay soil moisture content before tilling?
Testing the moisture content of clay soil before tilling is important to ensure that the soil is in an optimal condition for work. Here's a step-by-step process to test clay soil moisture content:
- Dig a small hole: Using a shovel or a garden trowel, dig a small hole in the area where you plan to till the soil. The hole should be around 6-8 inches deep.
- Remove any debris: Clean the sides and bottom of the hole from any debris, such as stones or roots, so you can accurately observe the soil.
- Water the hole: Fill the hole with water and allow it to soak into the soil. This will help loosen the compacted clay and give you a true representation of the soil moisture.
- Let it drain: Allow the water to drain completely from the hole. This might take a few minutes or even hours, depending on how well-drained your soil is.
- Test the soil moisture: Once the water has drained, use your hand or a small trowel to collect a sample of soil from the bottom of the hole. Squeeze the soil into a ball and then apply a little pressure. If the soil holds together and feels moist, it indicates sufficient moisture content. If it crumbles easily or feels dry, additional watering might be needed.
- Observe the soil texture: Clay soil typically feels sticky and compacted when wet. If the soil still feels easily malleable and sticky after testing its moisture content, it may not be suitable for tilling as it can compact and cause drainage issues when worked.
Note: It's crucial to test the soil moisture in multiple areas of the garden to ensure consistency. Different parts of the garden may have different moisture levels due to variations in sun exposure, drainage, or nearby vegetation.
How to store a garden tiller after tilling clay soil?
After tilling clay soil with a garden tiller, it is important to properly store the tiller to ensure its longevity and functionality. Here are some steps to follow:
- Clean the tiller: Use a garden hose or a bucket of water to wash off any dirt, mud, or clay residue from the tiller. Pay special attention to the tines and areas where soil tends to accumulate. Remove any excess soil using a brush or a cloth.
- Dry the tiller: Allow the tiller to dry completely before storing it, as storing it while wet can lead to rust or other damage. Wipe down any remaining moisture with a dry cloth or let it air dry in a shaded area.
- Inspect and oil: Check for any loose or damaged parts on the tiller, such as bolts, nuts, or cables. Tighten or replace as necessary. Apply a light coat of lubricating oil to the tines, transmission, and other moving parts to prevent rust and keep them in good working order.
- Remove fuel or stabilize fuel: If your tiller runs on gasoline, it is recommended to either drain the fuel completely from the tank and carburetor or add fuel stabilizer to prevent it from going bad. This is important, especially if you won't be using the tiller for an extended period.
- Store in a dry and secure location: Find a sheltered area, such as a garage, shed, or covered patio, to store the tiller. Make sure the location is dry, well-ventilated, and protected from extreme temperatures. If possible, store the tiller off the ground to prevent moisture accumulation. Cover the tiller with a tarp or a fitted cover to further protect it from dust or debris.
- Secure any loose cables or hoses: Coil and tie any loose cables or hoses to prevent them from tangling or becoming damaged during storage. This helps keep everything organized and prevents accidental damage.
By following these steps, you can ensure that your garden tiller remains in good condition and ready for future use.
How to minimize soil clumping when tilling clay soil?
To minimize soil clumping when tilling clay soil, follow these steps:
- Choose the right time: It's important to till clay soil when it is slightly dry, not overly wet. Tilling wet clay soil can make it extremely sticky and prone to clumping. Wait until the soil is moist but not saturated.
- Remove large debris: Before tilling, remove any rocks, plant roots, or large sticks from the soil. These can cause the tiller to bounce and create larger clumps.
- Break up the soil: Use a shovel or a garden fork to break up the top layer of soil. This will make it easier for the tiller to work through the clay and help prevent larger clumps from forming.
- Add organic matter: Clay soil benefits greatly from the addition of organic matter, such as compost or well-rotted manure. Spread a layer of organic matter over the soil and till it in. This will help improve the soil structure and reduce clumping.
- Till in stages: Instead of trying to till the entire area at once, divide it into smaller sections and till one section at a time. This will allow you to focus on breaking up the soil thoroughly and prevent excessive clumping.
- Adjust the tiller depth: Set the tiller to a shallow depth initially and gradually increase it as you work through the soil. This will prevent the tiller from digging too deep and causing larger clumps to form.
- Use a tiller with tines or blades: Tilling with a tiller that has tines or blades specifically designed for clay soil can help break up the soil more effectively and reduce clumping.
- Tiller speed: Avoid tilling too quickly, as it can cause the tiller to skip over the soil, leaving larger clumps behind. Slowly and steadily move the tiller through the soil to ensure thorough tilling.
- Repeat tilling: If the soil is heavily compacted or has large clumps after the first tilling, it may be necessary to repeat the tilling process. This will further break up the soil and help reduce clumps.
- Rake and level the soil: After tilling, use a rake to smoothen and level the soil surface. This will help break up any remaining clumps and create a more uniform planting bed.
Remember to avoid tilling clay soil when it is very wet, as it can cause compaction and make it even harder to work with in the long run.
How to break up compacted clay soil with a garden tiller?
Breaking up compacted clay soil with a garden tiller can be a challenging task, but it is possible with the right techniques. Here are the steps you can follow:
- Prepare the area: Remove any rocks, debris, or large roots from the soil surface to ensure a clear path for the tiller.
- Moisturize the soil: Water the area thoroughly to moisten the soil. This will help soften the clay and make it easier to till.
- Begin tilling: Start the tiller and hold it firmly with both hands. Slowly guide the tiller into the compacted clay soil, allowing the tines to dig into the soil.
- Work in sections: Divide the area into small sections and work on them one at a time. This will make it easier to control the tiller and ensure thorough tilling.
- Move in straight lines: Walk in straight lines while operating the tiller to maintain an even depth and coverage across the entire area. Overlapping each pass by about 20% will help ensure thorough tilling.
- Adjust the depth: Set the tiller's depth according to the level of compaction and desired depth of tilling. For compacted clay soil, it might be necessary to go deeper to break up the compacted layers.
- Work in different directions: After completing the first pass, change direction and till the area again, perpendicular to the first pass. This will enhance the tilling effect and break up the soil even further.
- Repeat if necessary: If the soil is still compacted after the initial tilling, repeat the process until you achieve the desired texture and level of tilth.
- Amend the soil: Once the clay soil is broken up, you can amend it with organic matter such as compost or aged manure to improve its fertility, drainage, and overall structure.
Note: It is important to exercise caution when operating a garden tiller, especially if the soil is particularly compacted. Follow the manufacturer's instructions, wear appropriate safety gear, and be mindful of any obstacles or uneven terrain that may affect the operation of the tiller.