
Best Kitchen Appliances to Buy in July 2026
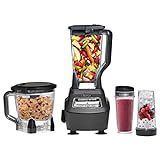
Ninja Mega Kitchen System, 1500W, 72 oz. Full-Size Blender & 8-Cup Food Processor with (2) 16 oz. To-Go Cups, Total Crushing Technology - Smoothies, Ice Crushing, Purees, Dough & More, Black, BL770
-
POWERFUL 1500W MOTOR CRUSHES ICE & TOUGH INGREDIENTS EFFORTLESSLY.
-
TOTAL CRUSHING TECHNOLOGY DELIVERS PROFESSIONAL BLENDING RESULTS FAST.
-
ON-THE-GO CONVENIENCE WITH 16-OZ CUPS FOR PERSONALIZED SMOOTHIES.


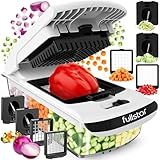
Fullstar The Original Pro Chopper - Vegetable Chopper and Spiralizer, Food Chopper with Container, Fruit Slicer, Kitchen Gadgets & Gifts, Home Essentials (4 in 1, White)
-
SAVE TIME & ENERGY WITH 5-CUP CAPACITY FOR MEAL PREP!
-
RUST-RESISTANT BLADES: DICE VEGGIES EFFORTLESSLY & SAFELY!
-
TOP-RACK DISHWASHER SAFE FOR EASY CLEANUP & CONVENIENCE!
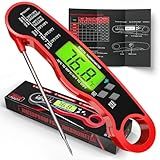
AWLKIM Meat Thermometer Digital - Instant Read Waterproof Food Thermometer with Backlight for Cooking, Grill, Candy, Kitchen & Stocking Stuffers for Men - Red
-
INSTANT ACCURACY: GET PRECISE TEMPS IN 1-2 SECONDS (±2°F)!
-
VERSATILE USE: PERFECT FOR MEATS, LIQUIDS, CANDY, AND MORE!
-
USER-FRIENDLY DESIGN: BRIGHT BACKLIT DISPLAY FOR EASY READING ANYTIME!
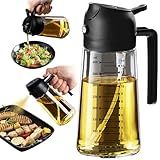
TrendPlain 16oz/470ml Glass Olive Oil Sprayer for Cooking – 2 in 1 Olive Oil Dispenser Bottle for Kitchen Gadgets and Air Fryer Accessories, Salad, BBQ - Black
- LIFETIME ASSURANCE: ENJOY CONFIDENCE WITH OUR LIFETIME SUPPORT GUARANTEE.
- DUAL DISPENSING OPTIONS: VERSATILE SPRAY AND POUR FOR TOTAL COOKING CONTROL.
- PRECISION CONTROL: FINE MISTING FOR HEALTHIER COOKING AND LESS WASTE.
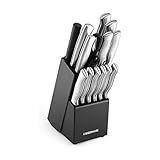
FARBERWARE 15-Piece Kitchen Knife Set with High-Carbon Stainless Steel Blades, Black Handles, Steak Knives, Wood Block, Razor Sharp and Ergonomic
-
SUPERIOR HIGH-CARBON BLADES STAY ULTRA-SHARP LONGER FOR PRECISION CUTTING.
-
ERGONOMIC HANDLES PROVIDE COMFORT AND BALANCE FOR EFFORTLESS SLICING.
-
IDEAL GIFT FOR COLLEGE STUDENTS AND NEW CHEFS STARTING THEIR KITCHEN.
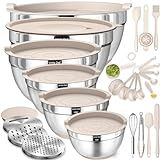
Mixing Bowls with Airtight Lids Set, 26PCS Stainless Steel Khaki Bowls with Grater Attachments, Non-Slip Bottoms & Kitchen Gadgets Set, Size 7, 4, 2.5, 2.0,1.5, 1QT, Great for Mixing & Serving
-
AIRTIGHT LIDS & GRATER ATTACHMENTS: KEEP INGREDIENTS FRESH AND CHOP EASILY!
-
NON-SLIP BOTTOMS: MIX WITH CONFIDENCE-NO SLIDING ON COUNTERTOPS!
-
SPACE-SAVING DESIGN: NESTING BOWLS WITH DISHWASHER-SAFE CONVENIENCE!
When deciding whether a hand blender is better than a food processor, it largely depends on the specific tasks you intend to perform and your personal preferences in the kitchen. A hand blender, also known as an immersion or stick blender, is compact and convenient for blending soups, sauces, and smoothies directly in the container they are prepared in. Its lightweight and portability make it ideal for quick, small tasks and easier cleanup. Conversely, a food processor is more versatile and powerful, capable of handling a wider range of functions, such as chopping, slicing, shredding, and kneading dough. It is better suited for larger, more complex food preparations. Ultimately, if you need something for quick blending tasks and have limited storage space, a hand blender might be more suitable. However, for more extensive and diverse food preparation, a food processor could be the better choice.
What is the ease of portability of a hand blender?
Hand blenders are generally considered quite portable, making them a convenient kitchen tool for a variety of tasks. Here are a few reasons why they are easy to carry and use:
- Compact Size: Hand blenders are typically small and lightweight, which makes them easy to store in kitchen drawers or cupboards when not in use. Their compact size also means they don’t take up much counter space.
- Lightweight: Most hand blenders are designed to be held with one hand, which necessitates a lightweight build. This makes them easy to move around the kitchen or transport to different locations if needed.
- Corded and Cordless Options: While many hand blenders come with a cord, you'll also find cordless models that enhance portability even further. Cordless models can be particularly useful if you lack immediate access to a power outlet.
- Ease of Assembly: Hand blenders typically consist of a motor unit and detachable blending attachments, which makes them easy to assemble, disassemble, and transport.
- Versatile Use: Aside from portability, their versatility in performing various kitchen tasks-such as blending soups, pureeing fruits and vegetables, or mixing ingredients-adds to their convenience.
The portability of a hand blender is conducive for those who need a multifunctional tool that’s easy to store and transport.
How to pulse ingredients in a food processor?
Pulsing ingredients in a food processor is a technique used to gain greater control over the texture of the food being processed. Here's how to do it:
- Prepare the Ingredients: Cut the ingredients into evenly-sized pieces. This helps ensure even processing and prevents over-processing.
- Assemble the Processor: Place the bowl on the base of the food processor, attach the blade, and secure the lid properly.
- Add Ingredients: Place the ingredients into the food processor bowl. Be sure not to overfill the bowl; work in batches if necessary.
- Use the Pulse Button: Most food processors have a pulse button or setting. Instead of running the processor continuously, press and release this button in short bursts. Each burst typically lasts about a second.
- Check the Texture: After a few pulses, stop and check the texture of the ingredients. You can either remove the lid or look through the bowl if it's transparent.
- Continue Pulsing as Needed: If the ingredients aren't processed enough, continue pulsing. It’s important to pulse at regular intervals rather than holding the button down, as this prevents over-processing and gives you more control over the final texture.
- Scrape the Bowl: If necessary, stop the processor, remove the lid, and scrape down the sides of the bowl with a spatula to ensure even processing.
- Repeat: Resume pulsing until the desired texture is achieved.
Tips:
- Consistency: Pulsing helps achieve a consistent texture, important for tasks like crushing nuts, making breadcrumbs, or preparing pie dough.
- Avoid Over-processing: For chunky textures, fewer pulses are required; for smoother textures, more pulses might be necessary.
- Safety: Always ensure the lid is secure before pulsing, and never insert fingers or utensils into the bowl when the processor is on.
By following these steps, you should be able to pulse ingredients effectively, achieving the texture you need for your recipe.
What is the difference between a hand blender and a regular blender?
A hand blender and a regular blender differ in design, functionality, and usage:
- Design and Structure: Hand Blender: Also known as an immersion or stick blender, it is compact and handheld. It typically consists of a motor in the handle and blending blades at the bottom. It can be immersed directly into pots, bowls, or cups for blending. Regular Blender: Also referred to as a countertop blender, it usually consists of a motor base, a large pitcher or jar with a lid, and blades attached to the base. It stands on the countertop and blends by containing the ingredients within the jar.
- Functionality: Hand Blender: Ideal for light blending tasks such as pureeing soups, making smoothies directly in a glass, or mixing soft ingredients. It provides more control and is more versatile for small, quick jobs. Regular Blender: Better suited for heavier tasks such as crushing ice, blending large quantities, making smoothies with tough ingredients, and emulsifying sauces. It typically has more powerful motors and a range of speed settings.
- Convenience and Storage: Hand Blender: Easier to clean since it has fewer parts and is usually dishwasher-safe. It is also more compact and easier to store, especially in small kitchens. Regular Blender: Often requires more cleaning effort because of multiple parts. It demands more storage space due to its bulkier size.
- Versatility: Hand Blender: Offers flexibility for blending directly in various containers, which can be useful for hot soups or when space is limited. It can also come with additional attachments like whisk or chopper, enhancing its versatility. Regular Blender: Generally more versatile in terms of power and functionality. It can handle tougher tasks and larger volumes but is limited to the size of its jar when it comes to blending capacity.
In summary, the choice between a hand blender and a regular blender depends on the specific tasks you need to perform, the size of the batches you plan to make, and your kitchen space.
How to use a food processor for chopping vegetables?
Using a food processor to chop vegetables is quick and efficient. Here’s a step-by-step guide to help you:
- Prepare the Machine: Ensure your food processor is clean and correctly assembled. Attach the chopping blade (S-blade) to the bowl of the food processor.
- Prepare the Vegetables: Wash and peel the vegetables as needed. Cut them into uniform pieces (about 1-2 inches) to ensure they chop evenly and fit through the feeder tube if applicable.
- Load the Processor: Place the vegetables into the bowl of the food processor. For larger quantities, process in batches to avoid overloading.
- Secure the Lid: Securely attach the lid to ensure safety and proper functioning.
- Begin Chopping: Use the pulse button for controlled chopping. Pulsing gives you more control over the texture. Pulse in short bursts to check consistency, stopping to scrape down the sides with a spatula as needed.
- Check Consistency: Continue pulsing until the vegetables reach your desired size. Avoid over-processing to prevent them from turning into puree.
- Remove and Use: Once done, turn off the processor, remove the lid, and carefully take out the blade. Use a spatula to remove the chopped vegetables.
- Clean Up: Wash the bowl, blade, and lid with warm soapy water, or place them in the dishwasher if they're dishwasher-safe. Wipe down the base with a damp cloth.
Tips:
- Different vegetables may have different processing times, so keep an eye on the texture.
- If you're mixing vegetables, consider processing them separately to get uniform results.
- For soft vegetables like tomatoes, only use a few quick pulses to avoid making them too mushy.
By following these steps, you'll be able to efficiently and effectively chop vegetables with your food processor.