
Best Hand Blenders for Crushing Ice to Buy in July 2026
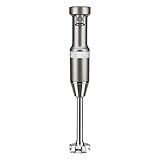
KitchenAid Variable Speed Corded Hand Blender KHBV53, Contour Silver
- VERSATILE BLENDING WITH 4-POINT BLADE FOR SMOOTHIES, SOUPS & MORE.
- VARIABLE SPEED CONTROL FOR PRECISE BLENDING IN YOUR RECIPES.
- BPA-FREE JAR FOR EASY STORAGE AND SERVING, PLUS A PATENTED PAN GUARD.


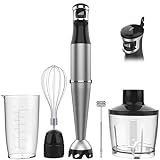
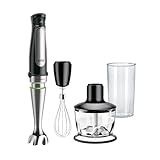
Immersion Blender Handheld Corded Hand Blenders Set 1100W, Trigger Variable Speed 5 in 1 Stick Emulsifier with Chopper, Whisk and Frother for Soup, Baby Food and Smoothies
- POWERFUL BLENDING: 1100W MOTOR DELIVERS SMOOTH RESULTS IN SECONDS!
- INTUITIVE CONTROL: SPEED TRIGGER FOR EASY, PRECISE BLENDING WITH LESS MESS.
- EFFORTLESS CLEAN-UP: SCRATCH-FREE DESIGN & DETACHABLE ATTACHMENTS FOR CONVENIENCE!
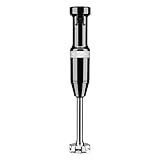
KitchenAid Variable Speed Corded Hand Blender KHBV53, Onyx Black
- REMOVABLE 8 ARM & 4-POINT BLADE FOR QUICK, EFFECTIVE BLENDING
- VARIABLE SPEED TRIGGER FOR CUSTOMIZABLE BLENDING CONTROL
- 3-CUP BPA-FREE JAR FOR EASY SERVING & STORAGE CONVENIENCE
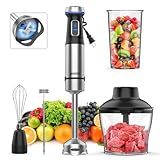
Ganiza Immersion Blender 5 in 1 Hand Blender Max 1000W Heavy Duty Motor, 16 Speed Mode Handheld Blender Stainless Steel Blade With 800ml Mixing Beaker, 600ml Chopper, Whisk and Milk Frother
-
DURABLE POWER: 1,000W MOTOR FOR LONG-LASTING, RELIABLE BLENDING.
-
TOTAL CONTROL: 16 SPEEDS PLUS TURBO FOR CUSTOMIZED BLENDING POWER.
-
VERSATILE BUNDLE: INCLUDES BEAKER, WHISK, FROTHER, AND CHOPPER!
Braun MultiQuick 7 3-in-1 Immersion Blender with Food Processor – Powerful Handheld Electric Stick Blender - Emulsifier for Chopping, Beating & Whisking - Ideal for Soup, Puree, Smoothies & More
- HIGHLY RECOMMENDED BY AMERICA'S TEST KITCHEN FOR SUPERIOR PERFORMANCE.
- EASY SMARTSPEED TECHNOLOGY FOR INTUITIVE ONE-HAND OPERATION.
- ACTIVEBLADE TECH DELIVERS FASTER, FINER RESULTS WITH LESS MESS.
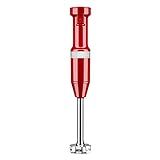
KitchenAid Variable Speed Corded Hand Blender KHBV53, Empire Red
- QUICK BLENDING WITH STAINLESS STEEL BLADE FOR SMOOTHIES AND SOUPS.
- EASY VARIABLE SPEED CONTROL FOR PRECISE RECIPE MASTERY.
- BPA-FREE JAR PERFECT FOR BLENDING, SERVING, AND STORING.
A hand blender is not typically designed to crush ice effectively. While it can handle soft or slightly frozen ingredients, ice can be too hard for the blades, risking damage to the motor or blade mechanism. Some high-power hand blenders with sturdy, reinforced blades may be able to handle small amounts of crushed ice, but it's generally recommended to use a countertop blender specifically designed for crushing ice. Always check the manufacturer's guidelines before attempting to crush ice with a hand blender to avoid damaging the appliance.
How to select the right wattage for a hand blender?
Selecting the right wattage for a hand blender depends on your specific needs and the types of tasks you plan to perform with it. Here are some guidelines to help you choose the appropriate wattage:
- Basic Tasks: Wattage Range: 100-200 watts Suitable For: Simple tasks like blending soft fruits, making milkshakes, or light mixing. Consideration: Adequate for occasional use and straightforward recipes.
- Moderate Use: Wattage Range: 200-300 watts Suitable For: Everyday blending, pureeing soup, making sauces, and more frequent use. Consideration: Offers a balance of power and efficiency for a variety of common kitchen tasks.
- Heavy Duty Tasks: Wattage Range: 300+ watts Suitable For: Blending tougher ingredients, crushing ice, making nut butters, and frequent, intensive use. Consideration: Ideal if you regularly prepare large batches, or need versatility and power for a range of preparations.
- Professional Use: Wattage Range: 500+ watts Suitable For: Commercial kitchens or if you're a home chef engaged in complex recipes requiring significant power. Consideration: Typically more expensive, but necessary for heavy, consistent demands.
Other Factors to Consider:
- Speed Settings: More speed settings can provide greater control over texture and consistency.
- Attachments and Accessories: Consider what additional tasks you might need, such as whisking, chopping, or frothing.
- Ergonomics and Weight: A comfortable grip and manageable weight are important for ease of use.
- Durability and Brand Reliability: Check reviews and brand reputation for reliability and customer service.
- Design and Ease of Cleaning: Removable, dishwasher-safe parts can make cleaning easier.
Choose a wattage based on your typical usage, keeping in mind the types of ingredients you frequently work with and the capacity you require. Always consider your specific needs and preferences alongside the wattage to ensure the hand blender is a practical tool for your kitchen.
How to make icy drinks using a hand blender?
Making icy drinks with a hand blender is quite simple and can be a great way to enjoy refreshing beverages at home. Here’s a basic guide you can follow:
Ingredients:
- Ice Cubes: Start with about 1 to 2 cups of ice cubes, depending on how thick or thin you want the drink.
- Liquid Base: Choose a liquid like juice, lemonade, soda, or milk. You’ll need about 1 to 1.5 cups.
- Flavorings: Add any flavor enhancers, such as syrups, fruits (like berries, bananas, or mango), or fresh herbs like mint. You can also include alcohol if making a cocktail.
- Sweetener (optional): Depending on your preference, you might want to add sugar or a sweetener.
Equipment:
- Hand Blender: A robust immersion blender with an ice-crushing blade is ideal.
- Large Mixing Cup or Bowl: Use a deep container to prevent splattering.
Instructions:
- Prepare Your Ingredients: Measure out the ice and place it in your mixing container. Add your liquid base. Include any flavorings or sweeteners.
- Blend: Submerge the hand blender into the container. Start blending at a lower speed to break up the ice, then gradually increase speed. Move the blender around to ensure all ice gets crushed and mixed well with the liquid and other ingredients. Continue blending until the mixture reaches your desired consistency. This typically takes 1 to 2 minutes.
- Taste and Adjust: Taste your icy drink. Adjust sweetness or flavor by adding more syrup, sugar, or flavorings as desired, and blend again briefly to incorporate.
- Serve: Pour the blended drink into a glass. Garnish with additional fruit slices, mint leaves, or other toppings.
Tips:
- Texture and Consistency: If the drink is too thick, add more liquid. If it’s too thin, add more ice.
- For Smooth Blending: Allow ice to sit out for a couple of minutes before blending; it helps to soften just enough for smoother blending.
- Safety First: Follow your hand blender’s manufacturer instructions, especially regarding the types and amounts of ingredients to ensure safe use.
With practice, you can customize and create many icy drinks, from smoothies and slushies to frozen cocktails, right at home!
What is the maximum quantity of ice a hand blender can handle?
The maximum quantity of ice that a hand blender can handle depends on several factors, including the specific model of the blender, its motor power, and the manufacturer's recommendations. Generally, most hand blenders are not designed to crush large amounts of ice effectively, as they often have less powerful motors compared to countertop blenders.
For safety and efficiency, you should typically adhere to the following guidelines:
- Manufacturer's Instructions: Always refer to the user manual that comes with your particular hand blender model. Manufacturers usually specify whether their product can handle ice and, if so, to what extent.
- Small Batches: If your hand blender is capable of crushing ice, it is advisable to do so in small batches to prevent overloading the motor.
- Pre-crushing: Crush the ice into smaller, more manageable pieces before blending, as this puts less strain on the motor.
- Power: Hand blenders with more powerful motors (usually measured in watts) are generally more capable of handling tougher tasks like ice crushing. Look for models with at least 250-300 watts for light ice crushing.
- Design and Blades: Some hand blenders come with specific attachments or blade designs intended for crushing ice. Using the appropriate attachments can help in safely and effectively handling ice.
If you're looking to crush ice regularly, you might consider investing in a high-powered countertop blender designed for that purpose, as these are better suited to handle the task without risking damage to the motor or blades.
How to maintain the blades of a hand blender?
Maintaining the blades of a hand blender is essential for ensuring optimal performance and extending the life of the appliance. Here are some tips on how to care for and maintain the blades:
- Clean After Every Use: Immediately after using the blender, rinse the blades under warm water. This helps prevent food from drying on them. Use a dish brush or a soft sponge with mild dish soap to gently clean the blades. Avoid using abrasive materials that could dull the blades over time.
- Deep Clean Regularly: For a deeper clean, fill a container with warm water and a few drops of dish soap, then submerge the blades and turn on the blender for a few seconds. Be sure to rinse thoroughly afterward to remove any soapy residue.
- Avoid Harsh Chemicals: Do not use harsh chemicals or cleaners on the blades as these can cause damage and may pose a risk if residue is left on the blades.
- Dry Thoroughly: After washing, dry the blades thoroughly with a clean towel to prevent rusting. Leaving them to air dry is not recommended as it may promote rust formation.
- Sharpen Regularly: If you notice the blades becoming dull, consider sharpening them. This should be done carefully, either manually with a sharpening stone or professionally if you're not comfortable doing it yourself.
- Inspect for Damage: Regularly inspect the blades for any nicks or damage. Damaged blades should be replaced to ensure food is evenly processed, and to maintain safety.
- Proper Storage: Store the hand blender with the blades facing upward or in a position where they won’t get damaged. Some models come with a cover or case, which is ideal for protecting the blades.
- Avoid Hard Ingredients: Try not to use the hand blender on very hard ingredients like ice or frozen fruit unless your blender is specifically designed for it. This can quickly dull or damage the blades.
- Read Manufacturer Instructions: Review the manufacturer's care instructions for any specific maintenance recommendations tailored to your particular model.
Consistently caring for the blades helps keep your hand blender in excellent working condition, ensuring consistent performance and safety during use.
How to blend soups directly in the pot with a hand blender?
Blending soups directly in the pot with a hand blender (also known as an immersion blender) is a convenient way to achieve a smooth texture without transferring the soup to a countertop blender. Here’s a step-by-step guide to do it safely and effectively:
- Check Capacity: Ensure the pot is not too full. For safety and effectiveness, the soup should not fill more than about two-thirds of the pot to prevent splattering.
- Cool Slightly if Necessary: If the soup is boiling, let it cool for a few minutes to reduce the risk of burns from splattering.
- Prepare the Blender: Assemble your hand blender according to the manufacturer’s instructions. Ensure the blades are securely attached.
- Submerge the Blender: Insert the immersion blender into the pot. Make sure the blending head is completely submerged in the soup to minimize splattering. Keep the blade away from the bottom of the pot.
- Blend in Pulses: Turn on the blender and use short bursts to begin blending the soup. This initial pulsing helps break down large pieces without splashing.
- Blend Continuously: Once the larger pieces are broken down, you can blend continuously. Move the blender around the pot in a slow, circular motion to ensure even blending.
- Adjust for Texture: Blend to your desired consistency. If you prefer a very smooth soup, continue blending until no chunks remain. You might have to tilt the pot slightly or angle the blender to reach every part of the soup.
- Check Temperature: After blending, check the soup’s temperature before serving, as it may have cooled during blending.
- Clean Safely: Unplug the blender before removing the blending wand. Clean the wand promptly to prevent food from drying on it.
Additional Tips:
- Safety First: Always keep the blender submerged while it’s running to avoid hot splatters.
- Texture: For chunky soup, remove some solid ingredients before blending and add them back after achieving the desired consistency.
- Avoid Hot Force: Don't press down too forcefully, as this can create suction, which might damage the pot or even the blender motor.
How to clean a hand blender?
Cleaning a hand blender is relatively straightforward. Here's a step-by-step guide to ensure it is done safely and effectively:
- Unplug the Blender: Always unplug the hand blender before you begin cleaning to prevent any accidents or damage.
- Detach Removable Parts: If your hand blender has detachable parts, such as a blending shaft or attachments, remove them for easier cleaning.
- Initial Rinse: Rinse off any large food particles or residue under running water.
- Soak and Wash: Fill a bowl with warm, soapy water. Submerge the removable parts in the soapy water and use a sponge or brush to gently scrub away any remaining residue. For the motorized part, use a damp cloth to wipe the exterior; never submerge it in water.
- Cleaning the Blades: Be cautious with the blades, as they are sharp. Use a sponge or brush to carefully clean them. If food is stuck, soak the blades in warm soapy water for a few minutes before scrubbing.
- Remove Stubborn Residue: For stuck-on food, try blending a small amount of baking soda and water in a bowl using the blender. This can help dislodge food particles.
- Rinse and Dry: Rinse all parts thoroughly under running water to remove soap residue. Dry the detachable parts with a clean towel or let them air dry.
- Reassemble: Once everything is dry, reattach all removable parts and store the blender as per manufacturer's instructions.
- Regular Maintenance: Regularly check for wear and tear, especially on the blades and seals, and replace parts as necessary.
Remember, always refer to your blender's user manual for specific cleaning instructions and safety recommendations, as different models may have unique requirements.