
Best Tools to Troubleshoot Garden Tillers to Buy in July 2026
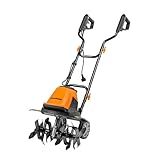
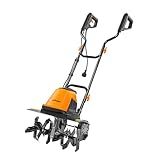
LawnMaster TE1016M Electric Tiller 12-Amp, 16-Inch
- MAX 16 CUTTING WIDTH FOR EFFICIENT AND FAST TILLING!
- DURABLE 6 STEEL BLADES TACKLE TOUGH TERRAIN WITH EASE.
- ADJUSTABLE TRANSIT WHEELS FOR OPTIMAL MANEUVERABILITY!


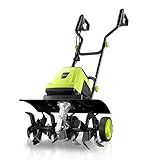
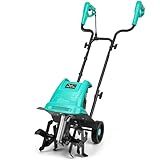
YERYORK Tiller Cultivator, 15-Amp 18-Inch Width 9-Inch Depth Corded Electric Tiller 24 Durable Steel Tines Gardening Tiller with Adjustable Wheels Foldable Handle for Easy Soil Cultivation
- POWERFUL 15-AMP MOTOR: CONQUER TOUGH SOIL EFFORTLESSLY!
- 18-INCH CUTTING WIDTH: COVER MORE GROUND IN LESS TIME!
- CUSTOM DEPTH CONTROL: PERFECTLY ADJUST FOR ANY TILLING NEEDS!
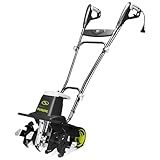
Sun Joe Electric Garden Tiller Cultivator, Steel Tines, 12 Amp, 16 Inch, Black - Heavy-Duty Gardening Machine & Equipment for Gardens, Lawns & Yards, TJ603E
- EFFICIENT SOIL PREP: 3-POSITION WHEEL FOR OPTIMAL DEPTH CONTROL.
- ECO-FRIENDLY: ELECTRIC DESIGN MEANS NO GAS OR OIL NEEDED.
- DURABLE BUILD: 6 RUST-PROOF STEEL TINES FOR LONG-LASTING USE.
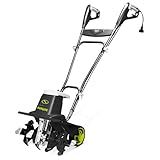
Sun Joe Electric Corded Garden Tiller & Cultivator, Steel Tines, 13.5 Amp, 16 Inch, Black - Heavy Duty Gardening Machine Equipment for Lawn, Yard, & Grass, TJ604E
- EFFICIENT TILLING: 13.5-AMP MOTOR TILLS 16 WIDE AND 8 DEEP EFFORTLESSLY.
- DURABLE BUILD: 6 RUST-PROOF, STEEL-ANGLED TINES FOR LONG-LASTING PERFORMANCE.
- COMPACT DESIGN: FOLDING HANDLE & ADJUSTABLE WHEELS FOR EASY TRANSPORT & CONTROL.
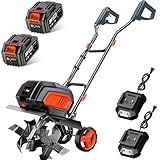
Cordless Electric Tiller Garden Cultivator TaskStar 40V Power Tiller Total 5000mAhx2 Battery Powered Rototiller 14" Width 9"Depth Tiller for Gardening,Dynamical Brushless Motor Enable Smooth Workflow
-
POWERFUL 40V BRUSHLESS MOTOR: EFFICIENT TILLING IN JUST 30 MINUTES!
-
DUAL 5.0AH BATTERIES: 40 MINS OF RUNTIME FOR UNINTERRUPTED WORK.
-
COMPACT & FOLDABLE DESIGN: EASY STORAGE AND TRANSPORT FOR ANY GARDEN!
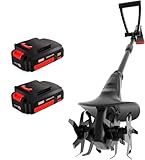
MZK 20V Cordless Tiller Cultivator with Steel Tines,8-inch Wide Battery Powered Garden Cultivator, 360RPM Electric Tiller for Lawn/Gardening/Soil Cultivation(2 * 2AH Battery&Charger Included),TC08D01
- CORDLESS CONVENIENCE: USE THE MZK TILLER ANYWHERE, ANYTIME!
- LIGHTWEIGHT & ERGONOMIC DESIGN FOR EFFORTLESS MANEUVERING.
- EFFICIENT 24-TINE FEATURE ENSURES QUICK SOIL CULTIVATION.
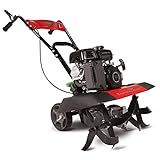
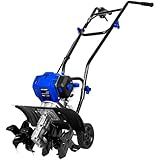
Earthquake 20015 Versa 2-in-1 Tiller Cultivator with a 99cc 4-Cycle Viper Engine, 2-in-1 Front Tine Tiller and Cultivator, Removable Side Shields and Outer Tines
- POWERFUL 99CC ENGINE FOR EFFICIENT TILLING PERFORMANCE.
- ADJUSTABLE TILLING WIDTH (11-21 INCHES) FOR VERSATILE GARDENING.
- EASY TRANSPORT WITH ONBOARD WHEELS AND ADJUSTABLE HANDLEBAR HEIGHT.
BILT HARD 46cc 4-Cycle 1.9HP Gas Powered Tiller Cultivator - 16" Heavy-Duty Steel Tines Rototiller, Adjustable Wheels & Cushioned Handle Grips for Plowing, Tilling, Weeding in Garden, Farm
-
POWERFUL 46CC ENGINE: 1,400W PEAK POWER FOR EFFICIENT SOIL BREAKING.
-
EFFORTLESS OPERATION: ONE-HAND CONTROL AND QUICK-START FEATURES FOR EASE.
-
ECO-FRIENDLY PERFORMANCE: LOW EMISSIONS AND NO-MIX FUEL SYSTEM ENSURE SUSTAINABILITY.
LawnMaster TE1318W1 Corded Electric Tiller 13.5-Amp 18-Inch Orange
- CUT THROUGH TOUGH SOIL WITH 6 RUST-RESISTANT BLADES AT 380 RPM!
- TILLING MADE EASY WITH 18-INCH WIDTH AND 9-INCH DEPTH CAPABILITIES.
- ECO-FRIENDLY OPERATION-NO GAS OR EMISSIONS FOR A GREENER GARDEN!
IncwBo Electric Rototiller Garden Tiller 12 Inch Tilling Width 8-Inch Electric Tiller 10.5 Amp Tiller Cultivator for Garden Yard
-
POWERFUL 10.5-AMP MOTOR: EFFORTLESSLY TILL 12 WIDE AND 8 DEEP!
-
DURABLE RUST-RESISTANT BLADES: FOUR BLADES ENSURE EFFECTIVE TILLING.
-
UNIQUE SPURS FOR BETTER CONTROL: REDUCE FATIGUE AND ENHANCE MANEUVERABILITY!
Troubleshooting common problems with a garden tiller can help diagnose and fix issues that may arise during its operation. Here are some common problems and their troubleshooting steps:
- Engine does not start: Ensure that the tiller is fueled correctly and the fuel valve is open. Check the spark plug for fouling or damage, and clean or replace it if necessary. Verify that the engine switch is turned on and the throttle is set correctly. If the engine is flooded, try removing the spark plug and pull the starter cord a few times to expel excess fuel. Finally, check the air filter and clean or replace it if clogged.
- Tiller tines do not engage: Check if the drive belt is intact and not slipping or broken. Look for any obstructions or debris around the tines that might be preventing movement. Inspect the engagement cable or lever and ensure it is appropriately connected or adjusted. If the tiller has an electric clutch or PTO, ensure it is functioning correctly.
- Tiller moves sluggishly or lacks power: Verify that the transmission or drive chain is properly lubricated. Check the drive belt tension and adjust it if necessary. Inspect the tines for damage or wear and sharpen or replace them if needed. Ensure the engine is running smoothly and not overheating. Additionally, make sure the wheels or depth adjustment lever are set correctly for the desired digging depth.
- Excessive vibration or shaking: Inspect the tines for any bent or damaged parts and replace them if necessary. Check the engine mounting bolts and tighten them if loose. Ensure that all nuts, bolts, and fasteners are securely tightened across the tiller's components. If the tiller is equipped with counterweights, verify their balance and alignment.
- Tiller does not turn correctly: Examine the wheels or tine guard pins for any debris or entanglement. Clean or remove any obstructions obstructing the turning mechanism. Check the steering cables or handles for any damage or misalignment and readjust or replace them if required.
- Engine stalling or running erratically: Check the fuel system for dirt or debris and clean or replace the fuel filter if clogged. Ensure that the carburetor is adjusted correctly and not clogged. Inspect the spark plug for fouling or damage and clean or replace it if needed. Clean the air filter to guarantee proper airflow. Verify that the fuel tank vent is clear and not obstructed.
When troubleshooting any problem with a garden tiller, always refer to the manufacturer's manual or seek professional assistance if necessary.
What is the best way to fix a garden tiller that is emitting excessive smoke?
If a garden tiller is emitting excessive smoke, it usually indicates a problem with the engine or fuel system. Here are a few steps to fix the issue:
- Check the oil levels: Ensure that the oil levels are correct and not overfilled. Excess oil can cause smoke. If necessary, drain some oil to reach the appropriate level.
- Clean or replace the air filter: A dirty or clogged air filter can restrict airflow and cause the engine to run rich, leading to smoke. Clean the filter or replace it if necessary.
- Check the spark plug: A worn-out or fouled spark plug can cause inefficient combustion and smoke. Remove the spark plug, inspect its condition, clean or replace it if necessary.
- Clean the carburetor: A dirty or clogged carburetor can disrupt the fuel-air mixture, leading to smoke. Remove the carburetor, clean it thoroughly, or consider using a carburetor cleaning solution.
- Check the fuel mixture: Ensure that the fuel is mixed with the correct oil and in the right ratio if using a 2-stroke engine. Incorrect fuel mixture can cause excessive smoke. Follow the manufacturer's recommended fuel mixing instructions.
- Inspect the fuel lines: Check the fuel lines for any damage or leaks. Replace any damaged fuel lines to ensure proper fuel flow.
- Examine the fuel tank and fuel: Inspect the fuel tank for dirt or debris. If dirt or water has contaminated the fuel, drain and replace it with fresh fuel.
- Adjust the carburetor: If none of the above remedies work, it might be necessary to adjust the carburetor. However, this requires technical knowledge, so it is recommended to consult the manufacturer's instructions or seek professional help.
If the excessive smoke issue persists after trying these steps, it might be best to take the garden tiller to a professional repair technician for a more in-depth diagnosis and repair.
How to properly tighten loose bolts and screws on a garden tiller?
To properly tighten loose bolts and screws on a garden tiller, follow these steps:
- Gather the necessary tools: You will need an appropriate size wrench or socket set to fit the bolts and screws on your tiller.
- Inspect the tiller: Before tightening any bolts or screws, thoroughly examine the tiller to identify which ones are loose. Check the handles, tines, engine components, and any other areas where bolts and screws may be present.
- Safety first: Ensure that the tiller is turned off and disconnect the spark plug wire to prevent accidental startup while working on it.
- Tighten the bolts: Using the appropriate size wrench or socket set, start tightening the loose bolts and screws. Begin with the ones that seem to be the loosest and work your way to the others. Pay attention to the torque specifications recommended by the manufacturer, as overtightening can cause damage.
- Alternate tightening: When tightening bolts or screws on multiple components, it is important to alternate tightening them gradually. This helps distribute the pressure evenly, ensuring a secure fit and preventing any damage.
- Double-check: After tightening all the loose bolts and screws, give them a final inspection to ensure they are properly tightened.
- Test the tiller: Reconnect the spark plug wire, start the tiller, and run it for a few minutes to check if any vibrations or issues persist. If everything runs smoothly, you have successfully tightened the loose bolts and screws on your garden tiller.
Remember that regular maintenance and periodic checks of your garden tiller's bolts and screws will help prevent them from becoming loose in the future.
How to troubleshoot a garden tiller that has a clutch that won't engage?
If you are experiencing issues with a garden tiller clutch that won't engage, there are several steps you can take to troubleshoot and potentially resolve the problem:
- Safety first: Make sure the tiller is turned off and unplugged or the spark plug wire is disconnected to prevent accidental starting or injury.
- Visual inspection: Look for any obvious signs of damage, such as broken or loose parts, worn-out belts, or debris that might be interfering with the clutch mechanism. Clean the tiller to remove any dirt or residue.
- Belt inspection: Check the condition and tension of the drive belt that connects the engine to the clutch assembly. If the belt is worn, damaged, or loose, it may need to be replaced or adjusted. Refer to the tiller's manual for proper belt specifications and adjustment procedures.
- Clutch cable check: Examine the clutch cable for damage, fraying, or disconnection. Make sure it is properly connected to both the clutch lever and the clutch assembly. If the cable is damaged, it will need to be replaced.
- Clutch adjustment: If the clutch engagement seems weak or inconsistent, there may be an issue with the clutch adjustment. Refer to the tiller's manual for the specific clutch adjustment procedures and follow them to ensure proper engagement.
- Lubrication: Apply some lubricant, such as WD-40 or a silicone-based lubricant, to the clutch and cable mechanisms, ensuring they move freely. Remove any rust or debris that may be hindering the clutch's ability to engage smoothly.
- Clutch assembly inspection: If none of the above steps solve the issue, it may be necessary to disassemble the clutch assembly to inspect the internal components. Be sure to consult the tiller's manual for guidance on disassembly and reassembly.
- Professional assistance: If you have attempted all the troubleshooting steps and are still unable to resolve the clutch engagement problem, it may be necessary to consult a professional mechanic or contact the manufacturer's customer service for further assistance or repair.
Remember, if you are not confident in your ability to troubleshoot or repair the tiller, it is always best to seek professional assistance to avoid causing further damage or injury.
How to troubleshoot a garden tiller that has a damaged wheel?
If your garden tiller has a damaged wheel, here are the steps you can follow to troubleshoot the issue:
- Inspect the damage: Start by examining the wheel closely to determine the exact nature of the damage. Check for flat or burst tires, bent or broken axles, loose or missing bolts, or other visible signs of damage.
- Remove the wheel: If necessary, remove the damaged wheel from the tiller. This may involve removing a retaining nut, bolt, or pin that secures it in place.
- Check the tire: If the wheel has a flat or burst tire, try repairing it or replacing it with a new one. Inflate the tire properly and ensure it has proper tread for sufficient traction.
- Inspect the axle: If the axle is bent or broken, it will need to be straightened or replaced. Check for any cracks or other signs of damage. If the axle is beyond repair, you will need to purchase a new one.
- Verify the bearings: The wheel may be damaged due to faulty or worn-out bearings. Check the bearings by rotating the wheel and listening for any grinding or squeaking noises. If there are issues, consider replacing the bearings.
- Check for loose or missing fasteners: Ensure that all bolts, nuts, and pins holding the wheel in place are tight and secure. If any fasteners are missing, replace them with suitable ones.
- Reinstall the repaired or replaced wheel: Once the necessary repairs or replacements have been made, reattach the wheel to the tiller. Make sure it is properly aligned and tightened according to the manufacturer's instructions.
- Test the tiller: After troubleshooting and fixing the damaged wheel, test the tiller by operating it to see if the issue has been resolved. Pay attention to any unusual noises or vibrations, which may indicate further problems that need attention.
If the troubleshooting steps above do not resolve the issue or if you are unsure of the repairs required, it is recommended to consult the manufacturer's manual or seek assistance from a professional garden equipment repair service.
How to troubleshoot a garden tiller that has a weak spark?
If your garden tiller has a weak spark, here are steps to troubleshoot the issue:
- Safety first: Ensure that the tiller is turned off and disconnected from any power source before starting the troubleshooting process.
- Inspect the spark plug: Remove the spark plug wire from the spark plug and unscrew the plug using a spark plug socket. Examine the spark plug for any signs of damage, such as fouling, buildup, or corrosion. If it's dirty or damaged, clean it with a wire brush or replace it if necessary.
- Check the spark plug gap: Using a spark plug gap tool, measure the gap between the center and ground electrode of the spark plug. Refer to the tiller's user manual for the recommended gap size and adjust it if necessary.
- Test the spark plug: Reconnect the spark plug wire to the spark plug but keep it away from your hands or any combustible material. Lay the spark plug on the engine so it grounds itself, then try starting the tiller while observing the spark plug gap. If you see a strong, blue spark, the spark plug is working fine; however, if the spark is weak or there is no spark at all, it may need replacement.
- Inspect the ignition coil: The ignition coil is responsible for creating the spark. Check the coil and its connections for any signs of damage, such as cracks, breaks, loose wires, or corrosion. If any issues are found, the coil may need to be replaced.
- Examine the ignition switch: Inspect the ignition switch and its wiring connections. Look for any loose connections, damage, or worn-out wires. Ensure they are securely connected, and repair or replace any damaged wiring.
- Check the flywheel key: The flywheel key ensures that the engine's timing remains synchronized. If the key is sheared or damaged, it can affect the spark. Remove the pull cord cover and inspect the flywheel key for any signs of damage. If necessary, replace it with a new one.
- Clean the flywheel magnet and coil: Over time, the flywheel magnet and ignition coil can accumulate dirt, debris, or rust, reducing the strength of the spark. Clean the magnet and coil using a soft brush or compressed air to remove any buildup, ensuring they are free from any obstructions.
- Consult a professional: If you have followed these steps and are still experiencing weak spark issues, it may be beneficial to consult a professional technician or contact the manufacturer's customer support for further assistance.
What is the best method for adjusting the throttle on a garden tiller?
The specific method for adjusting the throttle on a garden tiller may vary depending on the make and model of the tiller. However, here are some general steps that can guide you in adjusting the throttle:
- Locate the throttle control: The throttle control is typically a lever or a knob located near the engine or on the handlebar of the tiller. It may be labeled with symbols representing different throttle positions, such as "slow," "fast," or numbers indicating various speeds.
- Observe the existing throttle setting: Before adjusting the throttle, take note of the current throttle position to have a reference point.
- Start the tiller: Make sure the tiller is in a safe and open area with enough ventilation. Start the tiller's engine according to the manufacturer's instructions. Typically, this involves priming the engine, engaging the choke, and pulling the starter cord.
- Identify desired speed: Determine the desired speed for the task at hand. If you're starting the tiller or moving slowly, set the throttle to a lower speed. For tilling or heavy work, set it to a higher speed.
- Adjust the throttle: Looking at the throttle control, move the lever or knob to the desired speed position. Some controls may have graduated markings or numbers to assist in selecting a specific speed. Alternatively, there may be a throttle cable that needs adjustment by tightening or loosening a nut or screw.
- Test the tiller: With the throttle adjusted, try engaging the tiller's tines while ensuring you have a firm grip on the handles. Observe if the tiller is operating at the desired speed and adjusting the throttle as needed.
Note: It is highly recommended to consult your garden tiller's user manual for specific instructions on adjusting the throttle. The manual should provide model-specific details and safety precautions.