
Best Tools for Carburetor Adjustment to Buy in July 2026
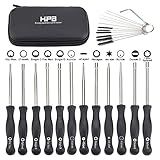
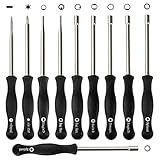
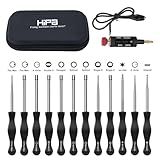
HIPA Pack-of-12 Carburetor Adjustment Tool Carburator Adjusting Kit for 2-Cycle Small Engine for Poulan Husqvarna STHIL ECHO Trimmer Weedeater Chainsaw
- FITS MOST 2-STROKE ENGINES: ESSENTIAL FOR REPAIRS AND DIY PROJECTS.
- PRECISION ADJUSTMENTS: EASY 1/4 TURN TUNING FOR OPTIMAL ENGINE PERFORMANCE.
- PORTABLE STORAGE CASE: KEEPS TOOLS ORGANIZED AND SECURE FOR ON-THE-GO USE.


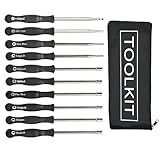
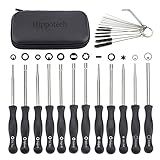
Hippotech Pack of 10 Carburetor Adjustment Tool Screwdriver Kit for Most 2-Cycle Small Engine Trimmers, Chainsaws, and Leaf Blowers
-
UNIVERSAL FIT FOR MAJOR BRANDS: COMPATIBLE WITH STIHL, POULAN, AND ECHO.
-
PRECISION TOOLS FOR PERFECT ADJUSTMENTS: DESIGNED FOR LEADING CARBURETOR BRANDS.
-
ORGANIZED CARRYING CASE FOR CONVENIENCE: PROTECTS AND SIMPLIFIES TOOL ACCESS ANYTIME.
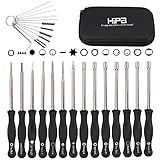
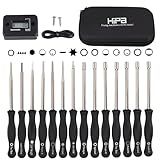
Hipa Pack-of-14 Carburetor Adjustment Tool Carburator Adjusting Kit for 2-Cycle Small Engine Compatible with Poulan STHIL Echo Ryobi Troy Bilt Trimmer Weedeater Chainsaw
-
VERSATILE FOR MANY BRANDS: COMPATIBLE WITH POPULAR BRANDS LIKE ZAMA, WALBRO, AND MORE.
-
PRECISION TUNING MADE EASY: ACHIEVE PERFECT ADJUSTMENTS WITH A SQUARE HANDLE DESIGN.
-
DURABLE & PORTABLE STORAGE: COMES WITH A RUGGED CASE FOR SECURE, ON-THE-GO ORGANIZATION.
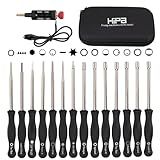
Hipa Pack-of-14 Carburetor Adjustment Tool Ignition Coil Spark Tester for 2-Cycle Small Engine Compatible with Poulan STIHL Echo Ryobi Troy Bilt Trimmer Leaf Blower Weedeater Chainsaw
-
EASY IGNITION TESTING: SPARK TESTER SIMPLIFIES IGNITION COIL OPERATIONS.
-
COMPREHENSIVE TOOL SET: 14 ESSENTIAL TOOLS FOR OPTIMAL 2-CYCLE ENGINE CARE.
-
UNIVERSAL COMPATIBILITY: WORKS FLAWLESSLY WITH TOP BRANDS AND EQUIPMENT.
HUSWELL Carburetor Adjustment Tool for 2 Cycle Small Engine Trimmer Weedeater Chainsaw Leaf Blower
- UNIVERSAL FIT FOR MOST 2-CYCLE CARBURETOR ENGINE BRANDS.
- CONVENIENT DESIGN FOR EASY AND COMFORTABLE ADJUSTMENTS.
- ENSURE COMPATIBILITY BEFORE PURCHASE FOR OPTIMAL PERFORMANCE.
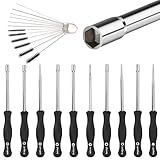
Hippotech Pack of 12 Carburetor Adjustment Tool with Acircle Scredrivers for 2-Cycle Small Engine for Husqvarna for STHIL for Echo Trimmer Chainsaw
-
FITS VARIOUS BRANDS: STIHL, HUSQVARNA, ECHO & MORE FOR VERSATILITY.
-
DURABLE, CORROSION-RESISTANT STAINLESS STEEL FOR LONG-LASTING USE.
-
INCLUDES 12 ADJUSTMENT TOOLS WITH CONVENIENT STORAGE CASE INCLUDED.
NEW B1919 10Pcs Carburetor Adjustment Tool, Carburator Adjusting Kit for 2-Cycle Small Engine, Nickel Protective Layer for Electroplating Industry, Applicable to Husqvarna Stihl, Etc
-
DURABLE ELECTROPLATED COATING: RUST-RESISTANT AND LONG-LASTING DESIGN.
-
ERGONOMIC PRECISION HANDLE: ENSURES ACCURATE ADJUSTMENTS WITH EASE.
-
VERSATILE COMPATIBILITY: FITS MOST MAJOR CARBURETOR BRANDS AND TOOLS.
HIPA Pack-of-14 Carburetor Adjustment Tool + RPM Tachometer Hour Meter for 2-Cycle Small Engine, Compatible with Poulan STHIL Echo Ryobi Troy Bilt Trimmer Leaf Blower Weedeater Chainsaw
-
MONITOR ENGINE RPM & TOTAL RUN TIME FOR OPTIMAL PERFORMANCE.
-
COMPATIBLE WITH MOST 2-STROKE ENGINES FOR VERSATILE USE.
-
DURABLE, PORTABLE STORAGE CASE KEEPS TOOLS ORGANIZED & SECURE.
Hipa Pack-of-12 Carburetor Adjustment Tool Carb Adjusting Tool Kit for 2-Cycle Small Engine Poulan Husqvarna STIHL Echo Trimmer Weedeater Chainsaw
- VERSATILE USE: COMPATIBLE WITH MAJOR BRANDS AND VARIOUS OUTDOOR MACHINES.
- PRECISION ENGINEERING: SQUARE HANDLE FOR EASY, ACCURATE ADJUSTMENTS.
- DURABLE STORAGE: COMES WITH A PORTABLE CASE TO ORGANIZE AND PROTECT TOOLS.
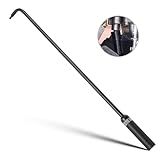
Pilot Screw Adjusting Tool, Carburetor Adjustment Screwdriver Tool, 16.34in 110° Angled Head Motorcycle Tool, for ATV, UTV, Snowmobile
- UNIVERSAL TOOL FOR ADJUSTING CARBURETORS IN VARIOUS VEHICLES.
- ROTATABLE BLADE TIP FOR EASY ACCESS TO HARD-TO-REACH SCREWS.
- DURABLE METAL CONSTRUCTION ENSURES LONG-LASTING PERFORMANCE.
To adjust the carburetor on a leaf blower, follow these steps:
- Locate the carburetor: The carburetor is usually found on the side or top of the leaf blower's engine. It has adjustment screws that regulate the air and fuel mixture.
- Identify the adjustment screws: There are usually two screws labeled "L" and "H." The "L" screw controls the low-speed fuel-air mixture, while the "H" screw controls the high-speed mixture.
- Warm up the engine: Start the leaf blower and let it run for a few minutes to reach normal operating temperature. This is important to make accurate adjustments.
- Adjust the low-speed mixture: Turn the "L" screw clockwise until it lightly seats, and then turn it counterclockwise 1.5 turns. This is the basic starting position for the low-speed adjustment.
- Adjust the high-speed mixture: Throttle the engine to full speed and turn the "H" screw clockwise until the engine starts to lose power. Then, turn the screw counterclockwise until the engine reaches its maximum speed and runs smoothly.
- Fine-tune the low-speed mixture: While the engine is idling, adjust the "L" screw clockwise or counterclockwise until the engine runs smoothly at idle speed.
- Test and verify: Run the leaf blower at different speeds and check for smooth acceleration, stable idle, and optimal power output. If needed, make slight adjustments to the screws until desired performance is achieved.
Remember, carburetor adjustments should be done carefully and in small increments to avoid damaging the engine. It is advisable to consult the leaf blower's user manual or seek professional assistance if you are unsure or uncomfortable with carburetor adjustments.
What is the function of the diaphragm in a leaf blower carburetor?
The diaphragm in a leaf blower carburetor serves as a crucial component for fuel delivery and regulation. Its main function is to control the flow of fuel from the fuel tank to the engine.
When the engine is running, the diaphragm oscillates due to the pressure changes in the crankcase. This movement creates suction that draws fuel from the fuel tank into the carburetor through the fuel line. The diaphragm also acts as a valve, regulating the amount of fuel entering the carburetor based on the engine's needs.
In addition to fuel delivery, the diaphragm plays a role in a metering system called a pump diaphragm. This system provides an extra fuel boost during initial startup and acceleration, ensuring a proper fuel-air mixture for optimal engine performance.
Overall, the diaphragm in a leaf blower carburetor combines with other components to ensure the engine receives the right amount of fuel, helping it run smoothly and efficiently.
What is the recommended fuel mix ratio for leaf blowers?
The recommended fuel mix ratio for most leaf blowers is typically 50:1, which means 50 parts gasoline to 1 part two-stroke engine oil. However, it is important to refer to the specific manufacturer's instructions for your leaf blower model, as some may have slight variations in recommended fuel mix ratios.
What is the correct procedure for adjusting the high-speed mixture on a leaf blower?
To adjust the high-speed mixture on a leaf blower, follow these steps:
- Familiarize yourself with the leaf blower's user manual. Different models may have specific instructions or requirements.
- Locate the carburetor adjustment screws. There are typically three screws – low-speed mixture, high-speed mixture, and idle speed adjustment.
- Identify the high-speed mixture screw. It is usually labelled "H" or "HI."
- Start the leaf blower and let it warm up for a few minutes.
- Set the throttle to the highest position or full throttle.
- While the leaf blower is running at full throttle, begin adjusting the high-speed mixture screw by turning it clockwise until it is lightly seated (do not overtighten).
- Slowly turn the high-speed mixture screw counterclockwise until you hear the engine's rpm increase to the highest point.
- If the engine's rpm continues to rise when you reach the highest point, start turning the high-speed mixture screw clockwise again until the rpm begins to drop slightly.
- When you reach the point where the engine's rpm is highest and stable, the high-speed mixture is properly adjusted. The screw should be in the optimal position for air-fuel mixture.
- Carefully turn the high-speed mixture screw back clockwise until you hear the rpm slightly drop. This helps ensure a safe amount of fuel is supplied to the engine while operating at high speeds.
- Finally, let the engine idle for a minute to stabilize, and check if it runs smoothly and responds well to throttle adjustments.
It's always recommended to consult your leaf blower's user manual for specific instructions, as the process may vary slightly depending on the model and manufacturer.
How to adjust the high-speed mixture on a leaf blower carburetor?
Adjusting the high-speed mixture on a leaf blower carburetor involves making adjustments to the carburetor's fuel-to-air ratio to optimize engine performance. Here's a step-by-step guide:
- Safety first: Always wear safety goggles and work in a well-ventilated area.
- Locate the high-speed mixture screw: The high-speed mixture screw is usually positioned on the side of the carburetor, labeled with an "H."
- Identify the current setting: Before adjusting, find out the current setting of the screw by noting its position (number of turns from fully seated) or by marking it with a marker or tape.
- Screw in the mixture screw: Start by lightly screwing the high-speed mixture screw all the way in until it's fully seated. Be gentle to avoid damaging the screw or carburetor.
- Back out the mixture screw: Turn the high-speed mixture screw counterclockwise 1.5 turns (or as indicated by the manufacturer's instructions for your specific leaf blower model). This is the initial starting point for adjustment.
- Start the leaf blower: Re-start the leaf blower and let it warm up for a few minutes, ensuring it's in a stable operating condition.
- Fine-tune the adjustment: With the leaf blower running at full throttle, gradually turn the high-speed mixture screw clockwise or counterclockwise in small increments (1/8 turns) until you reach the smoothest and highest RPM performance.
- Test and adjust multiple times: Run the leaf blower at full throttle for a few minutes to ensure it's running smoothly and without hesitation. If necessary, make additional small adjustments to the high-speed mixture screw until optimal performance is achieved.
- Recheck low-speed adjustment: After adjusting the high-speed mixture, it may be necessary to recheck and readjust the low-speed mixture screw (labeled as "L") for optimal performance. Follow the manufacturer's instructions to adjust the low-speed mixture if necessary.
Note: It is essential to consult the specific manufacturer's instructions and guidelines for adjusting the carburetor of your leaf blower model as the process may slightly vary across different models.
How to adjust the carburetor on a leaf blower?
To adjust the carburetor on a leaf blower, you will need a few tools, including a screwdriver, a tachometer, and possibly a carburetor adjustment tool (depending on the type of carburetor).
Here's a step-by-step guide to adjusting the carburetor on a leaf blower:
- Locate the carburetor: The carburetor is usually located on the side or top of the engine. It is a small metal device with a few screws and adjustments.
- Warm up the engine: Start the leaf blower and let it run for a few minutes to warm up. This will ensure the carburetor is at operating temperature.
- Identify the adjustment screws: Most carburetors have two main adjustment screws-a low-speed adjustment screw (L) and a high-speed adjustment screw (H). The L screw controls the fuel mixture when the engine is idling or running at a low speed, while the H screw controls the fuel mixture at high speeds.
- Find the proper initial settings: Check the leaf blower's manual for the recommended initial settings of the carburetor screws. This will give you a good starting point for adjustment.
- Adjust the low-speed screw (L): Use a screwdriver to turn the low-speed screw (L) clockwise until it lightly seats, then turn it counterclockwise to the recommended initial position. This will adjust the air-fuel mixture for idle and low-speed operation.
- Adjust the high-speed screw (H): Similar to the low-speed screw, turn the high-speed screw (H) clockwise until it lightly seats, and then turn it counterclockwise to the recommended initial position. This adjustment controls the air-fuel mixture for higher engine speeds.
- Fine-tune the adjustments: Start the leaf blower and let it idle for a few seconds. Slowly increase the speed and observe its performance. If the engine bogs down or sputters, adjust the low-speed screw (L) slightly clockwise. If the engine runs too fast or doesn't reach full power, turn the high-speed screw (H) slightly clockwise.
- Use a tachometer for accurate RPM adjustment (optional): If you have a tachometer, you can attach it to the leaf blower's spark plug wire to measure the engine RPM. Adjust the carburetor screws based on the manufacturer's specifications provided with the tachometer.
- Test and re-adjust as needed: Test the leaf blower at different throttle settings, paying attention to its performance. If necessary, make small adjustments to the L or H screws until you achieve optimal engine performance.
Remember, carburetor adjustment can be a trial-and-error process, so don't hesitate to make small adjustments based on the leaf blower's performance. If you're unsure or uncomfortable with adjusting the carburetor yourself, it's recommended to seek professional help.