
Best Cold Plunge Tub Kits to Buy in July 2026
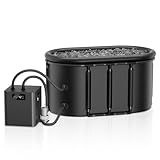
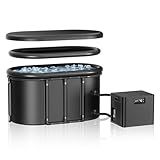
Ice Bath Chiller & Cold Plunge tub Kit, 1/3 HP Cold Plunge Chiller with External Filter & Pump, 148Gal Ice Pod, Upgraded Ice Plunge Tub, Cold Plunge Tub With Water Chiller for Cold Therapy
-
SMART TOUCHSCREEN CONTROL: EFFORTLESSLY ADJUST YOUR IDEAL COLD PLUNGE TEMP.
-
RAPID COOLING & QUIET: COOLS TO 42°F QUICKLY, OPERATES AT ONLY ~40DB.
-
LOW MAINTENANCE & CLEAN WATER: 20-MICRON FILTER ENSURES HYGIENIC COLD THERAPY.


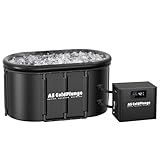
AS ColdPlunge Ice Bath Chiller & Cold Plunge Tub Kit, 1/3HP Cold Plunge Chiller with Built-in Pump & Filter, Upgraded XXL 148Gal Ice Pod, Cold Plunge Tub with Water Chiller for Cold Therapy Recovery
-
EFFORTLESS COOLING: PLUG IN, SET TEMP, AND ENJOY PROFESSIONAL-GRADE RECOVERY.
-
LOW MAINTENANCE: BUILT-IN PUMP AND FILTER KEEP YOUR WATER CLEAN AND FRESH.
-
ENHANCED DESIGN: UPGRADED TUB WITH INSULATED LID KEEPS WATER COLD LONGER.
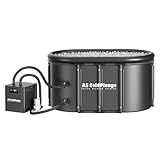
AS ColdPlunge Ice Bath Chiller & Cold Plunge Tub Kit, 1/3HP Cold Plunge Chiller with External Pump & Filter, XXL 148Gal Upgraded Ice Pod, Cold Plunge Tub with Water Chiller for Cold Therapy Recovery
- HASSLE-FREE COLD THERAPY: NO ICE NEEDED, JUST SET & ENJOY!
- RAPID COOLING TO 42°F WITH SMART LED CONTROL FOR PRECISE TEMPS.
- REINFORCED DESIGN KEEPS WATER CLEAN & COLD FOR LASTING RECOVERY.
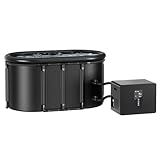
Ice Bath Chiller & Cold Plunge Tub Kit, 1/3HP Cold Plunge Chiller with Built-in Pump & Filter, 148Gal Insulated Ice Bath Tub for Cold Therapy, Recovery, Muscle Relaxation & Wellness at Home
- HASSLE-FREE COLD PLUNGE: NO ICE NEEDED, JUST PLUG IN AND ENJOY!
- SMART COOLING: MAINTAINS 42° WITH ENERGY-EFFICIENT TEMP CONTROL.
- DURABLE DESIGN: INSULATED TUB KEEPS WATER COLD FOR LONG SESSIONS.

1/3HP Ice Bath Chiller & 100 Gallon Portable Cold Plunge Tub Kit with External Filter Pump – Inflatable Ice Pod with Lid for Athletic Recovery and Home Wellness
- FAST MUSCLE RECOVERY WITH 42°F COOLING POWER-IDEAL FOR ATHLETES.
- EASY-MAINTENANCE FILTER KEEPS WATER CRYSTAL CLEAR AND HYGIENIC.
- XL INSULATED TUB RETAINS COLD FOR 4+ HOURS-MAX COMFORT GUARANTEED!
1/3 HP Ice Bath Chiller & Cold Plunge Tub Kit, Cold Plunge Chiller with Built-in Pump & Filter, 148Gal Ice Plunge Tub, XXL Ice Pod, Cold Plunge Tub with Water Chiller for Athlete Cold Therapy
- RAPID COOLING TO 42°F-PERFECT FOR QUICK RECOVERY!
- EASY SETUP WITH BUILT-IN FILTER FOR CLEAN, CLEAR WATER!
- SMART TOUCHSCREEN-CUSTOMIZE AND MAINTAIN YOUR IDEAL TEMP!
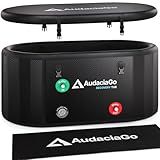
XXL Ice Bath Tub for Athletes, Compatible with Water Chillers, 216-Gallon Inflatable Cold Plunge Tub with Insulated Lid, Thermometer, Water-Absorbent Mat, Portable for Outdoor & Indoor Recovery
- CONNECTS TO CHILLIERS: SAVE ON ICE COSTS WITH EASY CHILLER CONNECTION!
- SPACIOUS ICE BATH: XL DESIGN ENSURES FULL BODY IMMERSION FOR COMFORT.
- FAST SETUP & PORTABLE: INFLATE IN UNDER 5 MINS; READY FOR THERAPY ANYWHERE!
Building a DIY cold plunge tub can be a fun and rewarding project for any individual interested in hydrotherapy or cold therapy. Here is an overview of the general steps involved:
- Planning: Begin by deciding on the location and size of your cold plunge tub. Consider factors such as available space, access to water supply, and drainage options. It is advisable to sketch out a rough design and take measurements before proceeding.
- Material selection: Determine the material you want to use for constructing the tub. Options include wood, concrete, or metal. Each material has its own advantages and disadvantages, so choose according to your preferences and budget.
- Construction: Start by building the frame or base of the tub using your chosen material. Ensure that it is sturdy and level. Next, build the walls or sides of the tub, making sure they are securely attached to the base. If using wood, seal it properly to protect against water damage.
- Insulation: To maintain a consistent temperature, consider adding insulation to your cold plunge tub. You can use foam boards or insulation materials around the walls and base. This step is particularly important if you plan to use the tub outdoors or in colder climates.
- Waterproofing: To prevent leaks, it is crucial to waterproof your tub. Apply a waterproof sealer or use a pond liner to line the interior of the tub. Make sure all seams, joints, and connections are sealed properly to avoid any water leakage.
- Plumbing: Install a water supply and drainage system for your tub. Consult a professional plumber or research online for detailed instructions specific to your chosen design and materials. Consider including a filter or water circulation system if desired.
- Finishing touches: Once the construction and plumbing are complete, add any finishing touches you prefer, such as tiling the interior walls or adding steps for easy entry and exit from the tub.
- Maintenance: After completing your cold plunge tub, establish a regular maintenance routine. This may include cleaning the tub, checking for any leaks or damage, and treating the water with appropriate chemicals or natural alternatives to keep it clean and hygienic.
Keep in mind that building a cold plunge tub requires some DIY skills and knowledge. Ensure you follow all safety guidelines and, if needed, consult with professionals or experts in plumbing, construction, or hydrotherapy.
Pools and Hot Tubs
How to frame the walls of a cold plunge tub?
Framing the walls of a cold plunge tub requires a few steps, materials, and tools. Here's a step-by-step guide to help you:
Materials and Tools:
- Pressure-treated lumber (2x4 or 2x6)
- Circular saw or miter saw
- Hammer
- Nails or screws
- Carpenter's square
- Level
- Tape measure
- Safety glasses and gloves
- Wood preservative or waterproofing sealer
Step 1: Measure and Plan Measure the dimensions of your cold plunge tub and determine the size and layout of the walls. This will help you calculate the amount of lumber needed. Take into account the desired height and any additional features, such as benches or shelving.
Step 2: Cut Lumber Using a circular saw or miter saw, cut the pressure-treated lumber pieces to the correct length and height based on your measurements. Make sure to wear safety glasses and gloves while cutting.
Step 3: Frame the Walls Start by laying out the bottom plate. Attach the pressure-treated lumber horizontally, following the shape and dimensions of the tub. Use a level and carpenter's square to ensure the walls are plumb and square.
Next, attach the vertical studs to the bottom plate, evenly spaced apart. Position them securely using nails or screws. Measure and cut the top plate to fit across the studs, attaching them firmly.
Step 4: Reinforce the Corners To strengthen the walls, add corner studs. These can be cut to fit from a 2x4 piece of lumber. Secure them in each corner using nails or screws. This will help prevent the walls from shifting or wobbling.
Step 5: Add Cross Bracing For added structural support, install cross braces between the studs. Measure and cut pieces of pressure-treated lumber to fit between the studs diagonally, making an 'X' shape. Attach them securely with nails or screws.
Step 6: Apply Wood Preservative As cold plunge tubs are prone to moisture exposure, it's important to apply a wood preservative or waterproofing sealer on the pressure-treated lumber. Follow the manufacturer's instructions to protect the wood from rotting or deteriorating.
Step 7: Install Benches or Shelving (Optional) If you plan to have benches or shelving inside the cold plunge tub, frame them using the same techniques described above. Ensure they are securely attached to the walls for stability.
Remember to consult any applicable building codes or regulations in your area before constructing the cold plunge tub walls. It's also recommended to consult with a professional if you're unsure about any of the steps involved.
How to install the tub liner for a DIY cold plunge tub?
Installing a tub liner for a DIY cold plunge tub can be a straightforward process if you follow the steps below:
- Measure the dimensions: Start by measuring the interior dimensions of your tub, including the length, width, and depth. Ensure you have accurate measurements to purchase the correct tub liner size.
- Purchase a tub liner: Look for tub liners that are specifically designed for cold plunge tubs and are made of durable materials such as high-density polyethylene (HDPE) or PVC. These materials are resistant to chemicals and temperature changes commonly found in cold plunge tubs.
- Prepare the tub: Clean the tub thoroughly to remove any dirt, debris, or residue. Ensure the surface is dry and free from any moisture before proceeding to the liner installation.
- Trim the tub liner: Unroll the tub liner and place it inside the tub, making sure it covers the entire interior. Mark any excess material that needs to be trimmed off to fit the tub perfectly. Use a pair of scissors or a utility knife to trim the liner to the desired size.
- Apply adhesive (optional): While some tub liners come with an adhesive coating, others require the application of a liquid adhesive for proper bonding. Follow the manufacturer's instructions to apply the adhesive to the tub's interior surface or the back of the liner.
- Insert and position the liner: Gently place the tub liner into the tub, starting from one end and gradually working your way to the other side. Press it firmly against the sides and bottom to ensure a secure fit. Smooth out any wrinkles or air bubbles by running your hand over the liner.
- Trim access holes: If your cold plunge tub has pre-cut access holes for plumbing or drains, carefully cut through the tub liner using a utility knife or sharp scissors. Ensure the holes align perfectly with the tub's fittings.
- Finish the installation: Once the liner is in place, give it a final inspection to make sure it covers the entire tub without any gaps or loose edges. If necessary, trim any loose edges to ensure a clean and neat appearance.
- Test the tub: Fill the tub with water to check for any leaks or improper fitting. Allow the water to sit for a few hours to ensure the liner is watertight.
Following these steps will help you install a tub liner for your DIY cold plunge tub effectively. Remember to always read and follow the manufacturer's instructions specific to the liner you have purchased.
What alternative options are there for heating a cold plunge tub?
There are several alternative options for heating a cold plunge tub:
- Electric immersion heater: This is a simple and convenient option where an electric immersion heater is placed directly into the water to heat it up. It's important to ensure the heater is designed for submersion and follows all safety guidelines.
- Propane or natural gas heater: These types of heaters are commonly used for hot tubs and can also be utilized for heating a cold plunge tub. They provide quick and efficient heating, but proper ventilation is essential when using gas heaters.
- Wood-burning stove or heater: This traditional and environmentally friendly option involves using a wood-burning stove or heater specifically designed for water heating. It can be an elegant and cozy solution, but requires regular stoking and maintenance.
- Solar heating panels: If you have access to ample sunlight, solar heating panels can be installed to harness the sun's energy and heat the water. This option is eco-friendly and cost-effective in the long run, although it may take longer to heat the tub compared to other methods.
- Heat exchange system: This system utilizes the waste heat generated by another source, such as a hot tub or pool heater. The heat is transferred through a heat exchanger to warm up the water in the cold plunge tub. This option is efficient and can be relatively inexpensive to set up.
Remember to consider factors such as cost, installation requirements, maintenance, and your personal preferences when choosing the most suitable alternative option for heating your cold plunge tub.
How to create a sturdy foundation for a cold plunge tub?
Creating a sturdy foundation for a cold plunge tub requires careful planning and proper construction techniques. Here are the steps to create a solid foundation:
- Choose a suitable location: Select a spot in your yard with good drainage to avoid water accumulation underneath the tub. Ensure the area is level and free from any obstructions.
- Excavate the area: Dig a hole in the chosen location that is slightly larger than the dimensions of the cold plunge tub. The depth should be enough to accommodate the tub and allow for a solid base.
- Create a leveled base: After excavation, ensure the bottom of the hole is level. Use a shovel and a level to achieve a flat and even surface. You can also use a gravel or sand layer to improve stability.
- Lay a concrete pad: Pour a concrete slab in the excavated area to create a sturdy base for the cold plunge tub. Calculate the amount of concrete needed based on the tub's dimensions and the depth of the slab (typically 4-6 inches). Use a concrete mix and follow the manufacturer's instructions for proper mixing and pouring.
- Reinforce the concrete: Strengthen the concrete slab by placing a steel mesh or rebar reinforcement within the concrete as it is poured. This will add strength and prevent cracking over time.
- Allow the concrete to cure: Concrete takes time to fully cure and attain its maximum strength. Follow the curing guidelines provided by the manufacturer, which usually involve covering the concrete with a plastic sheet and keeping it damp for several days.
- Install a waterproofing membrane: To protect the concrete foundation, consider applying a waterproofing membrane. This will minimize the risk of water damage and extend the lifespan of the foundation.
- Place the cold plunge tub: Once the concrete has fully cured and the waterproofing membrane is applied, carefully place the cold plunge tub onto the foundation. Ensure it is level and secure, following the manufacturer's installation guidelines.
- Test the tub and enjoy: Fill up the cold plunge tub with water to test for any leaks or issues. Once everything is in order, you can enjoy the benefits of your sturdy foundation and cold plunge tub.
Remember to refer to any specific instructions from the cold plunge tub manufacturer as the installation process may vary depending on the model and design.
How to install a water supply line for a cold plunge tub?
Installing a water supply line for a cold plunge tub can be done by following these steps:
- Planning and preparation: Begin by determining the location where you want to install the cold plunge tub and the path the water supply line will need to take from the main water supply. Take into consideration any obstacles, such as walls or floors that may require drilling or cutting.
- Gather the necessary materials: You will need a water supply line, typically made of copper or PVC, along with appropriate fittings, such as valves and connectors. You will also need a wrench, pipe cutter or hacksaw, Teflon tape, and waterproof sealant.
- Shut off the water supply: Locate the main water shut-off valve, usually found near the water meter or inside your home. Turn it clockwise to shut off the water supply to your house.
- Measure and cut the water supply line: Measure the distance from the main water supply to the cold plunge tub's location. Use a pipe cutter or hacksaw to cut the water supply line to the appropriate length. Cut the pipe cleanly and ensure there are no burrs or rough edges.
- Attach the fittings: Install onto the ends of the water supply line. Use a wrench to tighten the fittings securely. Apply Teflon tape to the threads of the fittings to create a watertight seal.
- Connect the water supply line: Connect one end of the water supply line to the main water supply. Use a wrench to tighten the connection. If necessary, use a reducer or adapter to ensure a proper fit.
- Install shut-off valves: Install shut-off valves near the cold plunge tub. These valves will allow you to control the water supply to the tub. Use a wrench to tighten the valves securely.
- Waterproofing: Apply waterproof sealant or silicone caulk around any openings or connectors to prevent leaks. Allow the sealant to dry completely before turning on the water.
- Turn on the water supply: Once you have completed the installation, turn on the main water supply and check for any leaks. If there are any leaks, tighten the fittings or shut-off valves further.
- Test the water supply line: Fill the cold plunge tub with water to ensure that the supply line is functioning properly and there are no leaks.
By following these steps, you should be able to install a water supply line for a cold plunge tub successfully. However, if you are unsure or uncomfortable with such installation, it is recommended to hire a professional plumber to ensure everything is done correctly and minimize the risk of damage or leaks.
What is the estimated cost of building a DIY cold plunge tub?
The cost of building a DIY cold plunge tub can vary depending on several factors such as the materials used, size, and desired features. On average, the estimated cost can range from $500 to $2000. Here is a breakdown of potential expenses:
- Structural Material: Depending on your design, you may require materials such as lumber, concrete, or metal. The cost may vary, but expect to spend around $200 to $800.
- Waterproof Liner: A waterproof liner is essential to prevent leakage. The cost of the liner can vary based on the size but typically ranges from $100 to $300.
- Insulation: Insulating your cold plunge tub is recommended to maintain a consistent temperature. The cost of insulation materials can vary, but estimates range from $100 to $300.
- Plumbing: If you plan to connect the tub to a water supply and drain, you'll need plumbing materials such as pipes, valves, and fittings. The expense for plumbing can be around $100 to $300.
- Filtration System: A filtration system helps keep the water clean. The cost depends on the type and quality of the system, but approximately $200 to $500 should cover it.
- Accessories: Optional features like jets, lighting, or digital controls can add to the cost. These can range from $100 to $500 depending on your preferences.
Remember that these estimates are approximate and may vary depending on your specific requirements, location, and the market price of materials. It is advisable to research prices in your area and create a detailed budget before starting your DIY project.