Best Bulb Planters to Buy in July 2026
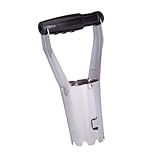
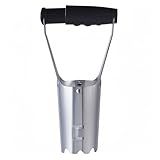
Edward Tools Bulb Planter - Bend Free Tool for Planting Bulbs, Depth Marker for More consistent Planting Tulips, Daffodils, Dahlias (Assorted)
- QUICK PLANTING WITH AUTOMATIC SOIL RELEASE MECHANISM!
- DURABLE REINFORCED STEEL FOR EASY DIGGING IN TOUGH SOILS.
- DEPTH MARKER ENSURES CONSISTENT BULB PLANTING EVERY TIME!


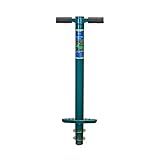
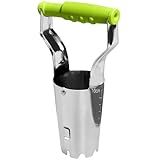
ProPlugger 5-in-1 Planting Tool - Sod Plugger, Bulb and Flower Planter
-
EFFORTLESS PLANTING: STAND COMFORTABLY AND PLANT IN SECONDS.
-
VERSATILE TOOL: PERFECT FOR BULBS, VEGETABLES, AND MORE GARDEN TASKS.
-
DURABLE & GUARANTEED: MADE IN THE USA WITH A 100% SATISFACTION PROMISE.
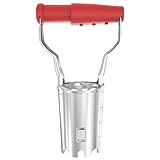
Colwelt Bulb Planter Tool Long Handle, Serrated Base Gardening Bulb Transplanter with Soft Grip, Heavy Duty Long Handled Bulb Planter Sod Plugger for Digging Holes to Plant Tulips, Iris, Daffodils
-
EFFORTLESS PLANTING: STEP, TWIST, AND PULL FOR QUICK, EASY HOLES!
-
COMFORTABLE DESIGN: LONG HANDLE FOR PLANTING WITHOUT BENDING OVER!
-
DURABLE & RELIABLE: HEAVY-DUTY STEEL ENSURES YEARS OF GARDENING USE!
Toresano Bulb Planter, Bulbs Transplanter Designed for Automatic Soil Release with Depth Marker for Dgging Holes and Planting Tool for Tulips, Daffodils, Dahlias
-
HEAVY-DUTY STEEL DESIGN: PREVENTS BENDING FOR EFFORTLESS DIGGING IN TOUGH SOIL.
-
DURABLE CONSTRUCTION: HIGH-HARDNESS MATERIALS ENSURE LONG-LASTING USE AND STRENGTH.
-
PRECISE DEPTH CONTROL: CLEARLY MARKED SCALE GUARANTEES UNIFORM PLANTING DEPTH EVERY TIME.
FLORA GUARD Bulb Planter with Depth Markers - Automatic Soil Releasing Seed Bulb Transplanter for Planting/Digging Tulips, Daffodils, Dahlias and More
- ERGONOMIC HANDLES REDUCE STRAIN FOR EFFORTLESS PLANTING EVERY TIME.
- AUTOMATIC SOIL RELEASE: SPEED UP YOUR PLANTING PROCESS EFFICIENTLY.
- LIFETIME WARRANTY ENSURES LASTING QUALITY FOR DEDICATED GARDENERS.
GREBSTK Sturdy Stainless Steel Gardening Bulb Transplanter Tool with Depth Mark and Soil Release Handle for Planting Bulbs
- TIME-SAVING AUTOMATIC SOIL RELEASE FOR EFFORTLESS PLANTING.
- DURABLE STAINLESS STEEL ENSURES LONGEVITY AND RELIABLE PERFORMANCE.
- VERSATILE TOOL FOR BULBS, FLOWERS, AND VEGETABLE GARDENING NEEDS.
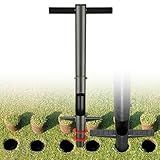
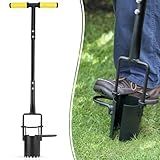
Bulb Planter Tool, 33.5 inch Long Handle Garden Sod Plugger to Dig Hole, Heavy Duty Metal Garden Tools for Soil Test Planting or Weeding Spring Flowers Bulbs,Bedding Plants,Tulips, Lilies, Potato
- ERGONOMIC DESIGN REDUCES FATIGUE, ENHANCING COMFORT DURING GARDENING.
- FOOT PEDAL BOOSTS EFFICIENCY, SAVING TIME AND PHYSICAL EFFORT.
- ADJUSTABLE DEPTH ENSURES OPTIMAL PLANTING FOR BETTER CROP YIELDS.
A [planting](https://ponddoc.com/blog/how-to-use-a-bulb-planter-for-<a class=)-flowers">bulb planter is a gardening tool designed specifically for planting bulbs, such as tulips, daffodils or crocuses. It simplifies the process of creating holes in the ground for the bulbs to be placed in, making bulb planting quick and efficient.
The bulb planter consists of a long handle with a cylindrical-shaped blade attached at the end. The blade has a sharp, pointed tip to penetrate the soil easily. The diameter of the blade is typically slightly larger than the bulbs being planted.
To use a bulb planter, first, choose the planting location in your garden. Make sure the soil is well-drained and suitable for the specific bulb type you are planting. Holding the handle of the bulb planter firmly, push the pointed end of the blade into the ground. Apply steady pressure and twist the planter slightly, if necessary, to create a hole of sufficient depth according to the bulb's planting instructions.
Once the hole is deep enough, release the pressure on the handle while twisting the bulb planter in the opposite direction. This action causes the soil to fill the blade's hollow cylinder. Gently lift the blade out of the hole, ensuring that the soil inside the cylinder stays intact. This process creates a ready-made hole for your bulb.
With the hole prepared, place the bulb into the hollow cylinder of the bulb planter. Make sure the bulb's base sits securely on the soil surface at the bottom of the hole. Then, carefully push the bulb down into the hole, using the bulb planter as a guide, until the top of the bulb aligns with the ground level.
After planting the bulb, gently lift the bulb planter away from the hole. As you lift, the soil within the blade's cylinder should fall back into the hole, covering the bulb completely. Gently press the surrounding soil to secure the bulb in place.
Repeat the process for each bulb you wish to plant. Once completed, water the newly planted bulbs thoroughly. Finally, mark the area where bulbs have been planted, as they may not be visible until they sprout in the following season.
By using a bulb planter, you can save time and effort when it comes to planting bulbs, ensuring they are placed at the correct depth for optimal growth.
What are some troubleshooting tips for common issues with a bulb planter?
Here are some troubleshooting tips for common issues with a bulb planter:
- Difficulty in removing soil plugs: If you are finding it hard to remove soil plugs from the bulb planter, try lubricating the interior of the planter with cooking spray or vegetable oil before using it. This will help the soil plugs slide out more easily.
- Bulbs not planting at the correct depth: If you're having trouble planting bulbs at the appropriate depth, ensure that you are pushing the planter down firmly into the soil. Additionally, make sure you are aware of how deep the specific bulb variety should be planted and adjust accordingly.
- Uneven or irregularly sized holes: If the holes made by your bulb planter are uneven or not uniform in size, this could be due to a dull or damaged cutting edge. Ensure that the cutting edge is sharp and, if needed, sharpen or replace it.
- Bulb planter getting clogged: Sometimes, the bulb planter can get clogged with soil, especially if the soil is too wet or compacted. To avoid this issue, make sure the soil is slightly moist and not overly compacted before using the planter. If clogging occurs, clean the planter periodically by removing any debris or soil from its interior before proceeding.
- Difficulty in locating the correct spot for planting: If you're having trouble determining where to plant the bulbs, mark the spot with a small stake or use biodegradable flags. This will help you accurately position the planter and avoid confusion or multiple plantings in the same area.
- Depth control issues: Some bulb planters come with depth control mechanisms, such as depth markers or adjustable settings. If you're struggling with depth control, refer to the manufacturer's instructions to learn how to use these features properly.
- Inadequate drainage or poor soil quality: If your bulbs are not performing well or struggling to grow, it may be due to poor soil drainage or low soil quality. Ensure that the planting area has good drainage and amend the soil with organic matter, such as compost or peat moss, if needed.
- Insufficient sunlight or water: If your bulbs are not blooming or performing as expected, check if they are receiving the appropriate amount of sunlight and water. Different bulbs have specific sunlight and water requirements, so ensure that you are meeting those needs.
If these troubleshooting tips do not resolve your issues, it may be helpful to consult the user manual or contact the manufacturer for further assistance.
How to maintain proper posture while using a bulb planter?
Maintaining proper posture while using a bulb planter is essential to prevent strain and injury. Here are some tips to help you maintain the correct posture:
- Stand straight: Stand with your feet shoulder-width apart and your weight evenly distributed on both feet. Avoid hunching over or leaning excessively.
- Bend at the knees: When using the bulb planter, bend at the knees instead of bending your back. This helps to engage the larger leg muscles and relieves strain on your back.
- Keep your back straight: Throughout the planting process, ensure that your back remains straight and aligned with your neck. Avoid slouching or rounding your shoulders.
- Use both hands: Use both hands to handle the bulb planter and the bulbs. This helps to distribute the weight evenly and prevents undue strain on one side of the body.
- Lift with your legs: When lifting the bulb planter or soil, utilize your leg muscles to lift, rather than straining your back. Squat down, grab the planter with a firm grip, and use your leg muscles to stand up, keeping your back straight.
- Take regular breaks: If you have a considerable amount of planting to do, take regular breaks to avoid prolonged strain on your muscles. Stretch and walk around to relieve tension.
Remember, maintaining proper posture is crucial not only when using a bulb planter but also during gardening activities in general. By following these tips, you can prevent backaches and injuries, ensuring a comfortable gardening experience.
What is the history behind the invention of bulb planters?
The history of bulb planters dates back to ancient times, where they were used by ancient civilizations for planting bulbs and tubers. The concept of a tool specifically designed for planting bulbs originated from the need to efficiently plant bulbs in the ground without causing damage to them.
The earliest bulb planters were likely simple handheld tools made from wood or bone, with a long handle and a tapered, pointed end for digging holes. These primitive tools enabled early farmers and gardeners to quickly and effectively plant bulbs and tubers without disturbing the soil too much.
As time progressed, advancements were made in terms of materials and design. During the Middle Ages, for example, bulb planters were often made of iron or brass, with a more ergonomic grip. These planters typically had a foot pedal that allowed the user to push the planter into the ground easily, creating a hole for the bulb to be placed.
In the 18th and 19th centuries, as gardening became more popular as a hobby, bulb planters evolved into more sophisticated tools. They started featuring a cylindrical shape with a cutting edge on the bottom to slice through the soil. The handle was constructed to provide leverage, making it easier for gardeners to dig deep holes and plant bulbs.
With the Industrial Revolution, bulb planters began to be mass-produced, making them more affordable and accessible to a wider range of gardeners. Manufacturers started experimenting with different materials, such as steel or cast iron, to make the planters more durable and efficient.
Over time, bulb planters continued to be refined, with improvements in handle design, materials used, and ease of use. Today, bulb planters come in a variety of shapes and sizes, including handheld ones and those that can be attached to power tools. The goal remains the same: to facilitate the efficient planting of bulbs and ensure their proper growth and development.
What are some creative uses for a bulb planter other than planting bulbs?
- Mini herb garden: Use a bulb planter to create small holes for planting individual herb plants. This can be a convenient and organized way to have a mini herb garden indoors or on a patio.
- Seedling starter: Create divots in seedling trays or pots using a bulb planter to sow seeds. This can help provide consistent spacing and depth for seedlings.
- Soil sampler: Use a bulb planter to extract soil samples from different locations in your garden. This can be helpful to assess soil quality, pH levels, or for conducting soil tests.
- Ice cream scoop: Bulb planters with a serrated edge can double as an ice cream scoop. They can create perfect, round portions of ice cream for serving.
- Fruit corer: Similarly, bulb planters with a serrated edge can be used to core and remove the center of fruits like apples or pears.
- Butter or cheese melon baller: Use a bulb planter to scoop out perfectly round portions of butter or cheese for presentation.
- Candle holder: Insert a small candle into the hole created by a bulb planter, creating a unique candle holder.
- Pencil or pen holder: Place a bulb planter with its wider end facing upwards on your desk or workspace to hold pencils, pens, or other stationary items.
- Wine bottle aerator: Invert a bulb planter into the neck of a wine bottle to enhance aeration while pouring. This can help improve the wine's taste and aroma.
- Decorative centerpiece: Fill a bulb planter with colorful stones, sand, or small decorative items to create an eye-catching centerpiece for tables or shelves.
Remember to clean and disinfect the bulb planter thoroughly before repurposing it for non-gardening uses.
How to achieve optimal bulb placement with a bulb planter?
To achieve optimal bulb placement with a bulb planter, follow these steps:
- Choose the right location: Select an area that receives the appropriate amount of sunlight and has well-draining soil. Different bulbs have different light requirements, so ensure you match the plant's needs with the location.
- Prepare the soil: Before using the bulb planter, loosen the soil in the planting area with a garden fork or shovel. Remove any weeds or grass and add organic matter (such as compost) to improve soil fertility and drainage.
- Select the right bulb planter: Bulb planters come in various sizes, shapes, and styles. Choose one that matches the size of the bulbs you are planting and fits comfortably in your hand.
- Dig the hole: Insert the bulb planter into the soil at the desired planting location. Push it down firmly into the soil, using the depth indicators on the planter to ensure the proper depth. Gently twist the planter to create the hole.
- Place the bulb: Drop the bulb into the hole with the pointed end facing up. Make sure you are following the specific planting depth recommended for the bulb plant you are working with.
- Cover the bulb: Remove the bulb planter vertically from the soil, allowing the extracted soil to fall back into the hole, covering the bulb. Be careful not to damage the bulb and ensure it is completely covered with soil.
- Repeat the process: Continue to dig holes using the bulb planter, placing bulbs at the recommended spacing. This will create an evenly spaced and aesthetically pleasing display of flowers.
- Water and mulch: After planting, thoroughly water the area to settle the soil. Applying a layer of mulch helps conserve moisture, suppress weeds, and protect bulbs during extreme weather conditions.
- Monitor and care for bulbs: Regularly check on the bulbs to ensure they are growing properly. Provide adequate water and follow any specific care instructions for the type of plants you have chosen.
By following these steps, you can achieve optimal bulb placement using a bulb planter, promoting healthy growth and a beautiful garden display.