
Best Bulb Planters to Buy in July 2026

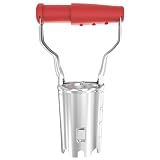
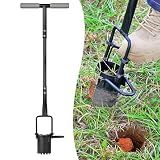
XVBITOR Bulb Planter Tool, Bulb Planter with Depth Markers and Bend Free for Planting Bulbs and Digging, Designed Automatic Soil Releasing Seed for Tulips, Dahlias, Daffodils
- EFFORTLESS PLANTING: SMOOTH SOIL CLEARING FOR QUICK, COMFORTABLE USE.
- DURABLE DESIGN: REINFORCED STEEL ENSURES LONGEVITY AND HANDLES TOUGH SOIL.
- PRECISION DEPTH: CLEAR SCALE FOR CONSISTENT, UNIFORM PLANTING EVERY TIME.


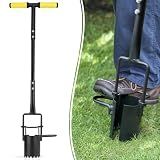
FLORA GUARD Bulb Planter with Depth Markers - Automatic Soil Releasing Seed Bulb Transplanter for Planting/Digging Tulips, Daffodils, Dahlias and More
- ERGONOMIC DESIGN REDUCES STRAIN; DURABLE FOR LONG-LASTING USE.
- EFFORTLESS SOIL RELEASE SPEEDS UP PLANTING FOR EVERY GARDENER.
- VERSATILE TOOL FOR BULBS AND SEEDLINGS, PERFECT FOR ANY GARDEN!
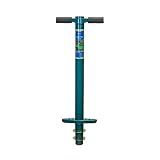
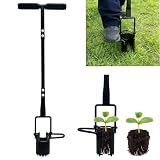
ProPlugger 5-IN-1 Lawn Tool and Garden Tool, Bulb Planter, Weeder, Sod Plugger, Annual Planter, Soil Test
- EFFORTLESS PLANTING: DIG HOLES QUICKLY WHILE STANDING-NO BENDING!
- VERSATILE TOOL: PERFECT FOR BULBS, VEGETABLES, WEEDING, AND MORE.
- DURABLE & COMFORTABLE: BUILT TO LAST WITH ERGONOMIC GRIPS FOR EASE.
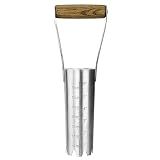
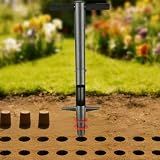
Haliaeetus Bulb Planter Tool, 6 inches Depth Mark Hand Bulb Planter, Non-Bending Stainless Steel Bulb Planter Digger, Garden Bulb Transplanter with Comfortable Wood Handle for Planting Tulip, Daffodil
-
10X EFFICIENCY: PLANT 150 BULBS/HOUR VS. 15 WITH SHOVELS.
-
PRECISE DEPTH: EASY-TO-READ 1-6 INCH MARKS ENSURE PERFECT PLANTING.
-
DURABLE DESIGN: STURDY STAINLESS STEEL RESISTS BENDING AND CORROSION.
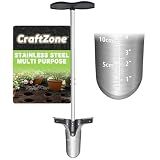
CRAFTZONE Bulb Planter Tool with Long Handle and Foot Pedal Heavy Duty High Carbon Steel Garden Dibber Sod Plugger Cutter for Planting Bulbs Tubers and Lawn Care for Digging Grass Plug Soil Tulips
- COMFORT DESIGN REDUCES STRAIN FOR EXTENDED PLANTING SESSIONS
- STURDY FOOT PEDAL DOUBLES PLANTING SPEED IN SECONDS
- ADJUSTABLE DEPTH CONTROL ENSURES OPTIMAL GERMINATION RATES
Omesata Sod Plugger, Bulb Planter with Long Handle and Serrated Base Garden Tool, Bulb Transplanter Also Grass Plug Tool for Digging Holes to Plant Tulips, Iris, Daffodils
-
EFFORTLESSLY PLANT BULBS WITH SHARP, SERRATED BASE FOR ROCKY SOILS.
-
5-IN-1 TOOL LETS YOU PLANT FROM A STANDING POSITION, REDUCING STRAIN.
-
DURABLE, HIGH-QUALITY DESIGN ENSURES STABILITY AND LONG-LASTING USE.
Colwelt Bulb Planter Tool Long Handle, Serrated Base Gardening Bulb Transplanter with Soft Grip, Heavy Duty Long Handled Bulb Planter Sod Plugger for Digging Holes to Plant Tulips, Iris, Daffodils
- EFFORTLESS PLANTING: STEP, TWIST, AND PULL FOR EASY BULB PLACEMENT!
- LONG HANDLE DESIGN: PLANT FROM A STANDING POSITION, NO BENDING REQUIRED.
- DURABLE AND RELIABLE: HEAVY-DUTY STEEL ENSURES YEARS OF USE.
Saxhexx Bulb Planter Tool Long Handle Bulb Planting Tool with Serrated Base Proplugger Garden Hole Digger for Plants Flower Seedling Transplanter Bulb Planters for Iris, Daffodils,Tulip Planter
-
DURABLE DESIGN: HEAVY-DUTY STEEL WITH RUST RESISTANCE FOR LONGEVITY.
-
EFFICIENT DIGGING: SAWTOOTH BOTTOM AND FOOT PEDAL ENHANCE SOIL PENETRATION.
-
ERGONOMIC COMFORT: LONG HANDLE AND ANTI-SLIP GRIP REDUCE STRAIN WHILE PLANTING.
DIOVPLX Bulb Planter Tool, 33.5" Long Handle Sod Plugger for Standing Planting, 2"/4"/6" Adjustable Depth Garden Hole Digger, Heavy Duty Auto Eject Lawn Plugger for Flower Bulbs,Grass Plugs,Seedlings
- AUTOMATED SOIL EJECTION FOR EFFORTLESS PLANTING SUCCESS!
- ERGONOMIC 33.5-INCH HANDLE: NO MORE BACK STRAIN!
- CUSTOMIZE PLANTING DEPTHS FOR OPTIMAL GROWTH RESULTS!
Jardineer 2PCS Bulb Planter Tools Set, Long Handle Garden Transplanter and Small Bulb Planting Tool with Deep Marker, Ideal for Planting Bulbs, Seedlings, Flowers & Vegetables
-
EFFORTLESS SOIL PENETRATION FOR CLEAN HOLES; PROTECT YOUR ROOTS!
-
DURABLE STAINLESS STEEL DESIGN OUTLASTS FLIMSY PLASTIC TOOLS.
-
ERGONOMIC GRIP REDUCES STRAIN; PERFECT FOR ALL GARDENERS.
Planting multiple bulbs close together with a bulb planter is a simple and efficient way to create beautiful flower beds or add color to your garden. Here's a step-by-step guide on how to do it:
- Prepare the soil: Choose a suitable location in your garden that receives adequate sunlight and has well-drained soil. Remove any weeds or debris from the area and ensure the soil is loose and fertile.
- Select the bulbs: Choose the type of bulbs you want to plant. Bulbs such as tulips, daffodils, or crocuses work well for mass planting.
- Measure the spacing: Consider the recommended spacing for the specific bulbs you have chosen. This information can usually be found on the packaging or obtained from a trusted gardening resource. Measure the spacing using a ruler or measuring tape, ensuring the distance meets the requirements for the bulbs you're planting.
- Use a bulb planter: A bulb planter is a specialized garden tool designed to make planting bulbs easier. It typically consists of a long handle with a cylindrical metal or plastic attachment at the end. Insert the bulb planter into the soil at the desired planting location, using the measurements determined earlier.
- Dig the hole: Push the bulb planter into the ground using a twisting motion. This will cut through the soil and create a hole for the bulbs. Continue twisting and pushing until the hole is deep enough to accommodate the bulbs.
- Plant the bulbs: Once the hole is prepared, drop the bulbs into the hole, ensuring they are placed at the appropriate depth as specified by the bulb's instructions. The top of the bulb should generally be positioned at a consistent depth, regardless of the type of bulb.
- Cover and firm the soil: After placing the bulbs in the hole, gently push the soil from the planter back into the hole around the bulbs. Use the bulb planter to gently compact the soil, ensuring the bulbs are securely planted. This step helps to prevent air pockets and stabilize the bulbs.
- Repeat the process: Continue using the bulb planter to dig additional holes for the remaining bulbs, making sure to maintain the desired spacing between each hole. Repeat steps 5 to 7 until all the bulbs are planted.
- Water and care: Finally, give the newly planted bulbs a thorough watering to settle the soil and promote root growth. Follow any additional care instructions specific to the bulbs you've planted, such as providing adequate water during the growing season and applying fertilizer if needed.
By planting bulbs close together with a bulb planter, you can create a stunning display of flowers that will brighten up your garden and provide a beautiful focal point. Enjoy the process of watching your bulbs transform into vibrant blooms!
How to prevent bulb rot or disease when using a bulb planter?
To prevent bulb rot or disease when using a bulb planter, here are some steps you can follow:
- Choose healthy bulbs: Select bulbs that are firm, plump, and free from any signs of decay or damage. Avoid bulbs that feel squishy or have moldy patches.
- Prepare a well-drained soil: Bulbs are more prone to rot in soil that retains excessive moisture. Improve the drainage of the planting area by incorporating organic matter, such as compost or well-rotted manure, into the soil.
- Ensure proper depth: Bulbs should be planted at the recommended depth according to the specific plant variety. Planting too deep may lead to poor root development and increased susceptibility to rot. Most bulbs require a planting depth of two to three times their height.
- Use proper planting techniques: When using a bulb planter, make sure to follow the instructions to ensure precise depth and avoid damaging the bulb. Place the bulb in the hole created by the planter and gently press it down to eliminate air pockets.
- Add bulb compost or fungicide: Before placing the bulb in the hole, you can dust or dip it in a bulb compost or fungicide solution. These products help protect the bulb against rot-causing organisms and can aid in root development.
- Avoid overwatering: Bulbs generally require a moderate amount of water during their growth period. However, excessive moisture can lead to bulb rot. Water the bulbs immediately after planting and then only water when the soil is dry to the touch.
- Maintain proper spacing: Avoid overcrowding the bulbs since this can increase the likelihood of disease. Follow the recommended spacing guidelines for the chosen bulb variety.
- Remove decaying foliage: After the bulbs have finished flowering, allow the foliage to die back naturally. Once the leaves have turned yellow and withered, gently remove them, being careful not to damage the bulbs. This helps prevent disease from spreading from the foliage back to the bulb.
By following these precautions, you can minimize the chances of bulb rot or disease and increase the success rate of your bulb plantings.
How deep should the bulb planter go into the soil?
The bulb planter should go into the soil to a depth that allows the bulb to be planted at the recommended depth for the specific type of bulb. Generally, bulbs should be planted at a depth that is about two to three times their diameter. However, it is best to refer to the specific planting instructions provided by the bulb manufacturer for the most accurate depth requirement.
What is the lifespan of a bulb planter?
The lifespan of a bulb planter can vary depending on the quality of the materials used and how well it is cared for. A good quality bulb planter that is well maintained can last for several years or even decades. However, if a bulb planter is made of lower quality materials or not properly cleaned and stored after each use, its lifespan may be shorter.
How to plant multiple bulbs close together with a bulb planter?
Planting multiple bulbs close together with a bulb planter can create a beautiful and dense display of flowers. Here's a step-by-step guide to doing it:
- Prepare the soil: Choose a suitable spot in your garden or flower bed that receives adequate sunlight and has well-drained soil. Remove any weeds or stones from the area and ensure the soil is loose and easy to work with.
- Measure and mark the planting area: Decide the spacing you want between the bulbs based on their recommended planting distance. For example, if the recommended spacing is 4 inches, measure and mark the planting locations accordingly.
- Consider bulb depth: Most bulbs require being planted at a specific depth. Check the bulb packaging or do some research to determine the depth for the specific bulbs you are planting. Typically, larger bulbs are planted deeper than smaller ones.
- Insert the bulb planter: Using the bulb planter, push it into the soil at the marked location. Twist it slightly to create a hole deep enough for the bulb(s) you are planting. Make sure the bulb planter goes down to the desired depth.
- Place the bulbs: Put one or multiple bulbs (as recommended for that specific type) into the hole created by the bulb planter. The pointed end or shoot should be facing upward. If you are planting multiple bulbs, make sure they do not touch each other or the sides of the hole.
- Cover the bulbs: Once the bulbs are in place, carefully remove the bulb planter from the soil, leaving the bulbs in the hole. Use your hands or a small garden trowel to cover the bulbs with soil, gently firming it down to eliminate any air pockets.
- Repeat the process: Move on to the next marked spot and repeat steps 4 to 6 until all the bulbs have been planted. Remember to maintain the recommended spacing between each bulb.
- Water and mulch: After planting, give the area a thorough watering to help settle the soil and provide moisture to the bulbs. Applying a layer of mulch over the planted area can help retain moisture and suppress weed growth.
- Regular care: Monitor the bulbs' progress and provide regular care as needed, such as watering and fertilizing according to the specific requirements of the bulb types you have planted.
By following these steps, you can efficiently plant multiple bulbs close together using a bulb planter, ensuring a stunning display of flowers in your garden.
What is the benefit of planting bulbs closer together?
Planting bulbs closer together can provide several benefits:
- Greater visual impact: Planting bulbs closer together creates a denser display of flowers, resulting in a more impactful and visually stunning garden. This can be particularly effective for smaller spaces or when trying to create a more concentrated burst of color.
- Increased color saturation: Planting bulbs closer together allows for a more vibrant and saturated display of colors. The intensity of the blooms is enhanced when they are grouped closely, which can create a more striking and eye-catching effect.
- Fuller and more natural appearance: When bulbs are planted closer together, the foliage and flowers grow more densely, creating a fuller and more natural-looking garden bed. This can help create a lush and abundant appearance, mimicking the look of wildflower meadows.
- Suppresses weed growth: Planting bulbs closer together can also help suppress the growth of weeds. The dense growth of the bulbs and their foliage shades the soil, making it difficult for weed seeds to receive sufficient sunlight to germinate. This can save time and effort in weed control.
- Efficient use of space: Planting bulbs closer together allows for a more efficient use of space. This is especially useful in smaller gardens or containers, where maximizing the number of blooms in a limited area is desired. It also allows for more bulbs to be planted in a given flowerbed, resulting in a greater variety and more diverse display of flowers.
It is important to consider the specific needs and requirements of each bulb variety before planting them close together, as some bulbs may require more space to grow and spread properly.