
Best Outdoor Ceiling Fans to Buy in July 2026
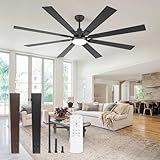
ZMISHIBO 72 inch Large Ceiling Fans with Lights and Remote, Indoor/Outdoor Black Modern Ceiling Fan for Kitchen Living Room Patio, 6 Speed Reversible Quiet DC Motor, 3 CCT, Dual Finish 8 Blades
- VERSATILE FOR BOTH LOW AND HIGH CEILINGS WITH INCLUDED DOWN RODS.
- ENJOY YEAR-ROUND COMFORT WITH 6-SPEED REVERSIBLE FAN CONTROL.
- MULTI-FUNCTION REMOTE FOR EASY ADJUSTMENTS AND LIGHT SETTINGS.


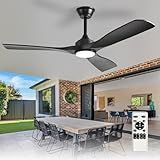
Depuley 52-Inch Ceiling Fan with Light: Black 3 Blade Outdoor Fans for Patios - Dimmable Indoor Fan with Remote Control Living Room Fandelier Ceiling Fans Ultra Quiet DC Motor Reversible 6 Speed Timer
- WHISPER-QUIET DC MOTOR FOR PEACEFUL LIVING SPACES
- DIMMABLE LED LIGHT: STYLE AND COMFORT ALL YEAR ROUND
- VERSATILE DESIGN FITS ANY ROOM DECOR EFFORTLESSLY
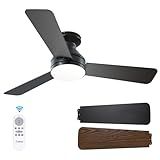
Amico Ceiling Fans with Lights, 42 inch Low Profile Ceiling fan with Light and Remote Control, Flush Mount, Reversible, 3CCT, Dimmable, Noiseless, Black Ceiling Fan for Bedroom, Indoor/Outdoor Use
- STYLISH & EFFICIENT: ENHANCE DECOR WITH 80% LESS ENERGY USAGE.
- REMOTE CONTROL CONVENIENCE: ADJUST SETTINGS WITH EASE FOR ULTIMATE COMFORT.
- QUIET PERFORMANCE: ENJOY SERENE SPACES, IDEAL FOR FAMILIES WITH CHILDREN.
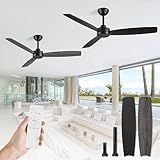
ZMISHIBO 2 Pack 52 Inch Outdoor Ceiling Fans with Remote, Black Ceiling Fan No light with Quiet Reversible DC Motor, 6 Speeds, 3 Blade Modern Ceiling Fans for Patio Living Room Bedroom Indoor
- VERSATILE INDOOR/OUTDOOR USE: PERFECT FOR ANY ROOM OR COVERED PATIO!
- STYLISH DOUBLE-SIDED BLADES: MODERN AND CHIC DESIGN FOR EVERY DECOR.
- QUIET, POWERFUL PERFORMANCE: ENERGY-EFFICIENT WITH LOW NOISE FOR PEACEFUL LIVING.
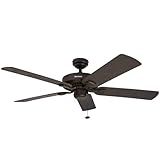
Honeywell Ceiling Fans Belmar 52 Inch Ceiling Fan Without Light, Outdoor Ceiling Fan with Pull Chain, Tri-Mount Traditional 5 Blade Design, ETL Wet Rated, Bronze (50199-01)
-
EFFICIENT COOLING FOR SMALL ROOMS UP TO 100 SQ. FT.
-
EASY CONTROL WITH DUAL PULL CHAINS FOR LIGHT AND SPEED.
-
SLEEK, MODERN DESIGN WITH VERSATILE FINISHES FOR ANY DECOR.
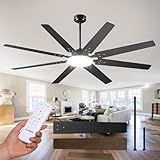
Fanbulous 65 Inch Ceiling Fans with Lights and Remote, Black Indoor/Outdoor Ceiling Fan with Quiet Reversible DC Motor, 6 Speeds, 3CCT, 8 Blades Large Ceiling Fan for Living Room Bedroom Patio
-
ELEGANT DESIGN: STYLISH DUAL-COLOR BLADES FIT MODERN & FARMHOUSE DECOR.
-
CUSTOMIZABLE COMFORT: 6 WIND SPEEDS & 3 COLOR TEMPS FOR PERFECT AMBIANCE.
-
ENERGY EFFICIENT: WHISPER-QUIET MOTOR SAVES ENERGY WHILE ENSURING COMFORT.
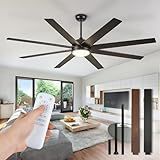
72 inch Ceiling Fans with Lights,Large Ceiling Fan with Light and Remote Control, Dimmable, 3CCT, Quiet, Black Modern Ceiling fan For Living Room, Bedroom, Kitchen, Patio, Farmhouse, Indoor/Outdoor
-
ENERGY-EFFICIENT DESIGN SAVES 80% ELECTRICITY COMPARED TO TRADITIONAL FANS.
-
WHISPER-QUIET OPERATION AT JUST 35 DECIBELS FOR UNDISTURBED RELAXATION.
-
CUSTOMIZABLE LIGHT SETTINGS WITH MEMORY FUNCTION FOR EVERY OCCASION.
Yes, ceiling fans can be used outdoors, but it's essential to choose fans specifically designed for outdoor use. Outdoor ceiling fans are built to withstand various weather conditions, including moisture and temperature fluctuations. They are typically categorized as either "damp-rated" or "wet-rated." Damp-rated fans are suitable for covered outdoor spaces like porches or patios where they are not directly exposed to rain or snow but may still encounter humidity. Wet-rated fans, on the other hand, are designed to endure direct exposure to water, making them suitable for uncovered areas or locations where heavy rain is possible. Using a standard indoor ceiling fan outdoors is not advisable as it can lead to malfunction or safety hazards due to exposure to the elements.
What is the most reliable brand for outdoor ceiling fans?
When selecting a reliable brand for outdoor ceiling fans, several factors such as durability, build quality, design, and customer reviews should be considered. Some of the most reputable and reliable brands in this space include:
- Hunter: Known for its long history and expertise in fan manufacturing, Hunter offers a wide range of outdoor ceiling fans that are durable and stylish.
- Minka-Aire: This brand is praised for its innovative designs and high-quality finishes. Minka-Aire fans often combine form and function effectively.
- Casablanca: A subsidiary of Hunter, Casablanca fans are renowned for their premium quality and timeless design.
- Emerson: Known for sturdy construction and powerful motors, Emerson fans are a solid choice for outdoor settings.
- Fanimation: This brand offers unique designs and reliable performance, with fans that are often suitable for various outdoor conditions.
- Westinghouse: Providing a balance between affordability and quality, Westinghouse offers outdoor ceiling fans that are functional and well-built.
It's essential to look for models specifically rated for outdoor use, such as damp-rated or wet-rated fans, depending on their exposure to the elements. Checking customer reviews and ratings online, as well as warranties provided by the manufacturer, can also help ensure you choose a reliable outdoor ceiling fan.
What is the ideal location for installing outdoor ceiling fans?
The ideal location for installing outdoor ceiling fans involves several considerations, including protection from the elements, air circulation needs, and aesthetics. Here are some key factors to consider when choosing a location:
- Covered Areas: Install the fan in a covered area, such as a porch, patio, gazebo, or pergola. This ensures that the fan is sheltered from direct exposure to rain and harsh weather, which can extend its lifespan and ensure safety.
- Adequate Ceiling Height: Ensure the ceiling is high enough to accommodate the fan. Ideally, there should be at least 7-9 feet from the floor to the fan blades to avoid accidents and ensure efficient air circulation.
- Proper Clearance: Ensure there is enough clearance from walls and any obstructions. Generally, the fan blades should be at least 18-24 inches away from the walls and any objects to allow for optimal air circulation.
- Electrical Access: Choose a location with existing electrical wiring or where it is feasible to install wiring for the fan. Ensuring easy access to electricity can simplify the installation process.
- Weather Ratings: Consider the fan’s weather rating for the specific location. Wet-rated fans are suitable for areas exposed to rain and moisture, while damp-rated fans are ideal for covered outdoor areas where they are not directly exposed to water.
- Aesthetic Considerations: The fan should complement the outdoor décor and not obstruct any views or architectural features that you wish to highlight.
- Functionality: Place the fan in areas where people are likely to gather and benefit from air circulation, such as dining or seating areas.
By considering these factors, you can choose the best location for your outdoor ceiling fan, ensuring both functionality and longevity.
How to ensure outdoor ceiling fan safety?
Ensuring the safety of an outdoor ceiling fan involves several considerations, from installation and maintenance to selecting the appropriate fan for your specific outdoor environment. Here are some key steps to ensure safety:
- Choose the Right Fan: Wet-Rated or Damp-Rated: Make sure the fan is specifically designed for outdoor use. "Wet-rated" fans can withstand direct exposure to rain, while "damp-rated" fans can handle some moisture but need to be placed in covered areas like porches or patios. Material Consideration: Opt for fans made with materials resistant to rust and wear, such as stainless steel or specially coated metals.
- Proper Installation: Professional Installation: Consider hiring a licensed electrician to install the fan, ensuring it is properly grounded and wired. Secure Mounting: Use a ceiling box rated for fan support. It should be securely fastened to a joist capable of supporting the fan's weight. Correct Clearance and Height: Ensure there is ample clearance between the fan blades and the ceiling, and maintain at least 7 feet between the blades and the floor.
- Regular Maintenance: Routine Inspections: Check the fan periodically for signs of wear or damage, particularly before and after heavy weather conditions. Tighten Screws and Bolts: Regularly ensure all screws and mounting bolts are tight to prevent wobbling or detachment. Clean Blades and Motor Housing: Remove any dirt or debris that could affect the fan’s performance.
- Monitor Environmental Factors: Secure in High Winds: If you live in an area prone to strong winds, consider additional securing measures, such as longer downrods, to avoid excessive movement. Protection from the Elements: For longer life and added safety, consider installing the fan in a sheltered area.
- Electrical Safety: Use Outdoor-Rated Wiring: Ensure all wiring and electrical components are rated for outdoor use, protecting them from moisture and temperature changes. Weatherproof Controls: Consider using remote controls or wall switches designed for outdoor environments.
- Safety Features: Auto Shutoff: Some fans come with an automatic shutoff feature when an obstruction is detected. Balanced Blades: Make sure the blades are balanced to minimize vibrations and potential wear.
By following these guidelines, you can ensure that your outdoor ceiling fan operates safely and efficiently, providing comfort for years to come.
What is the lifespan of an outdoor ceiling fan?
The lifespan of an outdoor ceiling fan can vary depending on several factors, including the quality of the fan, the environment in which it is installed, and how well it is maintained. On average, a good-quality outdoor ceiling fan can last anywhere from 10 to 15 years. However, those exposed to harsh weather conditions or not regularly maintained might have a shorter lifespan.
To maximize the longevity of an outdoor ceiling fan, consider the following tips:
- Choose a Suitable Fan: Ensure that the fan is rated for outdoor use. Wet-rated fans are suitable for exposed areas, while damp-rated fans can be used in covered outdoor spaces.
- Regular Maintenance: Clean the fan regularly to prevent the buildup of dirt and debris. Check for any loose screws or parts and tighten them as necessary.
- Weather Protection: If the fan is installed in an area prone to harsh weather, consider using a cover when the fan is not in use or during storms.
- Quality Installation: Ensure that the fan is properly installed, with all electrical components protected from moisture.
By following these guidelines, you can help extend the life of your outdoor ceiling fan.
How to install an outdoor ceiling fan?
Installing an outdoor ceiling fan can be a great way to enhance the comfort and usability of outdoor living spaces. Here's a general guide to help you through the installation process. Note that the specifics can vary depending on the fan model, so always consult the manufacturer's instructions provided with your fan. Additionally, if you're not comfortable with electrical work, consider hiring a professional.
Tools and Materials Needed:
- Outdoor ceiling fan
- Ladder
- Screwdriver (Phillips and flat head)
- Wire cutters/strippers
- Voltage tester
- Circuit tester
- Pliers
- Ceiling fan-rated electrical box
- Drill and drill bits (if needed)
- Electrical tape
- Wire nuts
- Safety glasses
Steps:
- Turn Off Power: Before beginning, turn off the power at the circuit breaker to the area where you'll be working. Use a circuit tester to ensure the power is off.
- Remove the Existing Fixture (if applicable): If you are replacing an existing light fixture or fan, carefully remove it by detaching any screws and disconnecting the wiring. Use your voltage tester to ensure wires are not active.
- Install the Electrical Box: Ensure that you have a ceiling fan-rated electrical box. Standard light fixture boxes may not support the weight and movement of a fan. Install the box according to the manufacturer's instructions. Make sure it is securely attached to a ceiling joist or another strong support structure.
- Assemble the Fan: Partially assemble the fan on the ground before hanging it. This often includes attaching the downrod to the motor housing and threading the wires through the downrod. Check the manufacturer's instructions for specific assembly steps.
- Mount the Bracket: Use screws to attach the mounting bracket to the electrical box. Ensure it's level and secure as it will support the entire fan.
- Wire the Fan: Hang the fan’s motor onto the mounting bracket (sometimes a temporary hook is provided for this purpose). Connect the fan wires to the house wires, typically matching white to white (neutral), black to black (hot), and green or bare copper to the ground wire. Use wire nuts to secure the connections, and wrap them with electrical tape for added security. Follow the fan's wiring schematic.
- Attach Fan Blades: Secure the fan blades to the motor using the screws provided. Make sure each blade is tightly fastened.
- Attach the Lighting Fixture (if applicable): If your fan includes a light kit, follow the manufacturer's instructions to attach it and wire it appropriately.
- Test the Installation: Restore power to the circuit. Test your fan and light (if applicable) by turning it on to ensure everything is functioning properly.
- Final Checks: Make sure the fan is operating smoothly without any wobble or noise. If necessary, balance the blades using a balancing kit that may be provided with the fan.
Safety Tips:
- Always make sure that the power is off before starting any electrical work.
- Use a sturdy ladder and have a partner assist you if possible.
- Ensure that any wiring connections are properly insulated to prevent electrical hazards.
If you encounter any issues or feel unsure at any stage, it's best to consult or hire a licensed electrician to complete the installation.