
Best Ceiling Fans with Light to Buy in July 2026
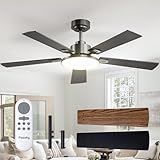
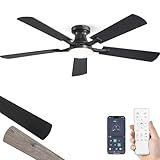
Passky Ceiling Fans with Lights, 52 inch Sleek Ceiling Fan with Light and Remote Control, 3CCT, Dimmable, Reversible, Noiseless, Black Ceiling Fan for Bedroom, Living Room
- ENERGY EFFICIENT: SAVE 80% ON ELECTRICITY WITH ADVANCED TECHNOLOGY.
- CUSTOM COMFORT: DIMMABLE LIGHTS & 6-SPEED SETTINGS FOR PERFECT AMBIANCE.
- WHISPER QUIET: ENJOY PEACEFUL AIRFLOW AT JUST 35DB FOR RESTFUL SLEEP.


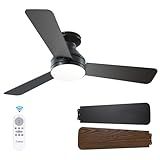
Amico Ceiling Fans with Lights, 42 inch Low Profile Ceiling Fan with Light and Remote Control, Flush Mount, Reversible, 3CCT, Dimmable, Noiseless, Black Ceiling Fan for Bedroom, Indoor/Outdoor Use
- ENERGY-EFFICIENT FAN SAVES 80% ELECTRICITY; ECO-FRIENDLY CHOICE!
- REMOTE CONTROL FOR EASY OPERATION: 6 SPEEDS, LIGHT OPTIONS & TIMERS.
- MEMORY FUNCTION REMEMBERS YOUR LAST SETTINGS FOR ULTIMATE CONVENIENCE!
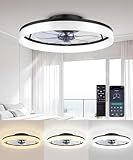
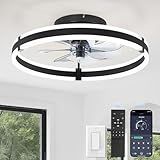
AQUBT Ceiling Fans with Lights and Remote, 20" Modern Low Profile Ceiling Fan with Light, Stepless Color Temperature Change and 6 Speeds for Bedroom, Kids Room and Living Room (Black)
- CONTROL VIA REMOTE & APP: EFFORTLESS SETTINGS FROM ANY ANGLE.
- STEPLESS DIMMING: CUSTOMIZE BRIGHTNESS FROM COZY TO BRIGHT.
- SILENT 6-SPEED FAN: ENJOY A SOFT BREEZE WITHOUT DISTRACTIONS.
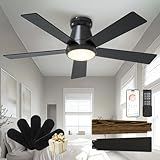
CubiCubi Ceiling Fans with Lights, 42 Inch Low Profile Ceiling Fan with Light and Remote/APP Control, Flush Mount, Stepless Dimmable, 6 Speeds, Quiet, LED Smart Ceiling Fans for Indoor Bedroom, Black
-
VERSATILE RETRO DESIGN: FITS MODERN AND FARMHOUSE DECORS EFFORTLESSLY.
-
SMART CONTROLS: MANAGE FAN AND LIGHT SETTINGS VIA REMOTE OR APP.
-
ENERGY EFFICIENT: REDUCES ENERGY LOSS BY UP TO 80% WITH HIGH AIRFLOW.
ZMISHIBO Ceiling Fans with Lights and Remote, 19.7'' Low Profile Ceiling Fan, 3000-6000K Dimmable Modern Flush Mount LED Fan Light, 6 Wind Speeds, Black Fandelier Ceiling Fans for Bedroom
- SMART CONTROL: CONTROL FANS AND LIGHTS VIA APP OR REMOTE EFFORTLESSLY.
- ENERGY EFFICIENT: ENJOY 2200LM BRIGHTNESS WITH LOW ENERGY CONSUMPTION.
- WHISPER-QUIET: POWERFUL AIRFLOW WITHOUT NOISE; IDEAL FOR ANY SETTING.
ZMISHIBO 52 Inch Ceiling Fan with Light, App&Remote Control, Flush Mount Low Profile, Dimmable 20W LED Light, Quiet Reversible Motor for Bedroom, Living Room, Apartment, Black
- IDEAL FOR ANY ROOM: PERFECT 52 FAN FOR SPACIOUS LIVING AREAS.
- SMART CONTROLS: APP & REMOTE, DIMMABLE, AND CUSTOMIZABLE LIGHT SETTINGS.
- YEAR-ROUND COMFORT: REVERSIBLE BLADES FOR SUMMER COOLING AND WINTER WARMTH.
Installing a ceiling fan with a light can be a simple and rewarding process. Here is a step-by-step guide on how to install one:
- Turn off the power: Start by turning off the electricity to the room from the circuit breaker to ensure safety during installation.
- Assemble the fan: Begin by assembling the ceiling fan according to the manufacturer's instructions. This typically involves attaching the blades, light fixture, and other elements to the fan base.
- Prepare the ceiling: If there was no previous fixture, you will need to install a ceiling fan-rated electrical box. Secure the box to the ceiling joist using screws. For an existing light fixture, remove it carefully and disconnect any electrical connections.
- Attach the mounting bracket: Connect the fan's mounting bracket to the electrical box using screws. Ensure it is securely tightened.
- Connect the wires: Match the wires from the fan to the corresponding wires coming out of the electrical box. Connect the black (hot) wire from the fan to the black wire from the box, the white (neutral) wire from the fan to the white wire from the box, and the green or copper (ground) wire from the fan to the ground wire or screw on the electrical box.
- Secure the fan: Lift the fan and hook it onto the mounting bracket. Rotate the fan until it locks into place. Check that all connections are secure and tight.
- Install the light fixture: If the ceiling fan has a light, follow the manufacturer's instructions to connect and secure it to the fan. This may involve attaching a light kit or fixture using screws or other provided hardware.
- Install the fan blades: Attach the fan blades onto the motor housing, ensuring they are tightened securely following the instructions provided by the manufacturer.
- Test the installation: Before closing everything up, turn the power back on and test the fan and light to ensure they are working correctly.
Remember, it is important to read and follow the instructions provided by the ceiling fan manufacturer, as installation steps may vary depending on the model and brand. Additionally, if you are unsure about any electrical connections, it is advisable to consult a professional electrician.
What is the proper wiring color coding for a ceiling fan with light?
The proper color coding for wiring a ceiling fan with light typically follows this standard:
- Green or bare copper wire: This wire is the grounding wire and should be connected to the grounding screw on the mounting bracket or fan.
- White wire: This wire is the neutral wire and should be connected to the white neutral wire in the ceiling electrical box.
- Black wire: This wire is the hot wire for the fan and should be connected to the black (or red) wire in the ceiling electrical box.
- Blue wire (if applicable): This wire is specifically for the light kit and should be connected to the blue wire (or other switched hot wire) in the ceiling electrical box.
Note: The exact wire colors may vary depending on your specific fan and electrical box. Always refer to the manufacturer's instructions for the correct wiring configuration.
How to find the electrical source for installing a ceiling fan with light?
To find the electrical source for installing a ceiling fan with light, you should follow these steps:
- Turn off the power: Before starting any electrical work, ensure that you turn off the power to the room or area where you plan to install the ceiling fan. Locate the corresponding circuit breaker in your electrical panel and switch it off. You can also use a non-contact voltage tester to confirm that the power is off.
- Select the location: Determine the specific location where you want to install the ceiling fan. This should be on a ceiling joist or a specially reinforced area capable of supporting the weight of the fan.
- Check for existing wiring: Examine the ceiling to find if there is any existing electrical wiring in the vicinity of where you plan to install the fan. Look for electrical boxes or wires protruding from the ceiling. If you find any, it is likely that these are the sources you can utilize for the fan.
- Use a stud finder: If you don't see any obvious electrical sources, you can use a stud finder to locate a ceiling joist. Ceiling fans require a secure anchor point, so it is essential to mount them to a joist. Once you locate a joist, your electrical source is likely to be nearby.
- Determine the wiring type: Determine whether the existing wiring is appropriate for a ceiling fan with a light. Regular light fixture wiring may not be suitable for the additional load a ceiling fan carries. You might require a reinforced or specialized electrical box that can support a fan.
- Consult an electrician if necessary: If you're unsure or uncomfortable working with electrical wiring, it is advisable to consult a licensed electrician. They will be able to identify the electrical source, assess the wiring situation, and safely install the ceiling fan with light if needed.
Remember to always prioritize safety when working with electricity and follow any building or electrical codes in your area.
How to select the right size downrod for a ceiling fan with light?
To select the right size downrod for a ceiling fan with a light, follow these steps:
- Measure the height from the ceiling to the floor in the room where the fan will be installed.
- Determine the optimal hanging height for the fan. A general guideline is to have the blades of the fan at least 7 feet above the floor.
- Subtract the optimal hanging height from the ceiling-to-floor measurement. This will give you the minimum recommended downrod length.
- Consider any special circumstances that might require a longer downrod. For example, if the ceiling is sloped or vaulted, you may need a longer downrod to ensure proper clearance.
- Compare the minimum recommended downrod length with the available downrod options provided by the fan manufacturer. Choose the closest size to the minimum recommended length. For example, if the minimum recommended length is 6 inches, choose a downrod that is at least 6 inches long.
- Make sure the downrod is compatible with your specific fan model. Check the fan's instructions or consult with the manufacturer to ensure the downrod is the correct size and style for your fan.
By following these steps, you can select the right size downrod for your ceiling fan with a light, ensuring proper installation and optimal performance.
How to test the wiring connections of a ceiling fan with light?
To test the wiring connections of a ceiling fan with light, follow these steps:
- Turn off the power: Before starting any electrical work, turn off the power to the circuit that powers the ceiling fan at the circuit breaker or fuse box.
- Remove the fan/light cover: Unscrew and remove the cover of the ceiling fan to access the wiring connections.
- Examine the junction box: Inside the junction box, where the ceiling fan is mounted, there will be several wires. Identify the wires coming from the breaker and those going to the fan and light.
- Verify the connections: First, ensure that all connections are tight and secure. Check that the wires are properly connected following the fan manufacturer's instructions.
- Use a voltage tester: With the power still off, use a voltage tester to check if there is any live electricity present in the wires. Touch the tester leads to the wire connections-black tester lead to the black wire, and red tester lead to the white wire. If the voltage tester lights up or beeps, it means there is still live electricity present, indicating that the power is not turned off at the breaker or fuse box.
- Test the fan and light: Turn the power back on, and test the fan and light to check if they are working correctly. Ensure that the fan rotates smoothly and that the light turns on and off as intended. If there are any issues, such as the fan not spinning or the light flickering or not working, it may indicate a wiring problem that needs to be addressed.
- Double-check the wiring: If the fan and light are not working correctly, double-check the wiring connections to ensure they are properly matched and secure. Refer to the fan's installation instructions or consult a professional if needed.
- Turn off the power: Once you have finished testing and made any necessary corrections, turn off the power again before reassembling the fan and cover. This ensures your safety during the final installation process.
Note: If you are unsure about any step or encounter unexpected issues, it is recommended to consult a qualified electrician for assistance.
What is the purpose of a pull chain on a ceiling fan with light?
The purpose of a pull chain on a ceiling fan with a light is to control the operation and settings of the fan and light. By pulling the chain, you can turn the fan on/off, adjust its speed, and control the lighting. It provides a convenient way to control and customize the comfort and illumination provided by the ceiling fan.
How to connect the electrical wires for a ceiling fan with light?
To connect the electrical wires for a ceiling fan with light, follow these steps:
- Turn off the power: Locate the circuit breaker for the room and switch it off to ensure there is no electricity flowing to the wires you will be working with.
- Gather the necessary tools: You will need a screwdriver, wire connectors, electrical tape, wire cutters, and a voltage tester.
- Remove the old fixture: Remove any existing light fixture, disconnecting the wires and set it aside.
- Check the wiring: Make sure your electrical box is properly wired and compatible with a ceiling fan. It should be sufficient to handle the extra weight and motion of the fan.
- Identify the wires: Carefully identify the wires you will be working with. Most ceiling fans will have a black (hot), white (neutral), green or bare copper (ground), and sometimes a blue wire (for the light).
- Connect the ground wire: Attach the green or bare copper wire from the ceiling fan to the bare copper or green wire in the electrical box using a wire connector. Secure it tightly.
- Connect the white wire: Connect the white wire from the ceiling fan to the white wire in the electrical box using a wire connector. Again, make sure it is tightly secured.
- Connect the black wire: If there is a separate wire for the fan motor and the light, connect the black wire from the ceiling fan to the black (hot) wire in the electrical box for the fan motor. Use a wire connector to connect them securely.
- Connect the blue wire: If your ceiling fan has a separate wire for the light, connect the blue wire from the ceiling fan to the black (hot) wire in the electrical box for the light. Use a wire connector to connect them securely.
- Double-check connections: Ensure all connections are tight and secure by gently tugging on the wires.
- Tuck the wires: Carefully tuck the wires into the electrical box and make sure the fan motor and light fixture are properly aligned and secured to the ceiling.
- Install the fan and light: Follow the manufacturer's instructions to install the ceiling fan with light. Usually, this involves attaching the fan blades and light fixtures using screws provided.
- Restore power: Once everything is securely in place, turn the circuit breaker back on and test the ceiling fan and light to ensure they are functioning properly.
It is important to note that if you are not familiar or confident with electrical work, it is recommended to hire a licensed electrician to ensure a safe and correct installation.