
Best Ceiling Fans to Buy in July 2026
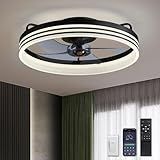
LUDOMIDE Ceiling Fans with Lights, Flush Mount Ceiling Fan with Lights and Remote, 6 Wind Speeds Smart Low Profile Ceiling Fan for Bedroom, Kids Room and Living Room 20" (Black)
- ENJOY CUSTOMIZABLE COMFORT WITH 6 WIND SPEEDS & REVERSIBLE AIRFLOW.
- VERSATILE LIGHTING: DIMMABLE LED WITH 3 COLOR MODES & APP CONTROL.
- CONVENIENT TIMER AND MEMORY FUNCTIONS FOR EFFORTLESS, SMART USE.


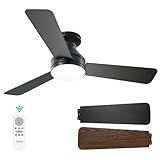
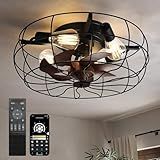
Amico Ceiling Fans with Lights, 42 inch Low Profile Ceiling fan with Light and Remote Control, Flush Mount, Reversible, 3CCT, Dimmable, Noiseless, Black Ceiling Fan for Bedroom, Indoor/Outdoor Use
-
ENERGY-EFFICIENT FAN REDUCES ELECTRICITY USE BY 80%-SAVE MORE TODAY!
-
CONTROL EVERYTHING WITH A REMOTE: SPEED, LIGHT, & TIMER SETTINGS!
-
SUPER QUIET OPERATION ENSURES A PEACEFUL ENVIRONMENT FOR ALL AGES.
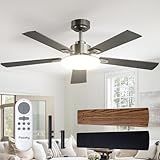
Passky Ceiling Fans with Lights, 52 inch Sleek Ceiling Fan with Light and Remote Control, 3CCT, Dimmable, Reversible, Noiseless, Black Ceiling Fan for Bedroom, Living Room
-
ENERGY-EFFICIENT DESIGN REDUCES ELECTRICITY LOSS BY 80%.
-
REMOTE CONTROL OFFERS 6-SPEED SETTINGS AND ADJUSTABLE BRIGHTNESS.
-
WHISPER-QUIET OPERATION ENSURES A PEACEFUL ENVIRONMENT FOR SLEEP.
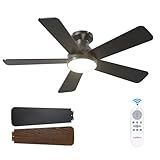
addlon Ceiling Fans with Lights, 42 Inch Low Profile Ceiling Fan with Light and Remote Control, Flush Mount, Reversible, 3CCT, Dimmable, Quiet, Black Small Ceiling Fan for Bedroom Indoor/Outdoor Use
- ENERGY EFFICIENT DESIGN: SAVE 80% ELECTRICITY WITH A-RATED EFFICIENCY.
- SMART FEATURES: REMOTE CONTROL WITH TIMER, MEMORY & DUAL ROTATION.
- QUIET OPERATION: WHISPER-QUIET AT 35DB, PERFECT FOR LIGHT SLEEPERS!
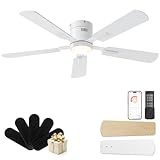
CubiCubi Modern Ceiling Fan with Lights and Remote Control, 52" White Ceiling Fan with APP, LED Fan Light with 3CCT and 6 Wind Speeds, Low Profile Ceiling Fans with Lights for Bedroom, Office
-
STYLISH DESIGN FOR ANY INTERIOR: RETRO AESTHETIC SUITS MODERN & FARMHOUSE DECOR.
-
ULTRA-SILENT COMFORT: ENJOY RESTFUL SLEEP WITH JUST 24DB NOISE LEVEL.
-
SMART CONTROL & CUSTOMIZATION: ADJUST BRIGHTNESS AND COLOR VIA APP OR REMOTE.
CubiCubi Modern Ceiling Fans, 20 Inch Black Ceiling Fan with Lights and Remote Control, APP, Fandelier with 6 Wind Speeds, Low Profile Ceiling Fans with Lights for Bedroom, Office
- QUICK SETUP: INSTALL IN JUST 15 MINUTES WITH NO COMPLEX ASSEMBLY.
- SMART CONTROL: USE REMOTE OR APP TO CUSTOMIZE FAN SPEED AND LIGHTING.
- WHISPER-QUIET: ENJOY 3400 CFM AIRFLOW AT JUST 24 DB NOISE LEVEL.
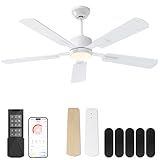
CubiCubi Ceiling Fans with Lights - 52 inch White Ceiling Fan with Light and Remote/APP, Dimmable, Super Quiet, Modern Ceiling Fan for Indoor Bedroom, Living Room, Kitchen
-
STYLISH RETRO DESIGN: TRANSFORM YOUR SPACE WITH DUAL-SIDED BLADES!
-
ULTRA-SILENT OPERATION: ENJOY COOLING COMFORT WITH JUST 24DB NOISE!
-
SMART CONTROL & MEMORY: ADJUST SETTINGS ANYTIME FOR PERSONALIZED COMFORT!

Ceiling Fans with Lights and Remote, 20 Inch White Low Profile Flush Mount Ceiling Fans with 3000-6000K Dimmable and 6 Wind Speeds, Modern Style with APP for Bedroom
-
QUICK 15-MINUTE SETUP: HASSLE-FREE INSTALLATION WITH NO ASSEMBLY NEEDED.
-
SMART CONTROL OPTIONS: REMOTE & APP FOR EFFORTLESS SPEED AND LIGHT ADJUSTMENTS.
-
STYLISH & FUNCTIONAL DESIGN: ELEGANT CRYSTALS ENHANCE DECOR WHILE PROVIDING SUPERIOR AIRFLOW.

ZMISHIBO 72 inch Large Ceiling Fans with Lights and Remote, Indoor/Outdoor Black Modern Ceiling Fan for Kitchen Living Room Patio, 6 Speed Reversible Quiet DC Motor, 3 CCT, Dual Finish 8 Blades
- VERSATILE DESIGN FITS BOTH LOW AND HIGH CEILINGS FOR ANY SPACE.
- 6-SPEED CONTROL OFFERS YEAR-ROUND COMFORT WITH JUST A CLICK.
- SILENT, ENERGY-EFFICIENT MOTOR ENSURES PEACE AND ECO-FRIENDLY USE.
Ceiling fans typically last between 10 to 15 years, although this can vary based on factors such as the quality of the fan, how often it is used, and how well it is maintained. Higher-end fans or those designed for heavy-duty use may last longer, while cheaper models or those subjected to harsher conditions might have a shorter lifespan. Regular maintenance, such as cleaning the blades and ensuring the fan is balanced and properly mounted, can help extend its life.
How to adjust ceiling fan speed settings?
Adjusting the speed settings on a ceiling fan typically depends on the type of controls it has. Here are the common methods:
- Pull Chain: Many traditional ceiling fans have a pull chain hanging from them. To adjust the speed, simply pull the chain: one pull might set it to low speed, two pulls to medium, three pulls to high, and a fourth pull to turn it off.
- Wall Switch: Some ceiling fans are wired to a wall switch that can adjust the speed. These switches often have a slider or buttons labeled with different speed settings (low, medium, high).
- Remote Control: Modern ceiling fans might come with a remote control that has buttons to change speed settings. Make sure the remote has working batteries, then use it to cycle through the speeds.
- Smart Home Integration: If your fan is smart-home compatible, you may be able to adjust speeds via a mobile app or voice command with a virtual assistant like Amazon Alexa or Google Assistant. Follow instructions in the specific app for connecting and controlling the fan.
- Integrated Control Panel: Some ceiling fans come with an integrated control panel at the fan’s base or nearby that allows direct speed adjustments.
If you're having trouble identifying which type of speed control your ceiling fan uses, consult the manufacturer's manual for specific instructions. If you don't have the manual on hand, you might find it online using the model number of your fan.
How to reverse the direction of a ceiling fan?
Reversing the direction of a ceiling fan is a useful feature that allows the fan to help with temperature regulation throughout the year. Typically, ceiling fans have two directions: counterclockwise for summer to create a cooling breeze and clockwise for winter to help circulate warm air. Here’s how you can reverse the direction of your ceiling fan:
- Turn the Fan Off: Ensure that the fan is completely turned off and wait for the blades to come to a complete stop.
- Locate the Direction Switch: Most ceiling fans have a small switch on the motor housing that changes the direction of the blades. This switch might be on the side or hidden under the fan’s light fixture or blade cover.
- Flip the Switch: Once you’ve located the switch, flip it to the opposite position. This will reverse the motor direction, changing the airflow direction.
- Check the Remote or Wall Control: If your fan doesn’t have a manual switch, you may have a remote control or wall control that allows you to reverse the direction electronically. Refer to the fan’s manual if unsure how to use these controls.
- Turn the Fan Back On: After reversing the direction, turn the fan back on at a low speed to ensure it is moving in the desired direction.
- Adjust Settings for Seasonal Use: Summer: Set the fan to rotate counterclockwise at a higher speed. This will create a wind-chill effect that makes the room feel cooler. Winter: Set the fan to rotate clockwise at a low speed. This helps distribute warm air trapped near the ceiling back into the room.
Remember to refer to the manufacturer’s instructions for specific details related to your model, especially if newer or more complex controls are involved.
What is the procedure for installing a ceiling fan on a vaulted ceiling?
Installing a ceiling fan on a vaulted ceiling can be a bit more complex than installing one on a flat ceiling due to the angles and heights involved. However, with the right tools and materials, you can accomplish it. Here's a step-by-step guide to help you through the process:
Tools and Materials Needed:
- Ceiling fan kit with downrod
- Vaulted ceiling adapter (if required)
- Ladder or scaffolding
- Stud finder
- Voltage tester
- Drill and drill bit set
- Screwdriver set
- Wire stripper
- Pliers
- Measuring tape
- Pencil or marker
- Electrical box rated for fan support
- Additional support brace or beam (if needed)
- Wire connectors
- Electrical tape
Procedure:
- Turn Off Power: Cut off power to the circuit where you'll be working, using the breaker box. Use a voltage tester to ensure the power is off.
- Choose Installation Location: Use a stud finder to locate a ceiling joist in the desired fan location. Mark the spot, ensuring it's at an appropriate height to avoid blades hitting the ceiling.
- Install the Electrical Box: Install an electrical box rated for fan support. If there isn't a joist where you want to install the fan, you may need to add a brace or build a frame between joists to mount the electrical box securely.
- Mount the Ceiling Fan Brace: If needed, install a ceiling fan brace that fits between the joists. This will provide additional support for the fan's weight.
- Install the Mounting Bracket: Attach the ceiling fan mounting bracket to the electrical box. If your ceiling fan requires a vaulted ceiling adapter, install it at this point, following the manufacturer’s instructions.
- Assemble the Ceiling Fan: Depending on the fan model, partially assemble the fan on the ground. Attach the downrod to the motor, ensuring that all screws and connections are secure.
- Prepare Wiring: Strip about half an inch of insulation from the wires coming from the ceiling.
- Attach Downrod and Canopy: Feed the wires through the downrod and attach the downrod to the mounting bracket. Secure it as per manufacturer instructions. Attach the canopy to the bracket but don't screw it in completely until the wiring is done.
- Wire the Fan: Connect the wires from the ceiling to the matching wires from the fan (typically black to black, white to white, and green or copper to the grounding wire). Use wire connectors and wrap them with electrical tape for extra safety.
- Secure the Fan: Once wired, push the wire connections into the electrical box carefully. Attach the fan canopy to the mounting bracket securely.
- Attach Fan Blades: Attach the fan blades to the motor, using the screws provided in the installation kit. Ensure all screws are tight to avoid wobbling.
- Attach Light Kit (if applicable): If your fan includes a light kit, connect the light kit wiring as indicated in the manufacturer’s instructions and attach the light fixture to the fan.
- Final Checks: Double-check that all screws and connections are secure and that the fan is balanced. Restore power and test the fan to ensure everything is functioning correctly.
Safety Tips:
- Always have someone assist you when working with ladders or if you need to handle heavy parts.
- Ensure the breaker controlling power to the fan location is turned off before beginning any work.
- If you're uncomfortable with electrical work, consider hiring a professional electrician.
By following these steps carefully, you should be able to successfully install your ceiling fan on a vaulted ceiling.
What is the function of a ceiling fan capacitor?
The function of a ceiling fan capacitor is crucial in ensuring the fan operates correctly. Here are the primary functions of a ceiling fan capacitor:
- Starting the Motor: The capacitor provides the necessary starting torque for the fan's motor. When you turn on a fan, the capacitor helps create a phase shift that generates a rotating magnetic field, which initiates the motor's rotation.
- Speed Regulation: Most ceiling fans have multiple speed settings. The capacitor helps regulate the speed by controlling the voltage and current supplied to the motor. Different capacitance values can adjust the speed of the fan, allowing it to run at high, medium, or low speeds.
- Efficient Operation: By improving the power factor, the capacitor enhances the efficiency of the motor. This results in smoother operation and reduces energy consumption, which can be beneficial for saving electricity and reducing wear on the motor.
If the capacitor is faulty or fails, it can lead to issues like the fan not starting, running only at one speed, or operating inefficiently with a humming noise. Replacing a defective capacitor is often necessary to restore the fan's normal function.