
Best Vacuum Troubleshooting Tools to Buy in July 2026
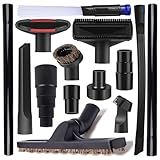
14Pcs Universal Vacuum Attachment Professional Shop Vac Accessories Wet Dry Vacuum Hose Adapter with Hair Brush Extension Wand Flexible Crevice Tool fit 2 1/2" to 1 1/4" and 1 7/8" to 1" Vacuum Hose
- UNIVERSAL FIT FOR MOST VACUUMS: ADAPTERS FOR VARIOUS SIZES AVAILABLE!
- EXTEND YOUR REACH: LONGER WANDS FOR HIGH AND HARD-TO-REACH AREAS!
- ALL-IN-ONE KIT: 14 VERSATILE ATTACHMENTS FOR COMPREHENSIVE CLEANING!


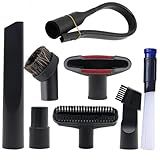
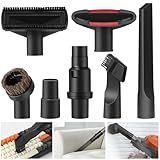
Alrens 1 1/4" Shop Vacuum Cleaner Attachments Brushes for Vac Accessories 1/4 inch 1 3/8 inch, Set of 8
-
FITS STANDARD VACUUMS: 32MM AND 35MM SIZES FOR VERSATILE USE.
-
DURABLE PP MATERIAL ENSURES LONGEVITY AND EFFECTIVE CLEANING.
-
EFFORTLESS INSTALLATION: ATTACH QUICKLY FOR EFFICIENT CLEANING.
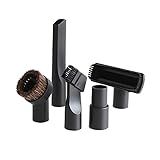
Buysk 32mm Vacuum Attachments Accessories, Vacuum Cleaning Set Brush Nozzle Crevice Tool with 35mm to 32mm Hose Adapter 5pcs
-
DURABLE, HIGH-QUALITY PP MATERIAL ENSURES LONG-LASTING USE AND PORTABILITY.
-
COMPATIBLE WITH 31MM & 34MM VACUUM HANDLES; MEASURE BEFORE PURCHASE!
-
VERSATILE ATTACHMENTS FOR EFFECTIVE CLEANING OF VARIOUS SURFACES AND SPACES.
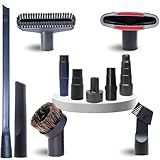
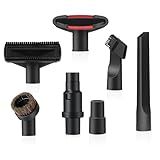
Replacement Vacuum Attachments & Brushes plus Universal Adapter Kit Compatible with Shop Vacs 2-1/4'' 1-7/8'' 1-3/8'' 1-1/4 Inch- Flexible Vacuum Crevice Attachment Tool for Shop Vac Accessories
- FREE VACUUM HOSE ADAPTER KIT WITH PURCHASE ($10.95 VALUE)!
- UNIVERSAL COMPATIBILITY: FITS MOST MAJOR VACUUM BRANDS EASILY!
- FLEXIBLE TOOLS FOR DEEP CLEANING IN HARD-TO-REACH SPOTS!
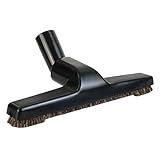
Selgo Upgraded Vacuum Floor Brush for Universal Vacuum Cleaners with 1 ¼ inch (1.25'') (32mm) Inner Diameter with Horse Hair Soft Bristles 10” Wide Black (1 Brush Only)
-
UNIVERSAL FIT: ATTACHES EASILY TO MOST STANDARD VACUUM CLEANERS.
-
GENTLE HORSEHAIR BRISTLES: SAFELY CLEANS DELICATE FLOORS WITHOUT SCRATCHES.
-
EXTRA-WIDE 10” PATH: CLEANS LARGE AREAS QUICKLY, BOOSTING EFFICIENCY.
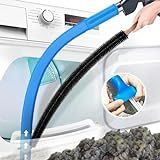
PetOde 2 Pieces Dryer Vent Cleaner Kit Compatible with Most Vacuum Cleaner, Dryer Lint Brush and Vacuum Hose Attachment with Universal Connector, Quickly Lint Remover
-
UNIVERSAL FIT: EASILY CONNECTS TO MOST VACUUM CLEANERS-NO MISMATCHES!
-
VERSATILE CLEANING: EFFECTIVE FOR DRYERS, COILS, RADIATORS, AND TIGHT SPOTS.
-
SAFETY FIRST: REGULAR LINT CLEANING HELPS PREVENT DANGEROUS DRYER FIRES.
1 1/4" (32mm) Vacuum Attachments Compatible with Shark Navigator Lift-Away NV350, NV352, NV360, NV500 NV501, Rocket HV300 HV301 HV322 Series Vacuum, for Home and Automotive Cleaning
-
VERSATILE COMPATIBILITY: FITS SELECT SHARK VACUUMS FOR BROAD USE.
-
MULTI-SURFACE CLEANING: IDEAL FOR FLOORS, CEILINGS, AND DELICATE SURFACES.
-
30-DAY REFUND GUARANTEE: SHOP CONFIDENTLY WITH HASSLE-FREE RETURNS.
Household Cleaning Kit Attachments Vacuum Cleaner Accessories Universal Vacuum Hose Adapters Flexible Crevice Tool for Dryer Lint Vent Trap Cleaner
- VERSATILE KIT: 9 ATTACHMENTS FIT MOST VACUUMS FOR ALL CLEANING NEEDS.
- SAFETY FIRST: PREVENT DRYER FIRES WITH EFFICIENT LINT REMOVAL TOOL.
- EXTENDED REACH: CLEAN HIGH CEILINGS & TIGHT CORNERS WITH EASE!
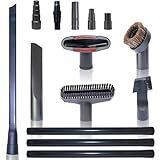
LANMU Vacuum Attachments Compatible with Shark Navigator Lift-Away NV360 NV352 NV356E, NV501 & Rocket HV301 HV322 Vacuum, 1 1/4" Accessories Kit with Adapter for Home, Car Interior Cleaning
-
BROAD COMPATIBILITY: FITS MOST SHARK MODELS FOR VERSATILE USE.
-
VERSATILE TOOLS: CLEAN ALL AREAS EASILY WITH MULTIPLE ATTACHMENT OPTIONS.
-
EFFORTLESS INSTALLATION: QUICKLY SWITCH TOOLS WITHOUT EXTRA TOOLS NEEDED.
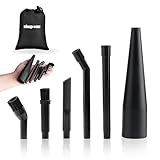
Shop-Vac Micro Cleaning Nozzle Kit, 1-1/4" Detailed-Cleaning Attachments for Compact Wet Dry Shop Vacuum, Storage Bag Included, 6 Pieces
- FEATURES THUMB-SIZED NOZZLES FOR PRECISION CLEANING IN TIGHT SPACES.
- INCLUDES VERSATILE ATTACHMENTS FOR HARD-TO-REACH AREAS AND SURFACES.
- CONVENIENT STORAGE BAG KEEPS ALL TOOLS ORGANIZED AND EASILY ACCESSIBLE.
Loss of suction in a Shark vacuum is a common issue that can be frustrating when trying to clean your home. However, there are a few troubleshooting steps you can take to resolve this problem:
- Check for clogs: Blockages in the vacuum hose, brush roll, or filters can cause loss of suction. Start by inspecting the hose and remove any debris or clogs that may be present. Next, remove the brush roll and clean it thoroughly. Lastly, check and clean or replace the filters as needed.
- Empty the dust cup: An overly full dust cup can restrict airflow and lead to loss of suction. Make sure to empty the dust cup regularly or when it reaches the maximum fill line. Additionally, clean the dust cup and its components to prevent any obstructions.
- Verify proper attachment of parts: Ensure that all parts, including the dust cup, filters, brush roll, and hose, are correctly attached. Loose or improperly secured components can affect suction.
- Replace or clean filters: Over time, filters can become clogged with dirt and debris, hindering suction power. Clean or replace the filters according to the manufacturer's instructions to maintain optimal performance.
- Check for leaks: Inspect the vacuum's hose, connections, and seals for any signs of damage or leaks. If you find any, repair or replace the affected parts to restore proper suction.
- Clean the brush roll: Hair, fibers, and other debris can get tangled around the brush roll, impeding its rotation and reducing suction. Regularly clean the brush roll with scissors or a brush to remove any obstructions.
- Inspect the vacuum belt: If your Shark vacuum has a brush roll belt, it may become stretched or worn out over time. A damaged belt can lead to weak suction. Check the condition of the belt and replace it if necessary, following the manufacturer's instructions.
- Check the airflow control: Some Shark vacuum models have a control feature to adjust suction power. Make sure the airflow control is set to the appropriate level for the surface you are cleaning.
If you have tried these troubleshooting steps and are still experiencing loss of suction, it may be advisable to contact Shark customer support or take the vacuum to a professional for further assistance.
How to ensure there are no obstructions in the intake ports?
To ensure there are no obstructions in the intake ports, you can follow these steps:
- Safety first: Before inspecting or cleaning the intake ports, make sure the equipment is turned off and unplugged to prevent any accidents.
- Locate the intake ports: Depending on the equipment, the intake ports can be found on the front, sides, or back of the device. Look for any obvious grills or openings.
- Visual inspection: Examine the intake ports for any visible debris, dust, or dirt. Use a flashlight if needed. Pay attention to any signs of blockages, such as clogged or obstructed openings.
- Compressed air: If you notice minimal dust or debris in the intake ports, you can use compressed air to blow away any loose particles. Hold the can of compressed air upright and use short bursts to avoid moisture buildup.
- Vacuum cleaner: If the intake ports are heavily clogged, you can use a small handheld vacuum cleaner with a brush attachment to gently remove the debris. Ensure the vacuum is set to a low suction power to avoid damage.
- Soft brush or cloth: For stubborn dust or dirt, you can lightly brush them off using a soft brush or cloth. Be careful not to apply too much pressure to prevent damage to the device.
- Check for obstructions from the inside: In some cases, you may need to open the device (if possible) to access the intake ports from the inside. Use caution and refer to the manufacturer's instructions or seek professional help if necessary.
- Regular maintenance: To prevent future obstructions, make it a habit to clean the intake ports regularly, especially if the equipment is used in dusty or dirty environments. This will help ensure optimal performance and longevity.
Remember, if you are unsure or uncomfortable with performing these steps yourself, it is best to consult the equipment's user manual or contact a professional technician for assistance.
How to inspect the brush roll bristles for wear or damage?
Inspecting the brush roll bristles is essential to ensure optimal performance of your cleaning equipment. Here are step-by-step instructions to help you inspect the brush roll bristles for wear or damage:
- Turn off and unplug the vacuum cleaner: It's essential to disconnect the power source for safety reasons.
- Locate the brush roll: Depending on the vacuum model, the brush roll is typically located underneath the vacuum cleaner head, secured by a fastener or cover.
- Remove any obstructions: Before inspecting the bristles, make sure there are no tangled hairs, threads, or debris wrapped around the brush roll. Use a pair of scissors or a seam ripper to carefully cut through the tangled material and remove it.
- Examine the bristles: Once the brush roll is clear of obstructions, inspect the bristles closely. Look for signs of excessive wear, fraying, or breakage. Pay attention to the bristle length and whether any are shorter or missing entirely.
- Check for stiffness: Gently run your fingers along the bristles to ensure they are not overly stiff, which could indicate damage or old age.
- Replace if necessary: If you notice significant wear, breakage, or stiffness, it's time to replace the brush roll. Most manufacturers provide replacement brush rolls that match their respective vacuum cleaner models.
- Clean the brush roll: If the bristles appear to be in good condition, it's still good practice to regularly clean the brush roll. Use a pair of scissors or a brush to remove any remaining debris, dust, or hair trapped within the bristles.
By following these steps, you can ensure that your vacuum cleaner's brush roll bristles are well-maintained, promoting efficient cleaning and extending the life of your appliance.
How to inspect the seals and gaskets for any damage?
Inspecting seals and gaskets for damage is important to ensure they are functioning properly and preventing leaks. Here's how you can inspect them:
- Visual Inspection: Start by visually inspecting the seals and gaskets for any obvious signs of damage, wear, or aging. Look for cracks, tears, crumbling, or uneven surfaces. Check for discoloration or hardened areas.
- Physical Examination: Gently touch the seals and gaskets to feel for any abnormalities. They should be firm, flexible, and not brittle. Press or squeeze them slightly to determine if they maintain their original shape without deforming or disintegrating.
- Leakage Test: Another effective way to check for damage is to conduct a leakage test. This can be done by pressurizing the area where the seal or gasket is located and observing if any fluid or air leaks out. This can be achieved using specialized equipment or by evaluating the functioning of the system they are a part of.
- Lubrication Check: Some seals and gaskets require a certain level of lubrication to function optimally. Refer to the manufacturer's instructions or consult an expert to determine if lubrication is necessary. If so, check if the lubrication is present and if it has dried out or become contaminated.
- Temperature and Chemical Resistance: Seals and gaskets may come into contact with extreme temperatures or harsh chemicals depending on their application. Make sure to verify if they are designed to withstand these conditions. Check for signs of melting, warping, or degradation due to exposure to high or low temperatures, corrosive fluids, or other environmental factors.
- Regular Maintenance: To prevent damage or failure, it's important to perform regular maintenance according to the manufacturer's recommendations. This may include cleaning, lubrication, replacement after a certain period, or based on usage.
- Replacement: If you identify any damage, leaks, or signs of wear during the inspection, it's crucial to replace the seals or gaskets promptly to avoid potential issues or further damage.
Always remember to exercise caution while inspecting seals and gaskets, as some systems may require professional expertise or specialized tools for examination. When in doubt, consult a technician or expert in the specific field or industry.
What is the recommended method for cleaning intake ports in a Shark vacuum?
The recommended method for cleaning the intake ports in a Shark vacuum is as follows:
- Unplug the vacuum cleaner and turn it off.
- Locate the intake ports, which are usually located on the front or bottom of the vacuum.
- Use a small brush or toothbrush to gently remove any dust, hair, or debris from the intake ports. Be careful not to push the dirt further into the vacuum.
- If the intake ports are clogged and cannot be cleaned with a brush, use a small tool like a toothpick or tweezers to carefully remove any stubborn debris.
- After cleaning the intake ports, use a vacuum cleaner with a hose attachment to suction off any loose dirt or debris from the intake area.
- Once the intake ports are clean, plug in the vacuum cleaner and turn it on to ensure that everything is working properly.
Note: It is important to clean the intake ports regularly to maintain the vacuum's performance and avoid any potential blockage.