
Best Ceiling Fan Maintenance Tools to Buy in July 2026
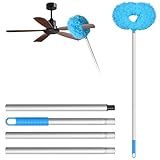
Storystore Ceiling Fan Cleaner Duster with Extension Pole, Adjustable from 13 to 49.7 Inches, Removable Fan Blade Cleaner (Blue)
- CUSTOMIZABLE LENGTHS: EASILY EXTEND FOR HARD-TO-REACH SPOTS.
- REUSABLE MICROFIBER: SOFT, WASHABLE MATERIAL FOR EFFECTIVE CLEANING.
- ALL-ROUND ACCESS: TRIANGULAR DESIGN CLEANS EVERY CORNER EFFORTLESSLY.


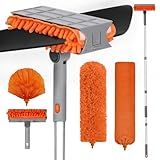
Blade Maid Ceiling Fan Blade Cleaner & Flexible Dusting Brush | Extendable Pole for High Ceilings, Reusable Microfiber Pads, Wall Duster, Removes Cobwebs| Size 3 feet (Pack of 1)
- EXTENDED REACH: EASILY CLEAN HIGH CEILINGS AND HARD-TO-REACH AREAS.
- UNIQUE MICROFIBER SLEEVE: GRIPS FAN BLADES FOR EFFECTIVE DUST REMOVAL.
- MACHINE WASHABLE: REUSABLE PADS PROVIDE LONG-LASTING CLEANING POWER.
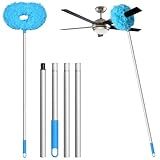
Ceiling Fan Cleaner Duster with 72‘’ Extendable Long Handle Cleaning Duster Kit, Reusable Chenille & Microfiber Mop Head for High Ceiling Fan Blade Wall Blinds Cobweb
-
VERSATILE CLEANING TOOL: EASILY TACKLE FANS, WALLS, AND HARD-TO-REACH AREAS.
-
6FT ADJUSTABLE HANDLE: CLEAN HIGH SPOTS EFFORTLESSLY WITH A CUSTOMIZABLE REACH.
-
ECO-FRIENDLY PADS: REUSABLE, WASHABLE MICROFIBER PADS FOR SUSTAINABLE CLEANING.
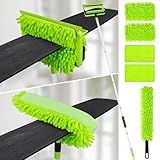
Ceiling Fan Cleaner Duster with 75'' Extension Pole, Flexible High Ceiling Fan Blades Cleaning Tool, Reusable Skinny Duster for Tight Spaces
-
EFFORTLESS CLEANING: NO LADDERS NEEDED; CLEAN HIGH FANS SAFELY AND EASILY!
-
MULTI-PURPOSE TOOL: VERSATILE DESIGN CLEANS FANS, WALLS, AND FLOORS EFFICIENTLY.
-
WASHABLE & REPLACEABLE: ECO-FRIENDLY REFILLS KEEP CLEANING TOOLS LIKE NEW!

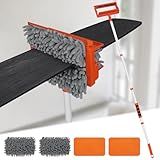
Zavrski Ceiling Fan Cleaner Duster with 6 Ft/72'' Extension Pole High Ceiling Fan Blade Cleaning Tool Microfiber Duster Reusable Pads for Cleaning Ceiling Fan, Baseboard, Blind, Cobweb, Molding
- REACH EVERY CORNER WITH 6FT HANDLE – NO LADDER NEEDED!
- MAGNETIZE DUST AWAY: CLEAN IN ONE SMOOTH MOTION!
- REUSABLE MICROFIBER PADS: ECO-FRIENDLY & MACHINE WASHABLE!
Qaestfy Ceiling Fan Cleaner Duster with 62.5‘’ Extendable Long Handle Ceiling Fan Blade Cleaning Tool, Reusable Chenille & Microfiber Mop Head for Dusting Ceiling Fan Baseboard Wall Floor
- CLEAN FANS EFFORTLESSLY-NO LADDER NEEDED, SAFE FOR ALL SURFACES!
- 62.5’’ LONG HANDLE REACHES HIGH SPOTS AND SPIDER WEBS EASILY.
- MACHINE-WASHABLE REFILLS AVAILABLE FOR ECO-FRIENDLY, COST-SAVING USE!
Eunice 13-49.7 Inches Ceiling Fan Duster with Extension Pole, Adjustable and Removable Cleaner Blade for High Ceiling, Fan Cleaner for Window Door Furniture (Blue)
-
ADJUSTABLE LENGTH: CLEAN HARD-TO-REACH AREAS WITH EXTENDABLE POLES (13-49.7).
-
ECO-FRIENDLY: REUSABLE AND WASHABLE BROOM HEAD FOR COST-EFFECTIVE CLEANING.
-
DURABLE DESIGN: BUILT TO LAST; STRONG MATERIALS ENSURE LONG-TERM USAGE.
Ceiling fans are a common and convenient way to cool and ventilate a room. However, a noisy fan can be quite annoying and disruptive. Here are some methods to help stop a ceiling fan from making noise:
- Tighten the screws: Start by checking the screws on the motor assembly, blade brackets, and down rod. Over time, these screws may become loose, resulting in vibrations and noise. Use a screwdriver to tighten any loose screws.
- Balance the blades: Imbalanced blades can cause the fan to sway and produce noise. To balance the blades, use a balancing kit (which usually comes with the fan) or a blade balancing clip. Attach the kit or clip to the top of the blades one by one until you find a balance where the fan operates quietly.
- Clean the fan: Accumulated dust and debris can affect the smooth operation of the fan, leading to noise. Turn off the fan and clean the blades, motor assembly, and other parts using a damp cloth or a soft brush. Make sure to remove any dirt and dust buildup, as well as any loose debris that may be causing the noise.
- Lubricate the fan: Lack of lubrication can cause the motor and other moving parts to make noise. Consult the manufacturer's instructions to identify the specific points that require lubrication. Typically, you'll need to add a few drops of lubricating oil to the motor, bearing, and shaft. Be cautious not to over-lubricate, as it can attract more dust and debris.
- Check for loose accessories: Loose light fixtures, globes, or other accessories can cause rattling and noise. Ensure that all accessories and attachments are securely fastened and tightened.
- Inspect the down rod: If the fan is attached to a down rod, examine it for any bends or defects. If you notice any damage, consider replacing the down rod as it can cause the fan to be unbalanced and noisy.
- Install rubber or cork pads: Placing rubber or cork pads between the fan mounting brackets and the ceiling can help reduce vibrations and noise transmission. These pads act as dampeners and absorb the sound generated by the fan.
- Upgrade to a high-quality fan: If the noise problem persists even after trying the above steps, it may be worth investing in a higher-quality ceiling fan. Cheaper fans tend to have poorer construction and inferior components, making them more prone to noise issues. Select a fan from a reputed brand known for producing quieter models.
Remember, if you're unsure about any of the steps or have concerns about your fan's maintenance, it's always recommended to consult the manufacturer's instructions or seek professional assistance.
What is the proper way to clean a ceiling fan to reduce noise?
To clean a ceiling fan and reduce noise, follow these steps:
- Turn off the fan: Ensure that the fan is turned off and the blades have come to a complete stop before starting the cleaning process.
- Prepare cleaning tools: Gather a ladder, a microfiber cloth or a duster, a vacuum cleaner with a brush attachment, a screwdriver (if necessary), and a cleaning solution such as mild dish soap diluted in water or a non-abrasive cleaner.
- Dust the blades: Use a microfiber cloth or a duster to gently wipe away the dust from the fan blades. Make sure to cover both sides of each blade.
- Vacuum the blades: Attach the brush attachment to your vacuum cleaner and run it along the blades to remove any remaining dust. This will help improve the airflow and reduce noise caused by dust buildup over time.
- Clean the motor housing: If your fan has a visible motor housing, use a damp cloth or a sponge with a mild cleaning solution to wipe it down carefully. Avoid excessive moisture on the motor and electrical components.
- Check and tighten screws: Sometimes loose screws can contribute to noise. Inspect the fan's screws, especially where the blades attach to the motor housing. Use a screwdriver to tighten any loose screws, if necessary.
- Lubricate if needed: If your fan still makes noise after cleaning, it might need lubrication. Refer to the manufacturer's instructions to identify the oiling points, if any, and use a few drops of lubricating oil recommended for ceiling fans.
- Test the fan: After cleaning, turn the fan back on and observe if the noise has been reduced. If not, consider checking the fan's balance or contacting the manufacturer for further assistance.
Remember to always prioritize safety when working with a ladder or electrical appliances.
What is the effect of dust accumulation on a ceiling fan's noise level?
Dust accumulation on a ceiling fan can have several effects on its noise level:
- Increased friction: Dust particles on the fan blades can create additional friction, causing the blades to spin less smoothly. This can result in a grinding or rubbing sound as the blades rotate, increasing the noise level.
- Imbalanced blades: Dust can accumulate unevenly on the fan blades, leading to an imbalance in weight distribution. This imbalance can cause the fan to wobble or vibrate when in operation, generating a noticeable humming or buzzing noise.
- Motor strain: Dust accumulation on the motor housing or other moving parts can hinder the motor's performance and put additional strain on its operation. This strain can result in an increased noise level as the motor tries to overcome the resistance caused by the dust.
- Airflow obstruction: Dust accumulation can block the airflow through the fan, causing it to work harder to move air. This increased airflow resistance can generate more noise as the fan blades forcefully push through the obstructed air.
Regular cleaning and maintenance of ceiling fans, including dusting the blades, motor, and other components, can help reduce dust-related noise and ensure optimal performance.
How to contact a professional electrician to fix a noisy ceiling fan?
To contact a professional electrician to fix a noisy ceiling fan, follow these steps:
- Research and shortlist electricians: Look for licensed and experienced electricians in your area. Check online directories, review sites, or ask for recommendations from family, friends, or neighbors.
- Check credentials and reviews: Visit their websites or profiles to verify the electrician's credentials, licenses, and insurance. Also, read customer reviews and ratings to ensure their reputation and competence.
- Contact potential electricians: Call or email the electricians to inquire about their availability and pricing. Provide them with information about the noisy ceiling fan and ask if they have experience in troubleshooting and repairing ceiling fans.
- Request an estimate: Ask the electricians to provide a detailed estimate that includes the cost of their services, any parts that might need replacement, and any additional fees.
- Schedule an appointment: Once you have received estimates and found an electrician you are satisfied with, schedule an appointment that works for both parties. Provide them with details about the problem, such as the type of noise and any observations you may have.
- Prepare for the appointment: Clear the area around the ceiling fan and make sure the electrician has easy access to inspect and repair it. Also, gather any information related to the ceiling fan's make, model, and warranty, if available.
- Be present during the appointment: Ensure you or someone trustworthy is home during the electrician's visit. This allows you to address any specific concerns, confirm the diagnosis, and discuss potential repair solutions.
Remember to document any agreements made, including the scope of work, cost, and expected completion time. Additionally, don't hesitate to ask the electrician any questions or concerns you might have during the visit to ensure a satisfactory resolution.
What is the difference between oil-bath and sealed-bearing ceiling fans in terms of noise?
Oil-bath and sealed-bearing ceiling fans differ in terms of noise due to the design and construction of their bearing systems.
- Oil-bath ceiling fans: These fans have an oil reservoir that surrounds the fan motor and bearings. The oil lubricates and reduces friction between the moving parts, thereby minimizing noise. The oil bath acts as a sound-dampening mechanism, resulting in quieter fan operation. However, over time, the oil may require routine maintenance or replacement to ensure optimal noise reduction.
- Sealed-bearing ceiling fans: In this type, the bearing system is sealed, typically using a lubricant such as grease. The sealed bearings prevent dust, dirt, and debris from entering and contaminating the bearings, which can contribute to noise. The sealed design also minimizes the need for regular maintenance, as the bearings remain protected. As a result, sealed-bearing fans tend to operate relatively quietly, although they may produce more noise than oil-bath fans.
Overall, both oil-bath and sealed-bearing ceiling fans are designed to reduce noise by employing different mechanisms. The oil bath offers excellent noise reduction, while the sealed-bearing design provides long-lasting protection against outside elements. The specific noise levels may still vary depending on factors such as fan quality, motor design, blade design, and installation.
How to replace worn-out bearings in a ceiling fan?
To replace worn-out bearings in a ceiling fan, follow these steps:
- Turn off the ceiling fan and disconnect it from the power source for safety.
- Remove the ceiling fan blades: Usually, the blades are held on by screws or clips. Locate these and remove them to detach the blades.
- Remove the fan motor housing: The motor housing encloses the fan motor and bearings. Loosen the screws or clips holding the motor housing in place and detach it from the ceiling fan.
- Access the bearings: Once the motor housing is removed, you should be able to access the bearings. They are typically located at each end of the motor shaft.
- Remove the old bearings: The bearings may be press-fit or secured with screws. If they are press-fit, use a bearing puller to extract them. If they are secured with screws, unscrew them to remove the bearings.
- Clean the motor shaft and surrounding area: Use a cloth or brush to clean any debris or dirt from the motor shaft and the area surrounding it.
- Install the new bearings: Take the new bearings and insert them into the designated spaces on the motor shaft. Press-fit or secure them with screws, depending on how they were originally installed.
- Reassemble the fan: Put the motor housing back in place and secure it with screws or clips. Attach the ceiling fan blades by screwing them or clipping them back onto the motor housing.
- Test the fan: Reconnect the ceiling fan to the power source and turn it on to check if the bearings are working properly. Ensure that the fan operates smoothly without any noise or vibration.
Note: If you are unsure about any step or lack the necessary tools, it is recommended to consult a professional electrician for assistance.