
Best Garden Tillers to Buy in July 2026
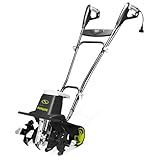
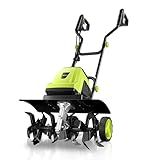
Sun Joe Electric Corded Garden Tiller & Cultivator, Steel Tines, 13.5 Amp, 16 Inch, Black - Heavy Duty Gardening Machine Equipment for Lawn, Yard, & Grass, TJ604E
-
EFFICIENT TILLING: 13.5-AMP MOTOR TILLS 16 WIDE AND 8 DEEP.
-
DURABLE TINES: SIX RUST-PROOF STEEL TINES ENSURE LONG-LASTING USE.
-
COMPACT DESIGN: FOLDING HANDLE FOR EASY STORAGE AND TRANSPORT.


MZK 16-Inch 13.5-Amp Corded Electric Tiller/Cultivator, 8-inch tillling Depth with Adjustable Wheels, Foldable Electric Rototiller for Lawn/Yard/Garden Soil Digging,TC16A08
-
EFFORTLESS TILLING: 13.5-AMP MOTOR WITH 16 CUTTING WIDTH FOR EFFICIENCY.
-
VERSATILE USE: PERFECT FOR FLOWER BEDS, VEGGIE PATCHES, AND WEED CONTROL.
-
ERGONOMIC DESIGN: LIGHTWEIGHT AND EASY TO MANEUVER FOR USER COMFORT.
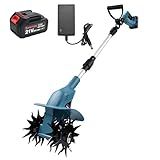
MZK 20V Cordless Tiller Cultivator with Steel Tines,8-inch Wide Battery Powered Garden Cultivator, 360RPM Electric Tiller for Lawn/Gardening/Soil Cultivation(2 * 2AH Battery&Charger Included),TC08D01
-
CORDLESS FREEDOM: RECHARGEABLE BATTERY FOR USE ANYWHERE, ANYTIME!
-
LIGHTWEIGHT COMFORT: ERGONOMIC DESIGN REDUCES FATIGUE FOR EASY USE.
-
EFFICIENT CULTIVATION: 24 TINES FOR QUICK, EFFECTIVE SOIL PREPARATION.
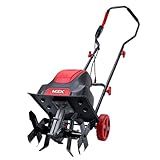
IncwBo Electric Rototiller Garden Tiller 12 Inch Tilling Width 8-Inch Electric Tiller 10.5 Amp Tiller Cultivator for Garden Yard
-
POWERFUL 10.5-AMP MOTOR: TILLS UP TO 12 WIDE AND 8 DEEP EFFORTLESSLY!
-
DURABLE RUST-RESISTANT BLADES: ENSURES RELIABLE PERFORMANCE FOR YEARS!
-
UNIQUE CONTROL SPURS: REDUCES FATIGUE AND ENHANCES TILLER HANDLING EASILY!
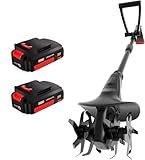
Alloyman 20V Cordless Tiller Cultivator, 360RPM Electric Garden Tiller, with 2 * 2.0Ah Batteries & Charger, 9In Tilling Width and 6.6In Depth Garden Rototiller for Lawn/Gardening/Soil Cultivation
- CORDLESS FREEDOM: ENJOY HASSLE-FREE GARDENING ANYWHERE YOU PLEASE!
- POWERFUL PERFORMANCE: CULTIVATES 9 WIDE AND 6.6 DEEP IN SECONDS.
- SAFETY FIRST: ACTIVATE WITH A DUAL SWITCH FOR MAXIMUM USER SAFETY.
YERYORK Tiller Cultivator, 15-Amp 18-Inch Width 9-Inch Depth Corded Electric Tiller 24 Durable Steel Tines Gardening Tiller with Adjustable Wheels Foldable Handle for Easy Soil Cultivation
- POWERFUL 15-AMP MOTOR: EFFORTLESSLY TACKLE TOUGH SOIL CONDITIONS.
- 18-INCH CUTTING WIDTH: EFFICIENTLY HANDLE LARGER YARDS AND GARDEN PLOTS.
- FOLDABLE DESIGN: EASY STORAGE IN TIGHT SPACES FOR CONVENIENT ORGANIZATION.
21v Cordless Tiller, 8-Inch Wide 4.0 Ah Battery Powered Garden Cultivator, Cultivator with Steel Tines and Battery Capacity Display, Rototiller for Lawn/Gardening/Soil Cultivation (Blue) by Shintyool
-
PERFECT GIFT FOR GARDEN LOVERS: IDEAL FOR FAMILY AND FRIENDS!
-
CORDLESS CONVENIENCE: CULTIVATE ANYWHERE WITHOUT RESTRICTIONS!
-
USER SAFETY FIRST: DESIGNED WITH DUAL ACTIVATION FOR SECURITY!
MZK 12-Inch 10.5 Amp Corded Electric Tiller/Cultivator for Gardening, 8-inch tillling Depth with Adjustable Wheels, Electric Garden Rototiller for Lawn/Yard/Garden Soil Digging,TC12A03
-
POWERFUL 10-AMP MOTOR FOR FAST AND EFFICIENT SOIL TILLING.
-
LOW MAINTENANCE ELECTRIC DESIGN-NO GAS OR OIL HASSLES NEEDED!
-
VERSATILE FOR ALL GARDEN TASKS; ADJUSTABLE WHEELS FOR EASY USE!
Preparing a flower bed with a garden tiller involves several steps to ensure that the soil is properly prepared for planting. Here's a general overview of the process:
Firstly, clear the area where you want to create the flower bed. Remove any existing vegetation, rocks, or debris. You can use a shovel or rake to loosen and remove the top layer of grass or weeds.
Next, set the depth of the garden tiller according to the requirements of your flowers. Typically, a depth of 8-12 inches is sufficient. Following the manufacturer's instructions, adjust the tines or blades of the tiller to the desired depth.
Start tilling the soil by gradually lowering the tiller into the ground or by turning it on and gently guiding it across the area. Begin at one end and work your way across, overlapping each pass slightly for thorough soil cultivation. Keep a steady pace, ensuring that the tiller reaches the same depth each time.
As you till, the machine will break up the soil and loosen it, making it easier to work with. This process helps improve soil aeration and drainage by loosening compacted soil and removing rocks or roots.
After tilling, use a rake or garden fork to remove any remaining large clumps of soil, rocks, or weeds. Raking will help to level the ground and create a smooth surface for planting.
Consider adding organic matter such as compost, peat moss, or well-rotted manure to the soil. Spread a layer of organic matter over the tilled area and use the tiller to incorporate it into the soil. This will improve the soil's fertility, drainage, and moisture retention.
Once the soil is prepared, you can finalize the shape and size of the flower bed by creating defined edges using a spade, edger, or garden hose. This will give the flower bed a neater appearance and help prevent grass or weeds from encroaching.
Before planting, water the flower bed to ensure that the soil is adequately moist. This will help settle the soil and provide a good environment for the plants.
Finally, you can begin planting your desired flowers in the prepared flower bed according to their specific planting requirements.
Remember to clean and store the garden tiller properly after use to ensure its longevity and continued performance.
How to remove grass or weeds before using a garden tiller?
Here are step-by-step instructions on removing grass or weeds before using a garden tiller:
- Assess the area: Determine the size and scope of the grass or weed-infested area you need to clear out. This will help you estimate the necessary tools and time required for the task.
- Hand pulling: Start by physically removing any large clumps of grass or weeds by hand. This is effective for smaller areas or when dealing with isolated patches. Make sure to pull out the entire root system to prevent regrowth.
- Mowing or cutting: If the grass or weeds are too tall, you can use a lawn mower or weed trimmer to cut them down to a more manageable height. This will make subsequent removal easier.
- Smothering: For weed-infested areas, smothering can be an effective method. Cover the area with a thick layer of cardboard, newspaper, or a weed-blocking fabric. Ensure that the material completely blocks sunlight and weighs it down with rocks or boards. Leave it in place for several weeks to starve the weeds of light, causing them to die.
- Herbicides: If the weed population is severe, you may consider using an herbicide. Choose a non-selective herbicide that targets all plants, and follow the manufacturer's instructions carefully. Apply the herbicide directly to the weeds, avoiding any desirable plants you want to keep. Keep in mind that chemical herbicides should be used as a last resort and with caution.
- Digging or tilling: Once you have removed the majority of the grass or weeds, you can use a shovel or garden tiller to dig up the remaining vegetation and loosen the soil. This will prepare the area for planting or further cultivation.
Remember to wear gloves and protective clothing when working with sharp tools or potentially harmful chemicals. Additionally, be cautious when using herbicides to prevent any unintended damage to surrounding plants or the environment.
How to edge the flower bed before tilling?
Edging the flower bed before tilling can create a clean and defined border, keeping the soil and mulch in place and preventing the spread of grass and weeds into the bed. Here's a step-by-step guide on how to edge a flower bed before tilling:
- Gather the necessary tools: You will need a garden hose or string, wooden stakes, a sharp spade or edging tool, a shovel, and a garden rake.
- Plan the boundary: Decide on the desired shape and dimensions of the flower bed. Lay out the garden hose or string in the desired shape. Drive wooden stakes into the ground at intervals along the hose or string to mark the edges of the bed.
- Remove existing vegetation: If there is grass, weeds, or other plants within the marked area, use a shovel or spade to cut through the roots and remove them.
- Dig a trench: Using the sharp spade or edging tool, carefully dig a trench along the marked line. Start from one end and work your way to the other, ensuring the trench is deep enough to prevent grass and weeds from coming up through the edge.
- Tidy up the trench: Use a shovel or garden rake to clean up any loose soil or debris from the trench. Make sure the edges are neat and straight.
- Optional: Install an edging material: If you want a more pronounced border, consider installing an edging material such as plastic, metal, or stone. Follow the manufacturer's instructions for installation, ensuring it is firmly in place.
- Till the flower bed: Once the edging is complete, you can proceed with tilling the flower bed. Start at one end and work your way across the bed, cultivating and loosening the soil to a suitable depth for planting. Remove any rocks, weeds, or other debris.
By following these steps, you will have a well-defined and clean border to your flower bed ready for tilling and planting.
How to mix compost with the existing soil using a garden tiller?
Mixing compost with the existing soil using a garden tiller is an efficient and thorough way to improve soil fertility and structure. Here is a step-by-step guide on how to do it:
- Prepare the area: Remove any debris, weeds, rocks or large clumps of soil from the area you want to till. This will help ensure an even distribution of compost throughout the soil.
- Determine the amount of compost: Calculate the amount of compost you need based on the size of the area and desired compost-to-soil ratio. As a general guideline, aim for a 1:4 to 1:1 compost-to-soil ratio, depending on the quality of your existing soil.
- Spread the compost: Use a shovel or garden fork to evenly spread the compost over the area to be tilled. Spread it in a layer that is about 2-4 inches thick.
- Set the tiller: Adjust the depth and width settings on your garden tiller according to your needs. If the compost layer is thick, you may need to till in smaller sections to ensure thorough mixing.
- Till the soil: Starting at one end of the area, slowly walk the tiller forward and let it work its way through the soil. Make sure to go over the entire area at least twice to ensure thorough mixing.
- Work in a grid pattern: To cover the entire area evenly, work in a grid pattern, overlapping each pass of the tiller by several inches. This will help prevent any pockets of undisturbed soil.
- Repeat if necessary: Depending on the condition of your soil and the amount of compost used, you may need to make additional passes to ensure complete mixing. For heavily compacted soil, it might be necessary to till the area a few more times.
- Level the soil: After tilling, use a garden rake to level the soil surface, ensuring an even distribution of compost and a smooth surface for planting.
By following these steps, you will effectively incorporate the compost into your existing soil, providing essential nutrients and improving its overall quality.
How to create a smooth finish on the tilled soil surface of the flower bed?
To create a smooth finish on the tilled soil surface of a flower bed, you can follow these steps:
- Remove any rocks, debris, or grass from the tilled soil using a rake or shovel. This will help you create a clean and even surface.
- Break up any large clumps of soil using your hands or a garden fork. This will make it easier to achieve a smooth finish.
- Use a garden rake or a landscaping tool called a leveling rake to level out the soil surface. Start at one end of the bed and pull the rake towards you, gently dragging the soil in the process to create an even surface. Repeat this process for the entire flower bed, making sure to keep the rake level while doing so.
- After leveling the soil, moisten it lightly with water. This will help settle the soil particles, making it easier to achieve a smooth finish.
- Go over the soil surface again with the leveling rake to smooth out any uneven spots or ridges that may have formed during the moistening process. Repeat this step if necessary until you achieve a smooth and even surface.
- Once you're satisfied with the smoothness of the soil surface, lightly tamp it down using a garden roller or your feet. This will help compact the soil slightly, creating a more solid and stable base for planting.
- Finally, consider adding a layer of organic matter such as compost or mulch to the top of the flower bed. This will not only provide additional nutrients for the plants but also help retain moisture and further improve the overall appearance of the bed.
By following these steps, you should be able to create a smooth finish on the tilled soil surface of your flower bed, providing an ideal foundation for planting your desired flowers or plants.