
Best Products to Deliver Power to an Outdoor Storage Shed to Buy in July 2026
APILAB Solar Shed Light Indoor Outdoor, 2000LM Daytime Available Pendant Light with Pull String, Dusk to Dawn, 3 Lighting Modes Solar Lights Indoor, IP65 Waterproof for Barn, Gazebo, Shop, Garage
- EFFORTLESS CONTROL: EASY PULL STRING DESIGN, NO REMOTE NEEDED!
- ECO-FRIENDLY SAVINGS: SOLAR-POWERED, CUT DOWN ON ENERGY BILLS!
- WEATHER-RESISTANT: DURABLE BUILD FOR RELIABLE YEAR-ROUND LIGHTING!


JIORRIO Solar Lights Outdoor Waterproof,396 LED Solar Shed Light Indoor Outdoor with Remote Control,Timer, Solar Pendant Light 5 Modes,Solar Powered Barn Lights for Chicken Coop,Gazebo,Garage,Shop
-
ILLUMINATE 400 FT² WITH SUPER-BRIGHT, ENERGY-EFFICIENT LED LIGHTS!
-
CONTROL BRIGHTNESS & MODES EASILY WITH A HANDY REMOTE-5 OPTIONS!
-
DURABLE IP65 WATERPROOF DESIGN ENSURES YEAR-ROUND OUTDOOR RELIABILITY!

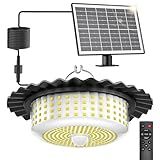
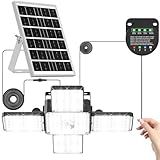
Solar Shed Light Indoor Outdoor, 6500K Daytime Available Pendant Light with Pull String, Power Display & Mode Indicator, IP65 Waterproof Solar Lights with 3 Lighting Modes for Garage Gazebo - 1 Pack
- 360° LIGHTING: ILLUMINATE EVERY CORNER WITH OUR WIDE-ANGLE DESIGN!
- EASY CONTROLS: SIMPLE PULL-STRING OPERATION; NO REMOTE NEEDED!
- DURABLE & WATERPROOF: BUILT TO WITHSTAND ALL WEATHER CONDITIONS!
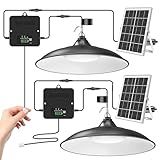
APILAB Solar Shed Light Indoor Outdoor, Dual Lamp 2000LM Daytime Available Pendant Light with Pull String, Dusk to Dawn, 3 Lighting Modes Solar Lights Indoor, Waterproof for Barn, Gazebo, Shop, Garage
-
QUICK PULL CONTROL: EASILY SWITCH MODES WITH A BUILT-IN PULL STRING.
-
DUAL PENDANT LIGHTS: ILLUMINATE WIDER AREAS WITH A SINGLE POWER SOURCE.
-
THREE LIGHTING MODES: SIMPLE CONTROL FOR VERSATILE BRIGHTNESS SETTINGS.
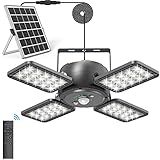
INXPHY Solar Shed Light Indoor Outdoor 1200LM 144LED Pendant Light, Motion Sensor with Upgrade 5 Lighting Modes & Remote Control 4-Leaf 120°Adjustable Lights for Home Yard Garage
- 5 FLEXIBLE LIGHTING MODES FOR EVERY NEED, DAY OR NIGHT.
- ULTRA-BRIGHT 1200LM WITH ADJUSTABLE PANELS FOR WIDE COVERAGE.
- REMOTE CONTROL CONVENIENCE & LONG-LASTING 5000MAH BATTERY.
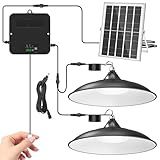
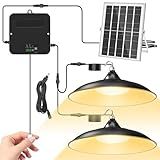
Solar Shed Light Indoor Outdoor, 2000LM 268LED Solar Pendant Light with Motion Sensor, Day & Night Available, 4 Lighting Modes, Battery/Mode Indicator, IP65 Waterproof for Shed Garage Gazebo Barn
- INSTANT CONTROL ANYWHERE: DUAL SWITCH FOR QUICK LIGHTING ACCESS ANYTIME.
- CUSTOMIZABLE BRIGHTNESS: FOUR MODES ADAPT TO YOUR LIGHTING NEEDS EFFORTLESSLY.
- FLEXIBLE PLACEMENT: SPLIT DESIGN LETS YOU POSITION LIGHT AND PANEL FREELY.
APILAB Solar Shed Light Indoor Outdoor, Dual Lamp Warm White Daytime Available Pendant Light with Pull String, Dusk to Dawn, 3 Lighting Modes Solar Lights Indoor, Waterproof for Barn, Gazebo, Shop
- EASY PULL STRING CONTROL FOR INSTANT LIGHTING ADJUSTMENTS!
- DUAL LAMPS OFFER BROADER COVERAGE FROM A SINGLE POWER BOX.
- THREE MODES WITH LONG-LASTING BATTERY FOR VERSATILE USAGE!
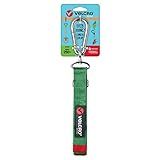
Velcro Brand Easy Hang Garden Shed Straps | Holds 250 Pounds | Organize Outdoor Power Tools, Leaf Blowers | Perfect for Hanging Hedge Trimmers or Weed Eaters
- HOLDS 250 POUNDS: STURDY STRAPS FOR HEAVY OUTDOOR TOOLS IN SHEDS.
- SPACE SAVER: ORGANIZES TOOLS NEATLY, MAXIMIZING SHED FLOOR SPACE.
- WEATHER RESISTANT: IDEAL FOR OUTDOOR STORAGE AND TOUGH APPLICATIONS.
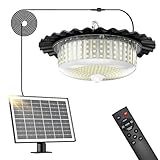
Otovoda Solar Shed Light Indoor Outdoor, 396LED 360° Lighting Waterproof Solar Powered Pendant Light with Motion Sensor, 5 Modes, Remote & Timer, for Home Shed Chicken Coop Barn Shop Gazebo Garage
-
BRIGHT 396 LEDS COVER 40 SQM, PERFECT FOR SHEDS & GARAGES.
-
5 LIGHTING MODES WITH MOTION SENSOR FOR CUSTOMIZED ILLUMINATION.
-
WEATHER-RESISTANT DESIGN ENSURES RELIABLE YEAR-ROUND PERFORMANCE.
To add electricity to an outdoor storage shed, you'll need to follow a few steps:
- Determine the power source: The first step is to decide where you will draw power from. You have two main options – running an electrical cable from your home's main electrical panel or installing a standalone power source like solar panels or a generator.
- Plan the wiring route: Once you've determined the power source, plan the route for the electrical wiring. It should be the most direct and safest path to the shed, avoiding any obstacles or potential hazards.
- Burying the cable (if applicable): In the case of running the electrical cable from your home, you may need to bury it underground. Check local building codes for specific requirements regarding the depth and type of conduit to use.
- Install a sub-panel: To distribute power within the shed, you'll need to install a sub-panel. This panel will act as a junction box for all the electrical connections within the shed.
- Run the electrical cable: Run the electrical cable from the power source to the shed. Be sure to use the correct gauge wire suitable for the power demand and distance. Consult an electrician or reference electrical codes to determine the appropriate wire size.
- Make electrical connections: At the main power source, make the necessary connections according to your chosen power source (e.g., connect to a circuit breaker). At the shed, connect the electrical cable to the sub-panel and install the appropriate circuit breakers to supply power to the outlets and lights.
- Install outlets and lighting: Once the electrical connections are made, install the outlets, switches, and lighting fixtures as desired. Make sure all fixtures are outdoor-rated and suitable for the shed's conditions.
- Test the electrical system: After completing the installation, test the entire electrical system to ensure it is functioning safely and properly. Use a voltage tester to check for the presence of electricity and validate all outlets, lights, and switches.
- Safety precautions: Lastly, always prioritize safety when working with electricity. If you're uncertain or uncomfortable with any step, consult a licensed electrician to ensure a safe and compliant electrical installation for your outdoor storage shed.
What is the purpose of a disconnect switch in a shed's electrical system?
The purpose of a disconnect switch in a shed's electrical system is to provide a means of disconnecting the power supply to the shed. It is typically installed near the main electrical panel or at the entrance point of the power supply to the shed. The disconnect switch allows for the easy and safe shutdown of power to the shed during maintenance, repairs, or in emergency situations. It acts as a switch to interrupt the flow of electricity, isolating the shed's electrical system and ensuring the safety of individuals working on or around the system.
What is the process of connecting a shed's electrical system to the main house?
The process of connecting a shed's electrical system to the main house typically involves several steps:
- Plan and design: Determine the power requirements of the shed, including the number and type of electrical devices, lighting, and any special equipment that needs to be connected. Calculate the expected electrical load to ensure the main house's electrical system can handle the additional load.
- Obtain permits: Check with the local building department to determine if any permits or inspections are required for the electrical work. Obtain the necessary permits and schedule inspections accordingly.
- Dig a trench: Dig a trench from the main house to the shed, ensuring it is deep enough to meet local building codes and regulations for burying electrical wires. The trench should be wide enough to accommodate the electrical conduit.
- Install conduit: Install the electrical conduit in the trench. The conduit serves as a protective sleeve for the electrical wires and should be approved for underground use. Run the conduit from the main house's electrical panel to the shed.
- Bury the conduit: After the conduit is in place, backfill the trench, ensuring the conduit is securely buried at the appropriate depth.
- Install the subpanel: Install a subpanel in the shed to distribute the electricity. The subpanel should be appropriately sized based on the electrical load requirements. Connect the subpanel to the main house's electrical panel through the buried conduit.
- Run wiring: Install the necessary electrical wiring from the subpanel to the outlets, switches, lights, and any other devices in the shed, following local electrical codes and regulations. Use proper wire sizes and types for the specific load requirements.
- Connect the power source: Connect the wiring from the shed's subpanel to the power supply in the main house's electrical panel. This usually involves installing a separate circuit breaker in the main panel to provide power to the shed.
- Grounding and bonding: Properly ground the shed's electrical system to protect against electrical faults and ensure safety. The grounding system should be connected to a grounding electrode, typically a grounding rod or metal water pipe, to establish a reliable earth connection.
- Test and inspection: Once the electrical work is completed, test the shed's electrical system to ensure everything functions properly. Schedule a final inspection with the local building department to ensure compliance with electrical codes and regulations.
It is crucial to follow local electrical codes and regulations, and it is recommended to consult with a licensed electrician to ensure a safe and compliant electrical installation.
What is the best type of lighting for an outdoor shed?
The best type of lighting for an outdoor shed can depend on the specific requirements and preferences of the shed owner. However, a popular and effective option for outdoor sheds is LED lighting. LEDs (Light Emitting Diodes) are energy-efficient, long-lasting, and versatile lights that provide bright illumination. Here are a few reasons why LED lighting is often considered the best type for outdoor sheds:
- Energy efficiency: LED lights are highly energy-efficient, consuming less power compared to other lighting options. This efficiency helps to save electricity costs over time.
- Longevity: LED lights have a significantly longer lifespan compared to traditional bulbs. This means less frequent replacement and lower maintenance requirements.
- Durability: LED lights are more resistant to shocks, vibrations, and extreme temperature variations, which makes them suitable for outdoor environments.
- Brightness and color options: LED lights are available in various brightness levels and color temperatures, allowing shed owners to choose a light output that suits their specific needs. Additionally, some LED lights can be dimmable, providing flexibility in controlling the shed's lighting levels.
- Safety: LEDs emit very little heat, which reduces the risk of starting a fire. They are also free from harmful materials like mercury, making them environmentally friendly.
- Easy installation: LED lights are often easy to install, with options for both wired and wireless setups.
While LED lighting is generally recommended, it's important to consider factors such as the size of the shed, the intended use, and personal preferences when selecting the most suitable lighting for an outdoor shed.
How to calculate the power requirements for a shed?
To calculate the power requirements for a shed, you need to consider the following factors:
- Determine the purpose of the shed: The power requirements will vary depending on the intended use of the shed. For example, if it is solely for storage, you may need minimal power, but if it is a workshop or an office space, you may require more power.
- Identify the electrical appliances and equipment: Make a list of all the electrical devices you plan to use in the shed, including lights, power tools, heaters, fans, air conditioners, etc. Note down the wattage or amps required for each device. This information can usually be found on the label or in the product documentation.
- Calculate the total power requirement: Add up the wattage or amps of all the devices you listed. If the appliances' information is given in amps, multiply the amps by the voltage (usually 110V or 220V) to calculate the wattage. This will give you the total power requirement in watts.
- Account for potential future needs: Consider any additional electrical devices you might add to the shed in the future. It is always better to plan for a slightly higher power capacity to accommodate potential expansion or additional needs.
- Choose an appropriate power supply: Based on the total power requirement, you can determine the type of power supply you will need. You may opt for a standard electrical connection from your house or a separate power source like solar panels or generators, depending on your preferences and available options.
- Seek professional advice: If you are unsure about calculating the power requirements or need guidance on electrical connections and installations, it is recommended to consult a qualified electrician or a professional with experience in shed electrical systems. They can provide accurate advice and ensure the safe and efficient operation of your shed's electrical system.
What is the recommended height to mount electrical outlets in a shed?
The recommended height to mount electrical outlets in a shed is typically around 18 inches from the floor. This height allows for easy access and functionality of the outlets while keeping them away from potential water or moisture that may accumulate on the ground. Additionally, this height is commonly used for proper code compliance. However, it is always best to consult local building codes and regulations to ensure specific requirements for your area.
How to choose the right size electrical wire for a shed?
When choosing the right size electrical wire for a shed, there are a few factors to consider:
- Gauge: The gauge of wire refers to its thickness. The smaller the gauge number, the thicker the wire. For sheds, a common wire gauge is 12 or 14. Generally, 12-gauge wire is recommended for heavier loads or longer distances, while 14-gauge wire is suitable for smaller loads and shorter distances.
- Load Calculations: Consider the electrical load you plan to have in your shed. This includes the equipment, tools, and lighting that will be powered. Calculate the total wattage or amperage that will be drawn by these devices to determine the wire gauge required. Check the National Electric Code (NEC) for guidance on wire sizing based on load calculations.
- Distance: Measure the distance from the electrical source to the shed. Longer distances increase the voltage drop, requiring a larger wire size to compensate for resistance and maintain proper voltage supply. Use a wire size calculator or electrical chart to determine the correct size based on the distance of the run.
- Circuit Requirement: Determine the number of circuits you need in your shed. Each circuit requires its own wiring. Depending on the intended use of the shed, you may require multiple circuits for different areas or equipment.
- Local Electrical Code: Consult your local electrical code regulations to ensure compliance. Different regions may have specific requirements for wire sizing in sheds and other outbuildings.
- Safety: It is always better to err on the side of caution and choose a larger wire gauge than the minimum requirement to ensure proper electrical supply and safety. Oversizing the wire will minimize voltage drop, reduce the risk of overheating, and provide more flexibility for future electrical needs.
If you are unsure about the wire size, it is recommended to consult with a licensed electrician who can assess your specific needs and provide guidance.