Best Garden Design Inspirations to Buy in July 2026
Bestylez Garden Gifts I Really Need All These Plants Vintage Gardening Signs for Home Garden Greenhouse Living Room Bedroom Yard Outdoor Decor 8X12 Inch (3362)
- HUMOROUS GIFT FOR PLANT LOVERS, PERFECT FOR ANY SPECIAL OCCASION!
- RUSTIC DESIGN ENHANCES COZY VIBES WITH DELIGHTFUL GARDENING ART.
- DURABLE, WEATHERPROOF SIGN IDEAL FOR INDOOR AND OUTDOOR ENJOYMENT.


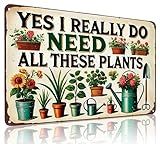
Homeimpro Moon Solar Lights Outdoor Garden Decor Gifts for Mom Women,Waterproof Stakes Yard Decorations for Lawn, Patio Accessories, Backyard Ornaments Birthday Gifts Mother Grandma (Bronze)
-
AUTOMATIC FUNCTIONALITY: CHARGES BY DAY, LIGHTS UP AT NIGHT FOR 8 HOURS.
-
ELEGANT DESIGN: WARM WHITE GLOW CREATES A ROMANTIC GARDEN ATMOSPHERE.
-
DURABLE & WEATHERPROOF: BUILT TO LAST IN ANY WEATHER, ENSURING YEAR-ROUND USE.
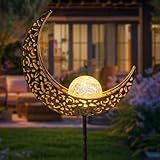
Leafriend: Plant Propagation Buddy; Plant Support for Sprouts, Stems, Shoots, and Cuttings; 3 Cute Plant Supports for a Plant Propagation Station or an Indoor Garden; Plant Lover Gifts by Peleg Design
-
ENHANCE GROWTH: SUPPORT YOUNG PLANTS WITH HUG-LIKE EMBRACING BUDDIES.
-
CUTE DECOR: FUN, HEART-WARMING DESIGNS ELEVATE YOUR INDOOR GARDEN STYLE.
-
IDEAL GIFTS: PERFECT FOR PLANT LOVERS, ADDING JOY TO THEIR GARDENING JOURNEY!
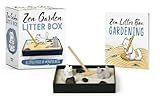
Running Press Mini Edition, Zen Garden Litter Box Kit
- ZEN GARDEN KIT MERGES TRANQUILITY WITH KITTY CARE FOR CAT LOVERS.
- PORTABLE GIFT SET FOR MINDFUL MOMENTS WITH FELINE FRIENDS.
- 32-PAGE GUIDE TO ACHIEVE LITTER BOX GARDENING ENLIGHTENMENT.
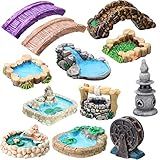
Jetec 12 Pcs Garden Accessories Miniature Bridge Mini Lighthouse Water Well Bridge Figurines Pond Lawn Ornament Figurines for DIY Craft Garden Decor(Classic Style)
-
ABUNDANT ASSORTMENT: 12 UNIQUE GARDEN ACCESSORIES FOR ENDLESS CREATIVITY!
-
DURABLE DESIGN: QUALITY RESIN ENSURES LONG-LASTING, VIBRANT DECORATIONS.
-
VERSATILE USE: PERFECT FOR GARDENS, TABLES, CRAFTS, AND SPECIAL OCCASIONS!
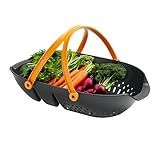
Fiskars Garden Harvest Basket - Container for Gardening and Harvesting with Tool Caddy - Harvesting Basket Doubles as a Colander for Vegetables and Fruits - Garden Accessories
-
MULTI-FUNCTIONAL DESIGN SIMPLIFIES HARVEST AND TOOL TRANSPORT.
-
ERGONOMIC HANDLES ALLOW FOR COMFORTABLE TWO-HANDED OR ONE-HANDED USE.
-
DURABLE, EASY-TO-CLEAN CONSTRUCTION ENSURES LASTING VALUE AND RELIABILITY.
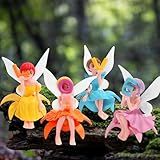
Breelytic 8pcs Fairy Garden Accessories, Mini Fairy Figurines Well-Designed & Handcrafted for Garden Decor Outdoor, Landscape Decor, DIY Craft, Dollhouse, Succulents & Home Decoration
-
DURABLE PREMIUM RESIN: LONG-LASTING BEAUTY WITH HIGH-TEMPERATURE RESISTANCE.
-
HANDCRAFTED DETAIL: UNIQUE, REALISTIC FIGURINES ENHANCE ANY GARDEN SCENE.
-
VERSATILE DECOR: PERFECT FOR FAIRY GARDENS, DOLLHOUSES, AND DIY PROJECTS.
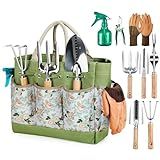
Gardening Tools 9-Piece Heavy Duty Garden Hand Tools with Fashion and Durable Garden Tools Organizer Handbag, Rust-Proof Garden Tool Set, Ideal Gardening Gifts for Women
-
DURABLE STAINLESS STEEL TOOLS: RUST-PROOF AND RESISTANT TO DEFORMATION.
-
COMPLETE 8-PIECE SET: EVERYTHING NEEDED FOR DAILY GARDEN MAINTENANCE.
-
ERGONOMIC HANDLES: COMFORTABLE FOR ALL AGES, EASY TO USE AND CARRY.
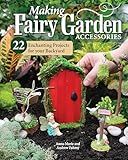
Making Fairy Garden Accessories: 22 Enchanting Projects for Your Backyard (Fox Chapel Publishing) Craft Fairy Houses, a Gnome Garden, a Swing, a Wishing Well, and More, Plus Learn How to Add Lighting
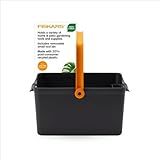
Fiskars Garden Tool Caddy with Removable Small Tool Storage for Indoor and Outdoor Gardening Use, Made with Recycled Plastic
-
LIGHTWEIGHT, DURABLE DESIGN FOR EASY TRANSPORT AND LONG-LASTING USE.
-
SPACIOUS TOOLBOX WITH REMOVABLE BIN FOR ULTIMATE ORGANIZATION.
-
CONVENIENT ONE-HANDED CARRY WITH LOCKING HANDLE FOR EASY ACCESS.
Designing a garden in front of a house is an exciting opportunity to showcase your creativity and enhance the overall aesthetic appeal of your property. While everyone's taste and preferences may differ, there are a few general guidelines to keep in mind when designing a garden:
- Assess your space: Take a close look at the area in front of your house where you want to create your garden. Consider the size, shape, and existing features such as trees, pathways, and fences. This assessment will help you make better decisions about plant selection, layout, and potential architectural features.
- Choose a theme or style: Determine the theme or style you want for your garden. It could be formal, informal, minimalist, cottage-style, or any other design approach that resonates with you. Having a theme in mind will guide your plant selection and overall design choices.
- Consider the climate and sunlight: Understand the climate of your location and the amount of sunlight the garden will receive throughout the day. This information will help you choose plants that thrive in your specific conditions. Some plants require more shade, while others need plenty of direct sunlight.
- Create a focal point: Introduce a focal point in your garden to draw attention and create visual interest. This could be a sculpture, a beautifully shaped tree, a water feature, or a unique plant arrangement. Focal points add a sense of depth and character to your garden design.
- Use layers for depth: Incorporate layers into your garden design by using plants of different heights. Place taller plants towards the back and shorter ones in the front to create depth and visual appeal. Layering also helps create a sense of enclosure and privacy.
- Choose a color palette: Decide on a color palette that complements the style of your home and your personal preferences. You could go for a monochromatic scheme using different shades of the same color, or opt for contrasting colors to create a vibrant and lively garden.
- Plan paths and walkways: If your garden is larger or if you'd like to create designated spaces, plan paths and walkways to guide visitors through the garden. These paths can be made of various materials like gravel, stone, or flagstone, and can enhance the overall design of your garden.
- Consider seasonal interest: Aim for year-round interest by selecting plants that offer blooms, colors, or foliage changes during different seasons. This way, your garden will maintain its beauty regardless of the time of year.
- Add finishing touches: Add finishing touches such as garden furniture, lighting, and ornamental decorations to complete the overall look of your garden. These elements can provide functionality, enhance ambiance, and reflect your personal style.
Remember, designing a garden is a creative endeavor, so don't be afraid to experiment and let your imagination guide you. Enjoy the process and watch your garden flourish into a beautiful space that complements and enhances your home.
What is the role of proper maintenance in preserving the beauty of a designed front garden?
Proper maintenance is crucial in preserving the beauty of a designed front garden. Here are some roles that maintenance plays:
- Growth and Health: Regular maintenance practices such as watering, fertilizing, and pruning help promote healthy growth for plants, trees, and shrubs in the front garden. Healthy plants are more likely to bloom, produce vibrant foliage, and overall contribute to the beauty of the garden.
- Weed and Pest Control: Maintenance includes removing weeds, which compete with plants for nutrients, water, and sunlight. Additionally, regular monitoring helps identify and control pests or diseases that might harm the plants and disrupt the aesthetics of the garden.
- Shape and Structure: Maintenance involves trimming or pruning plants to maintain their desired shape and size. This helps maintain the balance and structure of the front garden, ensuring that the design elements and focal points remain attractive and visually appealing.
- Cleaning and Mulching: Regular cleaning of the garden area by removing fallen leaves, debris, or any other clutter helps maintain a neat and tidy appearance. Mulching, on the other hand, not only adds aesthetics but also helps retain moisture, suppress weed growth, and protect plant roots from temperature fluctuations.
- Seasonal Changes: A well-maintained front garden can adapt to seasonal changes by adjusting planting schemes or incorporating seasonal flowers and foliage. Maintenance ensures that the garden remains visually appealing throughout the year, combating any overgrowth or decline due to changing weather conditions.
- Long-Term Sustainability: Proper maintenance ensures that the front garden design stays sustainable over time. By regularly caring for the garden, the plants are given the best chance to thrive, preserving the original intention and design vision.
In summary, proper maintenance is essential for preserving the beauty of a designed front garden by promoting growth and health, controlling weeds and pests, maintaining shape and structure, ensuring cleanliness, adapting to seasonal changes, and ensuring long-term sustainability.
What are the essential tools and equipment needed for garden design?
The essential tools and equipment needed for garden design may vary depending on the specific project, but some common ones include:
- Garden planner or design software: This tool helps in visualizing and planning the layout of the garden, including the placement of plants, pathways, and other features.
- Measuring tape: Important for accurately measuring the dimensions of the garden or specific areas within it.
- Graph paper and pencils: These are useful for sketching out the design, creating a scale drawing, or making notes as you plan.
- Garden gloves: Protect hands from dirt, thorns, and other potential hazards while working in the garden.
- Pruning shears: Used for trimming and shaping plants, shrubs, and trees.
- Garden spade or shovel: Essential for digging holes, lifting soil, and planting.
- Rake: Helps in leveling the soil, removing debris, and smoothing surfaces.
- Wheelbarrow or garden cart: Useful for transporting tools, plants, and materials around the garden.
- Watering can or hose: Required for watering plants, especially during dry spells.
- Garden fork: Assists in breaking up soil, removing weeds, and turning compost.
- Hand trowel: Used for planting small plants, bulbs, or seeds.
- Garden pruner or lopper: These tools are designed for cutting thicker branches and stems.
- Gardening knife: Helps with various tasks like dividing plants, cutting twine, opening bags, etc.
- Garden hose or soaker hose: Useful for watering larger areas or for setting up irrigation systems.
- Garden stakes and twine: Used to mark planting areas, create support structures for climbing plants, or mark out pathways.
- Wheelbarrow or garden cart: Useful for transporting tools, plants, and materials around the garden.
- Gardening apron or tool belt: Keeps essential tools, like hand trowels, pruners, and gloves, easily accessible.
- Weed control fabric or mulch: Helps to prevent weed growth and maintain soil moisture.
- Stepladder: Required for reaching taller plants, trees, or structures while working in the garden.
- Lawnmower and trimmer: Essential for maintaining the lawn and keeping it neat and tidy.
It is important to note that the specific tools and equipment needed may vary depending on the size and complexity of the garden design project.
What is the process of measuring and mapping a front garden?
The process of measuring and mapping a front garden typically involves several steps. Here is a general outline of the process:
- Take initial measurements: Start by measuring the perimeter of the front garden using a measuring tape. Note down the dimensions of each side of the garden and any existing structures within it (if applicable), such as the house, fences, or pathways.
- Identify and record features: Identify and record any significant features of the garden that you want to include in the map, like trees, shrubs, flower beds, lawn areas, or decorative elements. You can mark them with labels or numbers to identify them later.
- Sketch a basic layout: Use graph paper or a digital drawing tool to create a basic sketch of the garden layout. Start by drawing the outline of the garden using the measured dimensions. Add the structures and features you identified in step 2 and position them roughly in their actual locations.
- Measure additional details: Measure the dimensions of individual features, such as the width and length of the lawn, the size of flower beds, or the distances between trees. Ensure accuracy by measuring from fixed reference points or edges.
- Include scale and compass directions: Add a scale to the map to indicate the size of the garden accurately. For example, you could use 1 centimeter on the map to represent 1 meter on the ground. Also, indicate the compass directions (north, south, east, west) on the map.
- Add labeling and annotations: Label each feature on the map using numbers or names that correspond to the recorded features. You can also include annotations or additional notes about specific aspects of the garden, such as soil conditions, sun exposure, or areas for potential improvements.
- Finalize the map: Review the sketch, ensure all measurements and details are accurate, and make any necessary adjustments. Once you are satisfied, create a final version of the garden map, either by hand or using graphics software.
Remember, the level of detail and complexity of the map can vary depending on your purpose. This process provides a general framework, but feel free to adapt it to your specific needs or preferences.
What is the significance of texture and layering in garden design?
Texture and layering are key elements in garden design that add depth, visual interest, and create a sense of balance and harmony. Here are the significances of texture and layering in garden design:
- Visual Interest: Texture and layering create visual interest by combining different plant shapes, sizes, colors, and textures. By varying the textures and layering plants, you can create a visually appealing garden that captures attention and encourages exploration.
- Depth and Dimension: Texture and layering add depth and dimension to garden spaces. By incorporating plants with different heights, structures, and layers, you can create a layered effect that adds depth to your garden, making it look more multi-dimensional and intriguing.
- Contrast and Balance: Texture and layering allow you to create contrast and balance within your garden. By combining plants with contrasting textures, such as soft and feathery with bold and spiky, you can create dynamic and balanced compositions that draw the eye and create a pleasing visual experience.
- Seasonal Interest: Texture and layering are particularly important for year-round garden beauty. By carefully selecting plants with varied textures that offer interest in different seasons, you can ensure that your garden remains visually appealing throughout the year.
- Focal Points: Layering and texture can be used to draw attention to specific areas or elements within a garden. By strategically placing plants with interesting textures and using layering techniques, you can create focal points and guide people's gaze towards specific areas, such as a stunning flower bed or a beautifully textured shrub.
- Naturalism and Wildlife Habitat: Texture and layering help create a more naturalistic environment that mimics the layering and diversity found in nature. A well-layered garden with varied textures can provide different habitats and niches for wildlife, attracting birds, butterflies, and beneficial insects.
Overall, texture and layering in garden design play a crucial role in creating visually appealing, balanced, and dynamic spaces that engage the senses and provide year-round interest.
How to create a focal point in the front garden?
Creating a focal point in the front garden can help add visual interest and make your garden stand out. Here are some tips to create a focal point:
- Choose a specific area: Decide where you want to create your focal point. This could be near the entrance, along a walkway, or in the center of the garden.
- Select a focal point object: Find a visually appealing object that will serve as the focal point. It could be a large sculpture, a water feature, a unique plant, a colorful container, a bird bath, or even a beautifully arranged garden bench.
- Consider the height and scale: The focal point should be of a suitable size and scale for the area you've chosen. It should be big enough to catch the eye but not too overwhelming to overpower the overall design.
- Use contrast: Place the focal point in an area where it contrasts with its surroundings. For example, if the surrounding plants are green and leafy, choose an object with a different color or texture that will make it stand out.
- Use lighting: Install outdoor lighting, such as spotlights or solar-powered lights, to illuminate the focal point during the evening hours. This will make it visible even in low light conditions and create a dramatic effect.
- Surround it with plants: Frame your focal point with complementary plants to help draw attention to it. Use plants with different heights, colors, and textures to create a visually appealing backdrop.
- Create a pathway: If your focal point is in the center of the garden, consider creating a pathway leading to it. This will help direct the viewer's gaze towards the focal point and make it the main attraction.
- Maintain simplicity: Avoid overcrowding the area around the focal point with too many plants or other distracting elements. Keep the design clean and simple to ensure that the focal point remains the main focus.
Remember, the goal of a focal point is to create a visual centerpiece that grabs attention and adds interest to your front garden.