
Best Outdoor Storage Sheds with Windows to Buy in July 2026
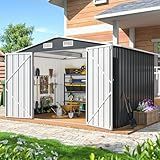
YADSUNY 10x8 FT Outdoor Storage Shed, Metal Garden Tool Shed with Updated Frame Structure and Lockable Doors, Ideal for Backyard Garden Patio Lawn, Grey
- DURABLE GALVANIZED STEEL: ALL-WEATHER PROTECTION FOR YEAR-ROUND USE.
- EASY ASSEMBLY: REINFORCED DESIGN MAKES SETUP 35% EASIER.
- SPACIOUS & ORGANIZED: AMPLE STORAGE FOR TOOLS AND OUTDOOR ESSENTIALS.


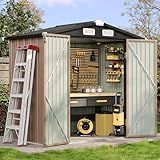
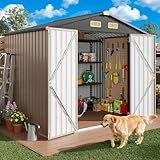
Aoxun 6.2x4 FT Shed Outdoor Storage Shed with Lockable Doors & Slooping Roof Metal Garden Tool Shed for Backyard, Patio, Poolside (Brown)
- WEATHER-RESISTANT DESIGN ENSURES DURABILITY IN HARSH CONDITIONS.
- AMPLE STORAGE SPACE FOR TOOLS, FURNITURE, AND OUTDOOR EQUIPMENT.
- EASY ASSEMBLY WITH LABELED PARTS AND DEDICATED CUSTOMER SUPPORT.

DAUSOLA 10x10 FT Outdoor Storage Shed, Metal Garden Tool Shed with Updated Frame Structure, Lockable Doors and Windows, Ideal for Backyard Garden Patio Lawn, Grey
-
DURABLE PROTECTION: ALL-WEATHER GALVANIZED STEEL ENSURES YEAR-ROUND USE.
-
EASY ASSEMBLY: REINFORCED DESIGN MAKES SETUP 35% EASIER AND STABLE.
-
SPACIOUS & FUNCTIONAL: ORGANIZE TOOLS IN A ROOMY, SECURE, AND PRACTICAL SHED.

Aoxun 10 x 12FT Outdoor Storage Shed with Double Hinged Large Door Utility Garden Shed with Lockable Door & Sloped Roof Metal Sheds Outdoor Storage for Garden, Backyard, Patio and Backyard, Brown
- MAXIMIZE SPACE WITH SMART ORGANIZATION FOR ALL YOUR OUTDOOR GEAR.
- SECURE AND PROTECT YOUR VALUABLES WITH A LOCKABLE, DURABLE DESIGN.
- VERSATILE STORAGE SOLUTION ENHANCES ANY OUTDOOR AREA EFFORTLESSLY.
Vongrasig 5 x 3 x 6 FT Outdoor Storage Shed Clearance, Metal Garden Shed with Large Window and Lockable Door, Anti-Corrosion Waterproof Tool Shed for Backyard Patio, Lawn (Dark Gray)
- DURABLE DESIGN: WEATHER-RESISTANT STEEL SHED WON’T RUST OR ROT.
- BRIGHT & SPACIOUS: LARGE WINDOW AND AMPLE ROOM FOR TOOLS AND PETS.
- EASY SETUP: COMES WITH ALL ACCESSORIES; INSTALLATION VIDEO AVAILABLE.
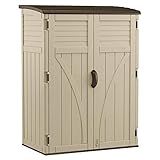
Suncast Outdoor Storage Cabinet Waterproof Resin Vertical Outdoor Storage Shed (54 cu. ft.) for Patio, Garden Tools, Cushions, & Equipment. Weatherproof Plastic Multi-Wall Design, Capacity Made in USA
- SECURE OUTDOOR STORAGE WITH PADLOCK-READY HANDLES FOR PEACE OF MIND.
- DURABLE ALL-WEATHER DESIGN ENSURES YEAR-ROUND PROTECTION, ZERO MAINTENANCE.
- CUSTOMIZABLE INTERIOR WITH SHELVES FOR ORGANIZED AND EFFICIENT STORAGE.

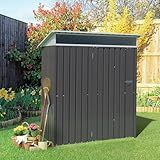
Vongrasig 5 x 3 x 6 FT Outdoor Storage Shed, Metal Tool Shed Clearance Garden Steel Shed with Side Window and Lockable Door Waterproof Tool Shed for Backyard Patio, Lawn (Gray)
- WEATHER-RESISTANT DESIGN: STURDY STEEL PLATES ENSURE RUST-FREE DURABILITY.
- BRIGHT & AIRY INTERIOR: ACRYLIC WINDOW AND VENTS FOR OPTIMAL LIGHT & AIRFLOW.
- VERSATILE USE: PERFECT FOR TOOLS, PETS, OR AS A STYLISH BACKYARD FEATURE.
IRONCK 8x6FT Outdoor Storage Shed with Lockable Doors, 7.4x5.3FT Base Galvanized Steel Metal Garden Tool Shed with Breathable Vent for Yard Bins/Generator/Wheelbarrow Storage, Brown
- DURABLE STEEL BUILD: HEAVY-DUTY GALVANIZED STEEL FOR ALL-WEATHER RESILIENCE.
- SPACIOUS DESIGN: AMPLE ROOM FOR TOOLS, PETS, OR RECYCLING; VERSATILE USE!
- QUICK ASSEMBLY: PRE-DRILLED PARTS & GUIDES FOR FAST, EASY SETUP.

Patiowell 6x4 FT Plastic Outdoor Storage Shed, Resin Outside Shed Perfect to Store Patio Furniture, GardenTools Bike Accessories, Beach Chairs and Lawn Mower, Light Grey
- DURABLE WEATHER RESISTANCE: PROTECTS BELONGINGS FROM ELEMENTS YEAR-ROUND.
- SPACIOUS & VERSATILE: IDEAL 6X4FT STORAGE FOR ALL OUTDOOR NEEDS.
- LOCKABLE & WELL-VENTILATED: ENSURES SECURITY AND PREVENTS MILDEW.

Suncast Outdoor Storage Cabinet Waterproof Resin Vertical Outdoor Storage Shed (54 cu. ft.) for Patio, Garden Tools, Cushions, & Equipment. Weatherproof Plastic Multi-Wall Design, Capacity Made in USA
- SECURE, LOCKABLE DESIGN FOR ULTIMATE SAFETY AND PEACE OF MIND.
- ALL-WEATHER, DURABLE CONSTRUCTION ENSURES YEAR-ROUND PROTECTION.
- TALL, CUSTOMIZABLE STORAGE FOR EASY ORGANIZATION OF BULKY ITEMS.
Outdoor storage sheds with windows can vary in ease of installation depending on several factors, including the size and design of the shed, the materials used, and the manufacturer's assembly instructions. Generally, many pre-fabricated sheds are designed for straightforward assembly by homeowners with basic carpentry skills. Manufacturers typically provide step-by-step instructions that can guide you through the process. However, the presence of windows can add a slight layer of complexity compared to windowless models, as proper alignment and sealing are crucial to ensure weatherproofing and structural integrity. It's important to prepare the installation site properly, typically requiring a flat, level surface, such as a concrete slab or wooden platform. Additionally, having the right tools on hand and possibly an extra pair of hands can make the installation process smoother and faster. Overall, with some preparation and attention to detail, installing an outdoor storage shed with windows can be a manageable task.
How to prepare the ground for a shed installation?
Preparing the ground for a shed installation is crucial to ensure stability and longevity. Here’s a step-by-step guide to help you prepare the ground:
- Check Local Regulations: Before starting, check with your local municipality for any building codes or permits required for shed installation.
- Select a Location: Choose a flat and level area for your shed installation. Ensure it has good drainage and is not prone to water pooling.
- Clear the Area: Remove any grass, rocks, or debris from the location. This can be achieved using a shovel, rake, and possibly a sod cutter if needed.
- Measure and Mark: Measure the dimensions of your shed and mark the area on the ground using stakes and string. Allow extra space around the shed for maintenance access.
- Level the Ground: Use a shovel and a garden rake to level the ground. You may need to add or remove soil to achieve a flat surface. Use a carpenter’s level to check your progress.
- Choose a Foundation Type: Decide on the type of foundation. Options include concrete slab, wooden frame, gravel base, or pavers. Concrete Slab: Provides a permanent, stable, and level base. Gravel Base: Allows for good drainage and can be topped with pavers. Wooden Frame: Easier to build, often used for smaller sheds.
- Prepare the Foundation: For a concrete slab, build a form with wood to hold the concrete, and pour the concrete according to manufacturer instructions. For a gravel base, dig out the topsoil to a depth of about 4-6 inches, add landscape fabric to prevent weed growth, fill with gravel, and compact it with a tamper. For a wooden frame, construct the frame from treated lumber and fill with gravel, if necessary, for drainage.
- Compact the Ground: Use a hand tamper or a mechanical plate compactor to compact the soil or gravel. This will help prevent your shed from settling unevenly over time.
- Check the Level: Use a long board and a level to ensure the base is completely level. Make any necessary adjustments.
- Install a Weed Barrier: Consider installing landscape fabric beneath your foundation to prevent weeds from growing under the shed.
Once the foundation is ready and level, you can proceed with assembling and installing your shed, following the manufacturer’s instructions. Make sure to ensure proper anchoring especially if you live in an area prone to strong winds.
What is the easiest shed design to install?
The easiest shed design to install is typically a prefabricated or modular shed kit. These kits come with pre-cut and pre-drilled components, and they often include all necessary hardware and clear instructions, making assembly straightforward. Here are some of the key features that make these sheds easy to install:
- Pre-fabricated Panels: Many kits include walls, roof, and floor panels that are already assembled, reducing the need for complex cutting or measuring.
- Simple Construction: Basic designs like the A-frame or lean-to are easier for beginners due to their straightforward structural elements.
- Material Options: Sheds made of resin, plastic, or metal are often lighter and easier to handle than those made of wood, which can be beneficial for quick assembly.
- Tool Requirements: These kits usually require standard household tools for assembly, such as a drill, screwdriver, and hammer.
- Size and Complexity: Smaller sheds, such as those in the range of 6x8 feet, are easier to manage and install, especially on a level surface.
- Foundation: Some sheds are designed to be placed directly on the ground with minimal foundation preparation, simplifying the process.
When selecting a shed kit, consider your skill level, tools available, and the complexity of the design instructions. Reading reviews and watching instructional videos can also aid in choosing a kit that aligns with your needs and capabilities.
How to measure for a shed placement in your yard?
Measuring for a shed placement in your yard is an important step to ensure that the shed fits well within the space, is easily accessible, and complies with any local zoning regulations or homeowners' association requirements. Here’s a step-by-step guide to help you through the process:
- Check Regulations: Start by reviewing local zoning laws and HOA rules to understand any restrictions on shed placement, such as distance from property lines, size limitations, or height restrictions.
- Determine Shed Size: Decide on the size of the shed you want to build or purchase. Consider what you’ll store inside and any future needs.
- Select a Location: Look for a flat, level area to minimize the need for site preparation. Consider accessibility from your house, proximity to utilities if needed (like electricity), and how it affects the overall appearance of your yard.
- Measure the Space: Use a measuring tape to determine the dimensions of the chosen area, ensuring there is adequate space around the shed for maintenance and aesthetic reasons. Leave extra space for doors or windows that you might plan to install and ensure the area is large enough to accommodate the size of the shed, including overhangs.
- Check for Obstacles: Identify any obstacles in the planned location, such as trees, rocks, or uneven ground, and plan how you’ll address these issues. Consider underground utilities by calling your local utility company to check for any lines.
- Consider Drainage: Ensure that the location provides good drainage to prevent water from collecting around the shed. You might need to build up the area or adjust it for proper water runoff.
- Plan Access and Usage: Think about access to the shed (pathways, doors) and ease of moving items in and out. Observe sunlight exposure if you’re using it as a workspace, or ventilation if storing items sensitive to temperature changes.
- Mark the Area: Use stakes and string, spray paint, or a garden hose to mark the dimensions of the shed on the ground. Double-check your measurements to ensure accuracy.
- Test Fit: If possible, simulate the shed placement with its approximate footprint to make sure it fits well in the chosen spot and doesn’t impede other yard features.
- Adjust as Necessary: If you find any issues with the initial placement, adjust the location or size accordingly before proceeding with installation.
By carefully measuring and considering these factors, you can ensure that your shed fits perfectly and functions well in your yard.
How to ensure proper ventilation in a shed with windows?
Ensuring proper ventilation in a shed with windows is important to maintain air quality, regulate temperature, and control humidity. Here are some steps you can take:
- Window Placement: Position windows on opposite sides of the shed to facilitate cross-ventilation. Ensure that windows are unobstructed by shelving or large objects inside.
- Opening Windows: Regularly open the windows to allow fresh air to circulate. If the shed is in a secure location, consider leaving a window slightly open for passive ventilation.
- Adjustable Windows: If possible, choose windows that can be adjusted or tilted to direct airflow. This can help control the amount of air and its direction, depending on current needs.
- Install Vents: Consider adding additional vents, such as gable or soffit vents, to aid airflow. These can help pull stale air out and allow fresh air in.
- Use Fans: Install an oscillating or exhaust fan to mechanically assist ventilation, especially if natural airflow is insufficient. Fans can help distribute air evenly and remove excess heat or humidity.
- Roof Ventilation: A roof vent or a ridge vent can be installed to allow hot air to rise and escape, promoting better airflow throughout the shed.
- Consider a Whirlybird: A wind-driven turbine vent on the roof helps extract air out of the shed naturally as it spins with the wind.
- Plant Natural Shade: If possible, plant trees or shrubs near the shed to provide shade, which reduces temperature variations and promotes better temperature management through ventilation.
- Monitor Humidity: Keep an eye on the humidity levels inside the shed using a hygrometer. If humidity is a consistent issue, consider integrating a dehumidifier into your ventilation strategy.
- Regular Maintenance: Ensure that vents and fans are kept clean and functional. Check windows and seals for dirt and debris that could hinder airflow or cause leaks.
By using these strategies, you can efficiently ventilate your shed, making it a more comfortable and healthier environment.