
Best Sheds with Windows to Buy in July 2026
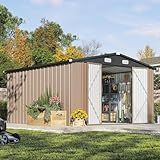
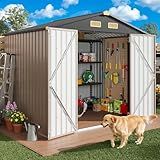
Aoxun 10 x 12FT Outdoor Storage Shed with Double Hinged Large Door Utility Garden Shed with Lockable Door & Sloped Roof Metal Sheds Outdoor Storage for Garden, Backyard, Patio and Backyard, Brown
-
MAXIMIZE SPACE: STORE SHOVELS, BIKES, & GEAR NEATLY ORGANIZED.
-
SECURE & PROTECT: STURDY DESIGN PREVENTS LEAKS; LOCKABLE FOR SAFETY.
-
VERSATILE USE: IDEAL FOR GARDENS, PATIOS, OR BY THE POOL-DURABLE EVERYWHERE.


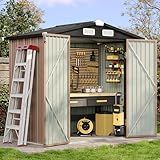
YADSUNY 10x8 FT Outdoor Storage Shed, Metal Garden Tool Shed with Updated Frame Structure and Lockable Doors, Ideal for Backyard Garden Patio Lawn, Grey
-
DURABLE DESIGN: GALVANIZED STEEL OFFERS UNMATCHED WEATHER PROTECTION.
-
EASY ASSEMBLY: REINFORCED STRUCTURE ENABLES 35% FASTER SETUP TIME.
-
SPACIOUS STORAGE: AMPLE SPACE FOR TOOLS AND ESSENTIALS, MAXIMIZING ORGANIZATION.
VanAcc 12x14x8.5 FT Galvanized Steel Outdoor Storage Shed with 2 4-Pane Windows Lockable Door, Nordic Cottage Shed for Backyard, Garden, Patio, Dark Grey/White
- STYLISH STORAGE SOLUTION: UNIQUE NORDIC DESIGN ENHANCES YOUR OUTDOOR SPACE.
- VERSATILE UTILITY SHED: PERFECT FOR TOOLS, EQUIPMENT, AND SEASONAL ITEMS.
- DURABLE & WATERPROOF: STURDY GALVANIZED STEEL ENSURES LONG-LASTING USE.
Rubbermaid Resin Outdoor Storage Shed With Floor (7 x 7 Ft) Weather Resistant Gray Organization for Home/Backyard/Garden Tools/Lawn Mower/Bike Storage/Pool Supplies
- SPACIOUS 7X7 STORAGE FOR LARGE LAWN GEAR AND EQUIPMENT.
- 50% STRONGER WALLS AND ROOF FOR ENHANCED DURABILITY AND LONGEVITY.
- 180-DEGREE DOOR ACCESS AND INNOVATIVE DESIGN FOR MAXIMUM CONVENIENCE.
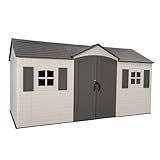
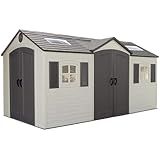
Lifetime Outdoor Storage Shed, 15x8 Ft, Desert Sand, Resin Backyard Tool Shed with Lockable Doors and UV-Protected Panels
- UV-PROTECTED & STAIN-RESISTANT: NO FADING OR PAINTING NEEDED!
- STEEL-REINFORCED DURABILITY: DUAL-WALL DESIGN ENSURES LONG-LASTING STRENGTH.
- SPACIOUS & BRIGHT: HIGH-PITCHED ROOF AND SKYLIGHTS FOR AMPLE INTERIOR LIGHT.
IRONCK 8x6FT Outdoor Storage Shed with Lockable Doors, 7.4x5.3FT Base Galvanized Steel Metal Garden Tool Shed with Breathable Vent for Yard Bins/Generator/Wheelbarrow Storage, Brown
- DURABLE GALVANIZED STEEL ENSURES ALL-WEATHER PROTECTION.
- EASY ACCESS WITH DOUBLE DOORS AND TOP VENTILATION FOR FRESHNESS.
- SPACIOUS DESIGN ADAPTS FOR TOOLS, PETS, OR RECYCLING STORAGE.
Aoxun 6.2x4 FT Shed Outdoor Storage Shed with Lockable Doors & Slooping Roof Metal Garden Tool Shed for Backyard, Patio, Poolside (Brown)
-
DURABLE DESIGN: HEAVY-DUTY GALVANIZED STEEL AND REINFORCED PANELS ENSURE LONGEVITY.
-
VERSATILE USE: PERFECT FOR GARDEN TOOLS, PETS, OR AS A GARBAGE ENCLOSURE.
-
EASY ASSEMBLY: LABELED PARTS AND A CLEAR MANUAL SIMPLIFY SETUP.
Lifetime 60079 Outdoor Storage Dual Entry Shed, 15 x 8 ft, Desert Sand
- EYE-CATCHING DESIGN WITH UV PROTECTION PREVENTS FADING AND CRACKING.
- DURABLE HDPE AND STEEL REINFORCE FOR UNMATCHED STRENGTH AND LONGEVITY.
- SLIP-RESISTANT FLOOR AND STEEP ANGLE ENSURE SAFETY AND QUICK WATER DRAINAGE.
The price range for sheds with windows can vary significantly based on factors such as size, material, design, and additional features. Generally, smaller, basic sheds with windows might start around a few hundred dollars, whereas larger, more elaborate models with enhancements like insulation, multiple windows, or custom designs can reach several thousand dollars. It is advisable to consider what specific features and improvements you need in a shed to determine a more accurate price range for your requirements.
What is involved in assembling a pre-fabricated shed?
Assembling a pre-fabricated shed can be a manageable but involved task that requires careful planning and execution. Here’s a step-by-step overview of what is typically involved:
- Preparation and Planning Check Regulations: Verify if any permits are needed from local authorities. Location Selection: Choose a suitable location on your property that is level and clear of obstructions. Foundation Preparation: Ensure the ground is level. You may need to prepare a concrete slab, gravel base, or use pre-made shed foundation kits.
- Gather Tools and Materials Tools: Commonly required tools include a drill, screwdriver, level, tape measure, ladder, wrench, and hammer. Parts Checklist: Confirm that all parts and hardware included in the shed kit are present.
- Unpacking and Sorting Inspect Components: Unpack the kit and inspect all parts for damage or missing pieces. Organize Parts: Sort and organize the parts so they are easily accessible during assembly.
- Assembly Process Follow Instructions: Carefully follow the manufacturer's instructions. This typically involves assembling the base first before moving on to walls, roof, and doors. Base and Floor: Assemble the floor framework if needed and secure to the foundation. Some sheds may have a pre-built floor. Walls Frame: Erect the wall panels or frames according to the instructions. Ensure they are square and plumb. Roof Assembly: Attach roof beams and panels. Make sure they are securely fastened. Doors and Windows: Install any doors and windows, ensuring they open and close correctly.
- Securing the Shed Anchoring: Secure the shed to the foundation using recommended anchors or straps to withstand wind and other elements. Weatherproofing: Apply any necessary sealants or weatherproofing materials as recommended by the manufacturer.
- Final Touches Cleanup: Remove any debris and organize leftover materials. Testing: Ensure all doors and windows function properly and make any necessary adjustments.
- Maintenance Considerations Keep an eye on water drainage around the shed and perform regular maintenance checks for any repairs needed due to wear over time.
Always prioritize safety, take breaks if needed, and seek assistance for heavy lifting or complex steps. If you’re unsure about any part of the process, consulting with the shed manufacturer’s support or professional assembly services might be beneficial.
How to choose the right shed for your garden?
Choosing the right shed for your garden involves several key considerations to ensure it meets your needs and complements your outdoor space. Here are some steps to guide you through the process:
- Define the Purpose: Determine what you will use the shed for, such as storage, a workshop, a greenhouse, or a hobby space. This will influence the size and design features you need.
- Assess Space and Location: Measure the available space in your garden. Consider any access restrictions for bringing in materials or the completed shed. Choose a location with level ground and ensure there’s adequate clearance from fences, trees, and other structures. Check for local zoning laws or homeowner association rules that might affect placement.
- Choose the Material: Wood: Offers a traditional look and can be customized easily but requires more maintenance. Metal: Durable and low-maintenance, but can be prone to rust if not adequately protected. Plastic/Resin: Lightweight, low-maintenance, and resistant to decay, although not as sturdy for heavy shelving or modifications.
- Consider Size and Design: Plan for future needs as well as current ones. Bigger sheds offer more storage and versatility. Select a design that complements your garden style. For example, a rustic wooden shed might suit a country garden, while a sleek metal or plastic shed could fit a more contemporary setting.
- Check for Features: Look for windows and ventilation if you’ll be spending time inside or storing delicate items. Consider shelves, hooks, and workbenches for better organization. Check for features like skylights or translucent panels if natural light is important.
- Evaluate Build Quality and Warranty: Check the shed’s construction quality, particularly the framing, roof, and floor. Tongue and groove cladding is typically stronger and more weatherproof than overlap cladding. Ensure there is a good warranty or guarantee for peace of mind regarding the shed's durability.
- Budget: Determine your budget and try to stick to it. Remember that installation costs and any additional features or treatments might add to the cost.
- Consider Assembly: Decide if you want to build it yourself or hire professionals. Consider the complexity of assembly, especially for larger or more modular sheds.
- Security: Ensure the shed has good security features, especially if storing valuable items. Look for a strong door, quality lock, and secure windows.
- Aesthetic and Environmental Impact: Consider the aesthetic appeal and how it fits into your garden’s landscape. Evaluate any environmental impact, such as sustainability of materials or energy efficiency, particularly for sheds used regularly as workspaces.
Once you’ve considered all these factors, you should be well-equipped to select the perfect shed for your garden.
How to install windows in a shed?
Installing windows in a shed can enhance its appearance and functionality by providing natural light and ventilation. Here's a general guide to help you through the process:
- Determine Window Placement: Choose the location where you want to install the windows. Consider factors like sunlight, ventilation, and wall structure. Measure and mark the rough opening on the shed's wall, ensuring it’s level and centered.
- Select the Right Window: Choose a window that fits within the structural integrity of your shed and meets your needs. Common options include single-hung, double-hung, or fixed windows.
- Gather Tools and Materials: Tools: Circular saw or reciprocating saw, measuring tape, level, hammer, drill, screwdriver, utility knife, and square. Materials: Window, flashing tape, shims, nails or screws, caulk or sealant, wood for framing (if necessary), and finishing trim.
- Prepare the Wall: Remove any siding or wall covering from the area where the window will be installed. Cut an opening in the wall slightly larger than the rough opening dimensions of the window to allow for frame adjustments. Use a circular saw or reciprocating saw for this task.
- Frame the Opening: Construct a frame (known as a rough opening) within the wall if one doesn’t exist. The frame consists of a header at the top, a sill plate at the bottom, and trimmer studs on the sides. Ensure the frame is square and level.
- Install Flashing: Apply flashing tape to the sill (the bottom part of the rough opening) to prevent water infiltration. Apply additional flashing around the sides and top for added protection.
- Place the Window: Insert the window into the rough opening from the outside. Use shims to adjust and ensure it is level and plumb. Once adjusted, temporarily secure the window with nails or screws.
- Secure the Window: Fasten the window permanently using the manufacturer's recommended method, which may involve more nails, screws, or brackets. Ensure it opens, closes, and locks properly.
- Seal the Window: Apply a bead of caulk or sealant around the perimeter of the window to prevent air and water ingress. Install exterior trim as needed for aesthetic purposes and to further enhance weather resistance.
- Reattach Siding:
- Replace any siding you removed and ensure it is flush with the window to maintain the shed's aesthetics and weatherproofing.
- Finish the Interior: Finish the interior side by trimming around the window edges for a neat appearance.
Always check the manufacturer's installation instructions specific to your window model, as they can provide more detailed guidance. If you’re uncertain about any steps, consider consulting with a professional to ensure proper installation and weatherproofing.
How to insulate a shed for year-round use?
Insulating a shed for year-round use is a great way to ensure it's comfortable and energy-efficient. Here's a step-by-step guide to help you get started:
- Assess Your Shed: Check the current condition of the shed, including the roof, walls, and floor. Seal any gaps, cracks, or holes to prevent drafts and moisture ingress.
- Choose Insulation Materials: Walls and Ceilings: Opt for fiberglass batts, foam board, or spray foam insulation. Foam board is easy to install and provides a decent R-value. Spray foam offers the highest R-value and excellent air sealing but is more expensive. Floor: Consider rigid foam insulation or using carpet underlay combined with plywood or another subfloor material.
- Prepare the Shed: Remove any internal wall panels or covering if they exist to expose the framing. Clean the surfaces to ensure better adhesion for foam boards or spray foam.
- Insulate the Walls: For foam boards: Cut them to fit snugly between the wall studs, and secure them in place with adhesive or fasteners. Seal the edges with foil tape or spray foam for a tight seal. For fiberglass batts: Measure, cut, and fit them snugly between studs without compressing the material. If using spray foam, apply it evenly in layers as per the manufacturer's instructions.
- Insulate the Roof/Ceiling: Similar to walls, cut and fit foam boards or fiberglass rolls between the rafters. Make sure to maintain any required ventilation gaps to prevent condensation issues.
- Insulate the Floor: If accessible, attach rigid foam insulation to the underside of the floor. Ensure all seams are sealed. If not accessible, you might consider raising the floor level slightly to add insulation on top before covering it with plywood or other materials.
- Seal the Features: Insulate around windows and doors using weather stripping or expandable foam to prevent air leaks. Consider installing double-glazed windows for better thermal retention.
- Install a Vapor Barrier: To prevent moisture buildup, install a vapor barrier on the warm side of the insulation in humid climates.
- Finish Interior: Cover the insulated walls and ceiling with plywood, drywall, or another finishing material to protect the insulation and give a finished look.
- Add Heating/Cooling: Consider installing a small electric heater, wood stove, ductless mini-split, or portable AC unit to maintain temperature throughout the year.
- Ventilation: Ensure there's adequate ventilation to control moisture and maintain air quality, especially if using a fuel-based heating source.
By following these steps, you can transform your shed into a usable space year-round. Don't forget to check local regulations or building codes before making any major modifications.
What is the standard window size for sheds?
The standard window size for sheds can vary based on the design and manufacturer, but some common sizes include:
- 18 inches x 24 inches (width x height)
- 24 inches x 24 inches
- 18 inches x 27 inches
- 24 inches x 36 inches
These sizes provide adequate natural light while maintaining privacy and security. When choosing windows for a shed, it’s important to consider the shed’s purpose, the amount of light needed, and the aesthetic you want to achieve. Additionally, custom sizes are often available if you have specific requirements.
What is the difference between a shed and a storage unit?
The main differences between a shed and a storage unit primarily pertain to their location, purpose, structure, and accessibility:
- Location: Shed: Typically found on residential or commercial properties, sheds are standalone structures that are usually located in a backyard or garden area. They are part of the premises where the owner resides or works. Storage Unit: These are part of larger storage facilities, often located away from personal property. They are rented spaces within a commercial storage complex.
- Purpose: Shed: Generally used for storing gardening tools, lawn equipment, bicycles, seasonal items, and sometimes used as workshops or hobby spaces. Sheds serve more immediate, everyday needs. Storage Unit: Used for storing surplus belongings, furniture, seasonal items, business inventory, or other items that are not needed regularly. They are more often used for overflow storage, especially during moves or renovations.
- Structure: Shed: Sheds can vary significantly in size and construction, often made of wood, metal, or plastic. They may have windows, electricity, and other amenities depending on their function. Storage Unit: These are usually uniform in size and construction, often made of metal or concrete. They are designed for security and protection against the elements and generally do not have windows or personal electrical outlets.
- Accessibility: Shed: Directly accessible anytime since it is on one's own property. There are typically no restrictions on when or how often you can access your items. Storage Unit: Accessibility may be subject to the hours of the facility. While many facilities offer 24/7 access, some may have limited hours or require you to check in at the office.
- Ownership and Cost: Shed: Typically owned outright by the property owner. Costs involve the initial purchase and maintenance of the shed, which can vary. Storage Unit: Rented on a monthly basis from a storage facility. Costs are ongoing as part of a rental agreement and can vary based on size and location of the unit.
Each option has its benefits depending on the needs and circumstances of the user. Sheds offer proximity and convenience, while storage units provide space and security for larger quantities or less frequently accessed items.