
Best Electric Egg Cookers to Buy in July 2026
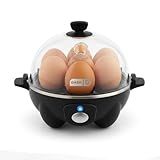
DASH Electric Rapid Egg Cooker for Hard Boiled/Poached/Scrambled Eggs or Omelets with Auto Shut-Off Feature, Black, 7 Egg Capacity
- COOK ALL EGG STYLES IN MINUTES WITH PRECISION AND EASE!
- SPACE-SAVING DESIGN WITH CONVENIENT STORAGE FOR ALL ACCESSORIES.
- EFFORTLESS CLEANUP: DISHWASHER-SAFE PARTS FOR QUICK MAINTENANCE!


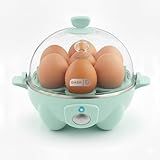
Dash Rapid Egg Cooker - Boiler, Poacher & Steamer - Includes Measuring & Recipe Guide - Dishwasher Safe - Holds 7 Eggs, Aqua
- COOK EGGS TO PERFECTION IN MINUTES: BOILED, POACHED, OR SCRAMBLED!
- BUILT-IN SENSOR ENSURES EFFORTLESS COOKING FOR PERFECT RESULTS EVERY TIME.
- SPACE-SAVING DESIGN WITH EASY-TO-CLEAN PARTS FOR HASSLE-FREE STORAGE!
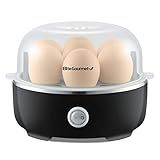
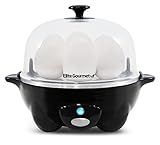
Elite Gourmet EGC115B Easy Egg Cooker Electric 7-Egg Capacity, Soft, Medium, Hard-Boiled Egg Cooker with Auto Shut-Off, Measuring Cup Included, BPA Free, Classic Black
- PERFECTLY COOKED EGGS: BOIL UP TO 7 EGGS TO DESIRED FIRMNESS EVERY TIME!
- USER-FRIENDLY & FAST: SIMPLE CONTROLS WITH AUTO SHUT-OFF FOR EASY USE.
- VERSATILE & COMPACT: EGG COOKER DOUBLES AS A STEAMER, IDEAL FOR ANY SPACE!
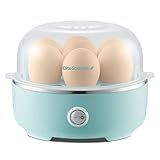
Elite Gourmet EGC115M Easy Egg Cooker Electric 7-Egg Capacity, Soft, Medium, Hard-Boiled Egg Cooker with Auto Shut-Off, Measuring Cup Included, BPA Free, Retro Mint
-
COOK 7 EGGS PERFECTLY WITH EASY CLEANUP AND NO HASSLE!
-
SIMPLE OPERATION: JUST ADD WATER, PRESS POWER, AND ENJOY!
-
COMPACT DESIGN FITS ANY KITCHEN, PERFECT FOR DORMS AND RVS!
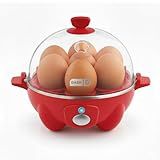
Elite Gourmet EGC-007B# Rapid Egg Cooker, 7 Easy-To-Peel, Hard, Medium, Soft Boiled Eggs, Poacher, Omelet Maker, Auto Shut-Off, Alarm, 16-Recipe Booklet, Black
- RAPID BOILING ENSURES PERFECT EGGS IN MINUTES-NO STOVETOP HASSLE!
- EASY-TO-PEEL SHELLS SAVE TIME AND SIMPLIFY YOUR COOKING EXPERIENCE.
- VERSATILE COOKING METHODS FOR ANY MEAL-SCRAMBLE, POACH, OR STEAM!
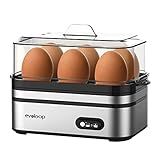
Evoloop Rapid Egg Cooker Electric 6 Eggs Capacity, Soft, Medium, Hard Boiled, Poacher, Omelet Maker Egg Poacher With Auto Shut-Off, BPA Free
- COOK UP TO 6 EGGS EFFORTLESSLY FOR PERFECT BREAKFAST DISHES!
- COMPACT DESIGN SAVES SPACE, IDEAL FOR DORMS, CAMPING, AND MORE.
- EASY CLEANUP WITH DETACHABLE PARTS AND INCLUDED RECIPE GUIDE.
DASH Rapid Egg Cooker: 7 Egg Capacity Electric Egg Cooker for Hard Boiled Eggs, Poached Eggs, Scrambled Eggs, or Omelets.
- COOK PERFECT EGGS IN MINUTES: HARD, SOFT, POACHED, OR SCRAMBLED!
- PRECISION THERMAL SENSOR ENSURES FLAWLESS COOKING EVERY TIME.
- DISHWASHER-SAFE PARTS MAKE CLEANUP QUICK AND HASSLE-FREE!
Electric egg cookers can be a convenient addition to your kitchen, especially if you frequently cook eggs and desire consistency. They can save time and effort by automating the cooking process, offering you the ability to cook eggs to your preferred doneness without having to monitor them closely. These devices are particularly useful for busy individuals who want a hassle-free way to prepare breakfast or snacks. Electric egg cookers are capable of boiling, poaching, and sometimes even scrambling eggs, and they often come with features like automatic shut-off and audible alerts to prevent overcooking. This makes them appealing for those who appreciate precision and ease. However, whether an electric egg cooker is worth it can depend on your cooking habits and the available space in your kitchen. Some might find them to be an unnecessary appliance if they are comfortable with traditional methods or if they have limited space for additional gadgets. Ultimately, the value of an electric egg cooker rests on personal preferences, lifestyle, and how much you prioritize convenience and consistency in your egg preparation.
How to prevent eggs from cracking in an electric egg cooker?
To prevent eggs from cracking in an electric egg cooker, you can follow these tips:
- Use the Pin Prick Method: Many egg cookers come with a pin or needle on the measuring cup. Gently prick a tiny hole in the large end of each egg before cooking. This allows steam to escape, reducing the chance of cracking.
- Room Temperature Eggs: If possible, use eggs that are at room temperature. Taking them out of the fridge about 30 minutes before cooking can help reduce the shock of temperature change, which is a common cause of cracking.
- Proper Water Measurement: Use the correct amount of water as per the manufacturer’s instructions. Too much or too little water can affect the cooking process and may lead to cracking.
- Placement: Arrange the eggs evenly in the cooker, making sure they are not too close to each other. Avoid overloading the cooker.
- Gentle Handling: Handle the eggs gently to avoid causing micro-cracks that can expand during cooking.
- Gradual Heating: If your cooker has different heat settings, you might try starting on a lower setting to gradually heat the eggs, if applicable.
- Fresh Eggs: Try to use fresher eggs. Older eggs have thinner shells that may be more susceptible to cracking.
By combining several of these methods, you can greatly reduce the chances of your eggs cracking during cooking.
How to make soft-boiled eggs in an electric egg cooker?
Using an electric egg cooker to make soft-boiled eggs is a simple and convenient process. Here's a step-by-step guide to help you get perfectly soft-boiled eggs:
- Check the Instructions: Before starting, check the user manual of your specific egg cooker model as it might have specific instructions or requirements.
- Prepare the Eggs: Take the number of eggs you want to cook and ensure they are at room temperature to prevent cracking during cooking.
- Measure the Water: Most electric egg cookers come with a measuring cup. Use it to measure the correct amount of water needed for soft-boiled eggs. The necessary amount of water varies depending on the cooker, so refer to the cooker’s instructions or water level guide marked on the measuring cup. Typically, less water is needed for soft-boiled eggs compared to hard-boiled.
- Pierce the Eggs: If your egg cooker has an egg piercing pin on the water measuring cup, you can use it to carefully pierce the wide end of each egg. This step helps prevent eggs from cracking during cooking.
- Load the Cooker: Arrange the eggs on the provided egg rack or tray within the cooker.
- Add Water: Pour the measured water into the heating plate or designated area of the egg cooker.
- Start Cooking: Place the lid on the cooker, ensuring it’s securely closed. Turn on the egg cooker. Most cookers have a single button or switch to start the cooking process.
- Wait for Completion: The egg cooker will automatically shut off, or notify you via a buzzer, when the eggs are done. This typically takes between 5 to 10 minutes, depending on your specific cooker and water level used.
- Cool the Eggs: Once the eggs are done, carefully transfer them to a bowl of cold water or ice bath to stop the cooking process and make peeling easier.
- Peel and Serve: Allow the eggs to sit in the cold water for a few minutes, then gently tap them on a hard surface to break the shell. Peel and enjoy your soft-boiled eggs!
Remember that different egg cookers may have slight variations in operation, so it’s always best to refer to your specific model’s manual for precise instructions.
How to store an electric egg cooker efficiently?
Storing an electric egg cooker efficiently involves a few considerations to ensure it's easily accessible, well-maintained, and doesn't take up unnecessary space. Here’s how you can do it:
- Disassemble Components: If your egg cooker has removable parts such as trays and lids, disassemble them to make the unit more compact. This also prevents any parts from being misplaced.
- Utilize Vertical Space: If possible, store the egg cooker vertically or on its side to save shelf space. Just ensure it's stable and won’t topple over easily.
- Cable Management: Wrap the power cord neatly. You can use a twist tie or a Velcro strap to keep it organized and prevent it from tangling.
- Dedicated Shelf Space: Assign a specific shelf or cabinet space for small appliances like the egg cooker. This keeps your kitchen counters uncluttered and allows easy access when needed.
- Store with Similar Items: Place the egg cooker with other cooking appliances or tools you frequently use together, such as other breakfast appliances or items like a toaster, to make your routine more efficient.
- Label the Storage Area: If you’re storing it in a pantry or cabinet that holds multiple items, consider labeling the area for quick identification.
- Protect from Dust and Damage: If you don't use it often, consider covering it with a cloth or storing it in a dust-free bin to protect it.
- Strategic Placement: Store it in a place where you usually prepare breakfast to minimize the time and effort of retrieving it and putting it away.
Following these tips will help keep your kitchen organized and your electric egg cooker in good condition.
What is the capacity of a typical electric egg cooker?
The capacity of a typical electric egg cooker can vary, but most standard models are designed to accommodate between 6 to 12 eggs at a time. Smaller models may hold around 6 eggs, while larger ones can handle up to 12 or even more, depending on the design and brand. Always check the specifications of a specific model to determine its exact capacity.
What is included in an electric egg cooker set?
An electric egg cooker set typically includes the following components:
- Heating Base: The main unit that generates heat to cook the eggs.
- Lid: A transparent or opaque cover that helps steam the eggs.
- Egg Tray/Rack: A tray designed to hold eggs upright during cooking, often with designated spaces for each egg. Some designs allow for different cooking methods (e.g., poaching, boiling).
- Measuring Cup: A cup with measurements to add the correct amount of water for the desired level of egg doneness (soft, medium, or hard-boiled).
- Piercing Pin: Often located at the bottom of the measuring cup, the pin is used to pierce the eggshell before cooking to prevent cracking.
- Poaching Tray: A tray for poaching eggs, found in some models.
- Omelet Tray: Some sets include a tray for making omelets or scrambled eggs.
- Instruction Manual: Guides users on how to use the cooker effectively and usually includes cooking times for different styles of eggs.
The specific components can vary based on the model and brand, with some cookers offering additional accessories or specialized trays for other cooking techniques.
How to boil eggs in an electric egg cooker?
Boiling eggs in an electric egg cooker is a straightforward process. Here are the general steps you can follow, though you should always check your specific model's manual for any particular instructions:
- Gather Your Equipment: Electric egg cooker Eggs Measuring cup (usually provided with the cooker) Needle or pin (often included with the cooker)
- Prepare the Egg Cooker: Place the electric egg cooker on a flat, stable surface. Ensure the heating plate is clean and dry.
- Measure Water: Use the measuring cup to pour the appropriate amount of water into the heating plate. The amount of water typically depends on how soft or hard you want the eggs to be (less water for soft-boiled, more for hard-boiled). The cup usually has markings to indicate the level for different preferences.
- Prepare the Eggs: Use the needle or pin to pierce a small hole in the larger end of each egg. This helps prevent the eggs from cracking during cooking by allowing air to escape.
- Place the Eggs: Arrange the eggs on the egg rack or tray provided. Ensure the hole side is facing upwards if you pierced the eggs. Be careful not to overcrowd the tray; the number of eggs you can cook at once depends on the size of your cooker.
- Cook the Eggs: Place the egg tray inside the cooker and secure the lid. Plug in the egg cooker and switch it on. Some models might start automatically once plugged in. Depending on your model, it might have a timer or an automatic shut-off feature. Most modern electric egg cookers will turn off automatically once the water has evaporated. If your model doesn’t have this feature, set a timer according to the manual’s guidelines.
- Cool the Eggs: Once cooking is complete, unplug the cooker and carefully remove the lid, being cautious of any steam. Immediately transfer the eggs to a bowl of cold water or ice water to stop further cooking and make peeling easier.
- Peel and Serve: Once the eggs are cool enough to handle, peel them. Start by tapping gently on a hard surface to crack the shell, then peel under cold running water to help remove the shell more easily. Serve as desired.
Always refer to your specific egg cooker’s manual for precise instructions as models can vary slightly in terms of operation and features.