
Best Ceiling Fans to Buy in July 2026
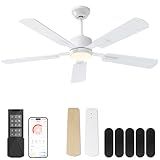
CubiCubi Ceiling Fans with Lights - 52 inch White Ceiling Fan with Light and Remote/APP, Dimmable, Super Quiet, Modern Ceiling Fan for Indoor Bedroom, Living Room, Kitchen
- STYLISH DUAL-SIDED BLADES: CUSTOMIZE DECOR WITH CHIC DESIGN OPTIONS.
- ULTRA-SILENT OPERATION: ENJOY RESTFUL SLEEP WITH 24DB NOISE LEVEL.
- SMART CONTROL & MEMORY: ADJUST SETTINGS EFFORTLESSLY FOR LASTING COMFORT.


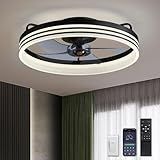
LUDOMIDE Ceiling Fans with Lights, Flush Mount Ceiling Fan with Lights and Remote, 6 Wind Speeds Smart Low Profile Ceiling Fan for Bedroom, Kids Room and Living Room 20" (Black)
- VERSATILE 2-IN-1 DESIGN: MODERN FAN WITH ADJUSTABLE LED LIGHTING.
- WHISPER-QUIET PERFORMANCE: ENJOY COOL AIR WITHOUT DISTURBING PEACE.
- SMART FEATURES: REMOTE/APP CONTROL WITH MEMORY AND TIMER OPTIONS.
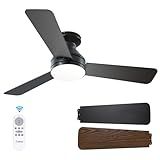
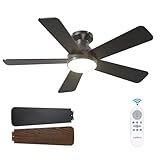
Amico Ceiling Fans with Lights, 42 inch Low Profile Ceiling fan with Light and Remote Control, Flush Mount, Reversible, 3CCT, Dimmable, Noiseless, Black Ceiling Fan for Bedroom, Indoor/Outdoor Use
- ENERGY-EFFICIENT DESIGN SAVES 80% ELECTRICITY COMPARED TO TRADITIONAL FANS.
- ENJOY CUSTOMIZABLE LIGHT SETTINGS WITH 10%-100% DIMMABLE OPTIONS.
- EASY, RENTER-FRIENDLY INSTALLATION WITH NO DRILLING REQUIRED.
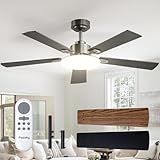
Passky Ceiling Fans with Lights, 52 inch Sleek Ceiling Fan with Light and Remote Control, 3CCT, Dimmable, Reversible, Noiseless, Black Ceiling Fan for Bedroom, Living Room
- ENERGY-EFFICIENT DESIGN: SAVE 80% ON ELECTRICITY COSTS!
- EASY REMOTE CONTROL: ADJUST FAN SPEED, LIGHT, AND TIMER EFFORTLESSLY.
- QUIET OPERATION: ENJOY A PEACEFUL ENVIRONMENT FOR SOUND SLEEPERS.
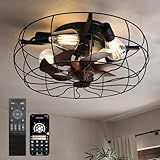
CubiCubi Modern Ceiling Fans, 20 Inch Black Ceiling Fan with Lights and Remote Control, APP, Fandelier with 6 Wind Speeds, Low Profile Ceiling Fans with Lights for Bedroom, Office
-
EASY SETUP IN 15 MINUTES: NO COMPLEX ASSEMBLY NEEDED!
-
SMART CONTROL: ADJUST SETTINGS VIA REMOTE OR MOBILE APP!
-
ULTRA-QUIET & EFFICIENT: ENJOY POWERFUL AIRFLOW WITH MINIMAL NOISE!
addlon Ceiling Fans with Lights, 42 Inch Low Profile Ceiling Fan with Light and Remote Control, Flush Mount, Reversible, 3CCT, Dimmable, Quiet, Black Small Ceiling Fan for Bedroom Indoor/Outdoor Use
- ENERGY EFFICIENT COMFORT: SAVE 80% ENERGY WITH OUR STYLISH FAN!
- CONVENIENT REMOTE CONTROL: ADJUST SPEED, TIMER & SETTINGS WITH EASE.
- WHISPER-QUIET OPERATION: ENJOY PEACEFUL SLEEP WITH JUST 35DB NOISE!
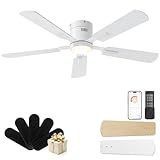
CubiCubi Modern Ceiling Fan with Lights and Remote Control, 52" White Ceiling Fan with APP, LED Fan Light with 3CCT and 6 Wind Speeds, Low Profile Ceiling Fans with Lights for Bedroom, Office
-
STYLISH AESTHETIC & VERSATILE DECOR: PERFECT FOR ANY MODERN SPACE!
-
ULTRA-SILENT OPERATION: ENJOY SERENE ENVIRONMENTS WITH 24DB NOISE LEVELS.
-
SMART CONTROL & CUSTOM LIGHTING: ADJUST SPEED, BRIGHTNESS, & COLORS EASILY!
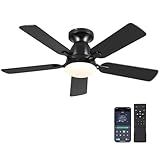
Mpayel Ceiling Fans with Lights- 46" Low Profile Indoor Ceiling Fan with Light and Remote/APP Control, Flush Mount, LED Dimmable DC Reversible Modern Ceiling Fan for Bedroom(Black)
-
CONTROL FAN SPEED & LIGHTS EASILY VIA REMOTE OR APP FOR ULTIMATE EASE.
-
ENJOY SILENT OPERATION WITH A POWERFUL DC MOTOR FOR PEACEFUL SPACES.
-
STYLISH LOW-PROFILE DESIGN FOR VERSATILE USE IN ANY INDOOR/OUTDOOR AREA.
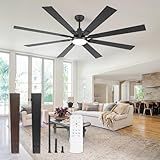
ZMISHIBO 72 inch Large Ceiling Fans with Lights and Remote, Indoor/Outdoor Black Modern Ceiling Fan for Kitchen Living Room Patio, 6 Speed Reversible Quiet DC Motor, 3 CCT, Dual Finish 8 Blades
- VERSATILE DESIGN FITS LOW & HIGH CEILINGS; BLENDS STYLES SEAMLESSLY.
- 6-SPEED REMOTE CONTROL FOR YEAR-ROUND COMFORT AND CONVENIENCE.
- ENERGY-EFFICIENT MOTOR OPERATES QUIETLY; PERFECT FOR ANY HOME.
Installing a ceiling fan offers several benefits. Firstly, it enhances air circulation, creating a more comfortable environment by distributing air evenly throughout a room. This improved ventilation can lead to energy savings, as the fan can make a space feel cooler, allowing you to raise the thermostat setting and reduce air conditioning usage. Ceiling fans also provide aesthetic appeal, available in a range of styles and designs to complement various decors. Furthermore, they can provide additional lighting if equipped with a light fixture, adding function and elegance to a room. In colder months, many ceiling fans have a reverse setting that helps distribute warm air pooled near the ceiling back down into the living space, improving heating efficiency. Overall, ceiling fans are a cost-effective way to improve comfort while potentially lowering energy costs.
How to maintain a ceiling fan for longevity?
Maintaining a ceiling fan properly can significantly extend its lifespan and ensure it works efficiently. Here's a guide to help you keep your ceiling fan in top condition:
- Regular Cleaning: Dust Blades: Regularly dust the blades using a microfiber cloth or a dusting tool designed for ceiling fans. Accumulated dust can imbalance the fan and put extra strain on the motor. Deep Clean: Occasionally, wipe the blades with a damp cloth. Avoid using harsh chemicals, as these may damage the finish.
- Check for Balance: Imbalance can cause wobbling and noise, leading to premature wear and tear. If you notice wobbling, use a balancing kit (often provided with the fan) or adjust the blade screws to ensure all blades are securely attached and aligned.
- Annual Tightening: Once a year, inspect and tighten all the screws and bolts, particularly those connecting the fan to the ceiling, the blades to the motor, and any light fixtures attached to the fan.
- Lubrication: Some fans require lubrication, especially older models. Refer to your ceiling fan's manual to see if this is necessary and which type of lubricant to use. For lubricated models, ensure oil is topped up as specified.
- Motor Housing and Mounting: Ensure the motor housing is clean and not obstructed by dust or debris. Check that the fan is securely mounted and there is no excessive movement when the fan is operating.
- Inspect Wiring: Periodically examine the wiring connections to ensure there are no loose connections, corrosion, or wear. If any issues are found, it may be best to hire a professional electrician for repairs.
- Seasonal Rotation: Adjust the fan's rotation direction with the change of seasons. In summer, set the fan to rotate counterclockwise to push cool air down. In winter, switch it to clockwise at a low speed to distribute warm air more effectively.
- Light Fixture Maintenance: If your fan has a built-in light fixture, replace any burned-out bulbs promptly and clean the light cover to maximize illumination and prevent heat buildup.
- Listen for Noise: Pay attention to any unusual noises like grinding or clicking, which may indicate a problem with the motor or components.
- Professional Inspection: If you notice persistent problems or if the fan is quite old, consider having it inspected by a professional to ensure everything is functioning correctly.
By regularly maintaining your ceiling fan through these steps, you'll ensure a longer, more efficient operational life and a more comfortable home environment.
What are ceiling fans with lights?
Ceiling fans with lights are a type of ceiling fan that incorporates built-in lighting fixtures, combining the functionality of air circulation with illumination in one unit. These fixtures are often used in residential and commercial settings to save space and streamline the appearance of a room. Ceiling fans with lights can vary considerably in style, size, and design, from modern to traditional, to fit different room decors.
Key features and considerations of ceiling fans with lights include:
- Design: Available in a wide range of designs, finishes, and blade shapes to match room aesthetics.
- Lighting Options: May feature various types of lighting, including LED, incandescent, or fluorescent bulbs. The light fixtures can range from single bulbs to multi-light setups, and some models offer dimmable options.
- Control Mechanisms: Many modern fans come with remote controls or wall-mounted switches to control both fan speed and light intensity. Some are compatible with smart home systems.
- Energy Efficiency: Energy-efficient models often utilize LED lighting and energy-saving motors to reduce electricity consumption.
- Installation: Typically installed by linking to the room's electrical system, which makes professional installation recommended, especially for complex systems or high ceilings.
- Size and Blade Span: Selection of size and blade length should consider room size for optimal air circulation.
- Reversibility: Many fans include a reversible motor for changing blade direction to provide cooling in the summer and heat distribution in the winter.
Ceiling fans with lights are a practical and stylish option for enhancing comfort and aesthetics in various indoor spaces.
How to upgrade a ceiling fan without an electrician?
Upgrading a ceiling fan without the assistance of an electrician is a feasible DIY project if you have a basic understanding of electrical work and adhere to safety precautions. Here's a step-by-step guide to help you through the process:
- Select a New Fan: Choose a fan that is suitable for the room size and matches your decor. Ensure it's compatible with your ceiling mount and has the features you want (e.g., light kits, remote control).
- Gather Necessary Tools: Screwdriver (both flathead and Phillips) Voltage tester Ladder Wire stripper/cutter Electrical tape Circuit tester
- Turn Off Power: Switch off the power to the ceiling fan at the breaker box. Use a circuit tester or voltage tester to confirm that the power is off.
- Remove the Old Fan: Carefully uninstall the fan blades and light fixtures if present. Unscrew the fan canopy and gently lower the fan base. Disconnect the wires: typically, you will find black (hot), white (neutral), and green or bare copper (ground).
- Install the Mounting Bracket: Attach the new fan’s mounting bracket to the ceiling box. Ensure it’s securely fastened according to the fan manufacturer's instructions.
- Assemble the New Fan: Assemble the fan motor and attach the downrod (if applicable). Securely attach the fan blades and light kit, if included.
- Wire the New Fan: Connect the wires using wire nuts. Typically, this means matching black to black, white to white, and green/bare to green/bare wires. Make sure all connections are tight and secure with electrical tape to prevent loose connections.
- Mount the Fan: Carefully attach the fan motor to the mounting bracket. Attach the canopy to cover the wiring and mounting bracket.
- Attach the Blades and Light Fixture: Securely install the fan blades to the motor. Install the light fixture components, if your fan includes lighting.
- Turn the Power On and Test: Once everything is assembled and secure, turn the power back on at the breaker. Test the fan and light functionality to ensure everything is working correctly.
- Finalize the Installation: Make any necessary adjustments and ensure the fan is balanced. Clean up any debris and reinstall any removed items such as furniture or fixtures.
Safety Tips:
- Always prioritize safety by turning off power at the circuit breaker, not just using the wall switch.
- Double-check all connections and secure installations.
- If uncertain about any step, consult the fan’s manual or seek advice from a professional before proceeding.
If any part of the process seems beyond your ability or if issues arise, it’s advisable to consult or hire a licensed electrician to avoid potential hazards.
What is the importance of blade size in ceiling fans?
The blade size of a ceiling fan is important for several reasons, as it directly impacts the fan's performance, efficiency, and suitability for a given space. Here are some key reasons why blade size matters:
- Airflow Efficiency: Larger blades move more air and can create a stronger breeze, making them suitable for larger rooms. Smaller blades are better suited for smaller spaces or where a gentle airflow is desired.
- Room Size Compatibility: The size of the blades should be proportional to the size of the room. Larger rooms typically require fans with longer blades to effectively circulate air throughout the space. For small rooms, a fan with shorter blades is often sufficient.
- Energy Consumption: Fans with appropriately sized blades for the room can be more energy-efficient. If a fan is too small for a large room, it may need to run at a higher speed to achieve the desired airflow, potentially leading to higher energy use.
- Ceiling Height and Clearance: In rooms with low ceilings, smaller blade fans can be safer and provide adequate clearance. Conversely, larger blade fans can be installed in rooms with higher ceilings.
- Noise Levels: Larger fans can operate at lower speeds while still providing ample airflow, which can result in quieter operation compared to smaller fans that need to run at higher speeds.
- Aesthetic and Design: The size of the blades also affects the visual balance of the fan within the room. Larger blades may look more proportional in spacious rooms, while smaller blades may be less obtrusive in tight spaces.
- Functional Needs: Different spaces have different cooling needs. For instance, a living room may require a fan with longer blades for comfort, whereas a kitchen or hallway might benefit from a smaller fan due to space constraints.
When selecting a ceiling fan, it's important to consider the size of the room, the ceiling height, and the desired airflow to choose a fan with the appropriate blade size to meet your needs effectively.