
Best Ceiling Fan with LED Lights to Buy in July 2026

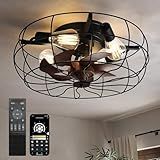
LUDOMIDE Ceiling Fans with Lights, Flush Mount Ceiling Fan with Lights and Remote, 6 Wind Speeds Smart Low Profile Ceiling Fan for Bedroom, Kids Room and Living Room 20" (Black)
-
ENJOY VERSATILE COMFORT: 6 SPEEDS AND REVERSIBLE AIRFLOW FOR YEAR-ROUND USE.
-
DIMMABLE LED LIGHT: CUSTOMIZE AMBIANCE WITH 3 COLOR MODES AND DIMMING.
-
CONVENIENT SMART FEATURES: TIMER AND MEMORY FUNCTION FOR EASY CONTROL.


CubiCubi Modern Ceiling Fans, 20 Inch Black Ceiling Fan with Lights and Remote Control, APP, Fandelier with 6 Wind Speeds, Low Profile Ceiling Fans with Lights for Bedroom, Office
-
EFFORTLESS SETUP IN 15 MINUTES – NO COMPLEX ASSEMBLY NEEDED!
-
CONTROL FAN & LIGHTS VIA REMOTE OR APP FOR ULTIMATE CONVENIENCE!
-
ULTRA-QUIET 3400 CFM – ENJOY COMFORT YEAR-ROUND WITH MINIMAL NOISE!
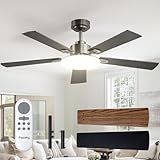
Passky Ceiling Fans with Lights, 52 inch Sleek Ceiling Fan with Light and Remote Control, 3CCT, Dimmable, Reversible, Noiseless, Black Ceiling Fan for Bedroom, Living Room
- ENERGY-EFFICIENT DESIGN REDUCES ELECTRICITY LOSS BY 80% FOR SAVINGS.
- CUSTOMIZE LIGHT BRIGHTNESS AND COLOR; PERFECT FOR ANY OCCASION!
- NOISE-FREE OPERATION ENSURES A PEACEFUL ENVIRONMENT FOR ALL AGES.
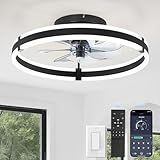
ZMISHIBO Ceiling Fans with Lights and Remote, 19.7'' Low Profile Ceiling Fan, 3000-6000K Dimmable Modern Flush Mount LED Fan Light, 6 Wind Speeds, Black Fandelier Ceiling Fans for Bedroom
- CONTROL WITH EASE: SMART APP & REMOTE FOR CUSTOMIZED LIGHTING & SPEED.
- YEAR-ROUND COMFORT: REVERSIBLE MOTOR FOR SUMMER COOLING & WINTER WARMTH.
- QUIET POWER: 6 SPEEDS AND NOISELESS OPERATION FOR ULTIMATE AIRFLOW.
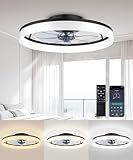
AQUBT Ceiling Fans with Lights and Remote, 20" Modern Low Profile Ceiling Fan with Light, Stepless Color Temperature Change and 6 Speeds for Bedroom, Kids Room and Living Room (Black)
- CONTROL WITH EASE: REMOTE & APP FOR 360° FAN OPERATION ANYWHERE!
- CUSTOMIZE LIGHTING: STEPLESS DIMMING FROM WARM TO BRIGHT LIGHT!
- WHISPER-QUIET OPERATION: 6 SPEEDS FOR A PEACEFUL, COMFY BREEZE!

Homewerks 7141-80 Bathroom Fan Integrated LED Light Ceiling Mount Exhaust Ventilation 1.1 Sones 80 CFM, White
-
QUIETLY ELIMINATES MOISTURE WITH JUST 1.1 SONES AND 80 CFM.
-
EFFECTIVELY REMOVES HARSH ODORS FOR A FRESH BATHROOM ENVIRONMENT.
-
EASY INSTALLATION WITH NO-CUT DESIGN AND DURABLE GALVANIZED STEEL.

Ceiling Fans with Lights and Remote, 20 Inch White Low Profile Flush Mount Ceiling Fans with 3000-6000K Dimmable and 6 Wind Speeds, Modern Style with APP for Bedroom
-
QUICK 15-MINUTE INSTALLATION: HASSLE-FREE SETUP WITH NO ASSEMBLY NEEDED.
-
SMART CONTROL OPTIONS: ADJUST SPEED AND BRIGHTNESS VIA REMOTE OR APP.
-
ELEGANT CRYSTAL AESTHETICS: STUNNING DESIGN COMPLEMENTS ANY ROOM DECOR.
Yes, you can use a ceiling fan with LED lights in all rooms. LED lights are versatile, energy-efficient, and come in various designs, making them suitable for any room's aesthetic and lighting needs. Ceiling fans with integrated LED lighting can provide ample illumination and air circulation, enhancing comfort and style throughout your home. They are often equipped with dimmable features, allowing you to adjust the brightness according to your preference. Additionally, the long lifespan of LED lights means less frequent replacements, adding to their convenience and cost-effectiveness. When selecting a ceiling fan with LED lights, consider the size and style that best fits each room to ensure optimal performance and visual appeal.
How to enhance room aesthetics with ceiling fans?
Enhancing room aesthetics with ceiling fans involves selecting a fan that complements your interior design, provides functionality, and serves as a focal point in the space. Here are some tips to achieve this:
- Choose the Right Style: Select a fan style that matches your room's décor. Whether you prefer modern, traditional, rustic, or industrial, there are ceiling fans available in various designs. For a minimalist look, opt for sleek, simple fans with clean lines.
- Consider Color and Finish: Coordinate the fan's color with your room's color scheme. Neutral shades like white, black, or metallics often blend well with different styles. Use finishes like brushed nickel or bronze to add elegance or warmth.
- Select the Right Size: Ensure the fan size is proportionate to the room. A fan that is too small may look out of place, while an overly large fan can overwhelm the space.
- Integrate with Lighting: Choose a fan with built-in lighting to serve dual purposes. Look for models with dimmable options to adjust the ambiance. Consider using a fan with LED lights for energy efficiency.
- Incorporate Unique Designs: Look for fans with unique blade shapes or materials, such as wood or clear acrylic, to add visual interest. Some fans come with decorative elements like carved blades or ornate motor housings.
- Install Smart Fans: Use smart ceiling fans that can be controlled through your smartphone or smart home system for modern convenience and added tech appeal.
- Highlight with Ceiling Features: Pair your fan with architectural ceiling features, such as beams or medallions, to enhance the visual impact. Use contrasting colors or textures between the fan and ceiling to draw attention.
- Position Strategically: Ensure the fan is centrally located to serve as a focal point. In large rooms, consider using multiple smaller fans for balanced aesthetics.
- Add Decorative Elements: Some fans allow added embellishments like pull chains or decorative downrods that can match other room accessories.
By thoughtfully selecting and installing a ceiling fan that aligns with your overall room design, you can significantly enhance aesthetics while ensuring comfort and functionality.
What is the difference between ceiling fan controls?
Ceiling fan controls vary in terms of functionality, convenience, and complexity. Here are the main types of controls and their differences:
- Pull Chain Controls: Description: The most basic form of control, pull chains are attached directly to the fan and are used to manually adjust the fan speed and light if applicable. Use: You typically pull the chain once to turn the fan on, again to adjust speeds, and once more to turn it off. Advantage: Simple and inexpensive. Drawback: Less convenient, especially for high ceilings.
- Wall Switch Controls: Description: These replace a standard wall switch and can provide more advanced features like multiple speed settings, light dimming, and usually have separate controls for the fan and light. Use: Operated like a standard light switch, but with added buttons or dials for fan speed control. Advantage: More convenient than pull chains, allows for quick adjustments from a wall location. Drawback: Installation can be more complex, potentially requiring wiring changes.
- Remote Controls: Description: Handheld remotes that allow for controlling the fan speed, direction, and lighting from anywhere in the room. Use: Operated similarly to a TV remote, they can include features like speed adjustment, light dimming, and timer settings. Advantage: Highly convenient, with no need to get up to adjust settings. Drawback: Remotes can be misplaced, and batteries need to be replaced periodically.
- Smart Controls: Description: Integrated systems that connect to home networks, allowing control via smartphone apps, voice commands, or automation systems. Use: Often operated through apps or via voice-activated devices like Amazon Alexa or Google Assistant. Advantage: Offers advanced features like scheduling, geo-fencing, and integration with other smart home devices. Drawback: More expensive and may require a stable internet connection.
- Speed Switches: Description: These allow direct control over fan speed independent of the main power control; often integrated into remote or wall controls. Use: Adjust specific fan speeds without completely turning off the fan. Advantage: Precise control over comfort settings. Drawback: Can be limiting if used as the sole control method without additional settings.
Different fan models and brands can offer various combinations of these controls, allowing homeowners to choose based on their preference for ease of use, feature set, and budget.
How to choose the right ceiling fan for your room?
Choosing the right ceiling fan for your room involves considering several factors to ensure that the fan is both functional and stylish. Here is a step-by-step guide:
- Room Size and Fan Size: Small Rooms (up to 75 sq. ft.): Opt for a fan with a blade span of 29 to 36 inches. Medium Rooms (76 to 144 sq. ft.): A fan with a blade span of 36 to 42 inches is suitable. Large Rooms (145 to 225 sq. ft.): Choose a fan with a blade span of 44 to 50 inches. Great Rooms (225 to 400 sq. ft.): Consider fans with blade spans of 50 to 72 inches or greater.
- Ceiling Height: Low Ceilings: Use a flush-mount or hugger fan designed to be close to the ceiling. Standard Ceilings (8 feet): A standard mount fan should be adequate. High Ceilings (over 8 feet): Consider fans with downrods to bring the fan to the optimal height. Sloped Ceilings: Ensure the fan can be installed at an angle, or purchase an angled ceiling mount kit.
- Airflow and Efficiency: Look for Energy Star-rated fans, which are 20-30% more efficient than standard models. Compare the cubic feet per minute (CFM) rating for airflow efficiency; higher CFM generally means better air circulation.
- Motor Quality: Choose fans with a quality motor (e.g., DC motors) for quieter operation and energy efficiency. Ensure the fan includes a good warranty, which often reflects the motor’s quality.
- Style and Design: Select a fan that complements the room’s aesthetic, considering factors like blade color and material. Consider whether you want additional features like integrated light kits.
- Controls and Features: Decide between pull-chain controls or more modern remote/wall control systems. Consider fans with reversible motor functions for seasonal efficiency (downward in summer to cool, upward in winter to circulate warm air).
- Installation and Maintenance: Make sure the fan you choose is compatible with the existing ceiling box or that you are prepared for necessary adjustments. Consider ease of cleaning and maintenance, especially if the fan is in a location that collects dust easily.
By evaluating these factors, you can choose a ceiling fan that best meets the functional needs of your space while also enhancing its overall decor.
How to install a ceiling fan with LED lights?
Installing a ceiling fan with LED lights can be a manageable DIY project if you follow these steps carefully. Here's a general guide:
Tools and Materials Needed:
- Ceiling fan with LED light kit
- Ladder
- Screwdriver (Phillips and flathead)
- Wire stripper
- Voltage tester
- Adjustable wrench or pliers
- Wire nuts
- Electrical tape
- Circuit tester
- Ceiling fan-rated electrical box (if one is not already installed)
- Optional: Assistant for support
Step-by-Step Guide:
1. Turn Off Power
- Locate the circuit breaker and switch off the power to the area where you will be working to ensure safety. Use a voltage tester to confirm that the power is off.
2. Remove Existing Fixture
- If there is a light fixture or an existing fan in place, carefully remove it. Use a screwdriver to detach it and disconnect the wires by unscrewing the wire nuts.
3. Install Ceiling Fan-Rated Electrical Box
- If not present, install a ceiling fan-rated electrical box to support the weight and motion of the fan. This box must be securely fastened to the ceiling joist.
4. Assemble the Ceiling Fan
- Follow the manufacturer's instructions to assemble the fan motor, blades, and optional light kit, if not pre-assembled. Each model may have specific assembly instructions.
5. Mount the Ceiling Bracket
- Install the mounting bracket or plate that will hold the fan to the ceiling. Ensure it is securely fastened to the electrical box using the screws provided and following instructions.
6. Wire the Ceiling Fan
- Use the circuit tester again to ensure the power is off. Connect the wires from the ceiling to the fan following these general color codes: Black (or Red): Fan power White: Neutral Green or Bare Copper: Ground Blue: Light (if separate from the fan)
- Use wire nuts to connect wires and wrap them with electrical tape for extra security. Tuck the connections neatly into the electrical box.
7. Attach the Fan to the Bracket
- Lift the fan assembly and hang it on the bracket hook temporarily (if included) while you make wire connections. Secure the fan to the bracket using the provided screws, ensuring it's tight and stable.
8. Attach Fan Blades
- Follow the manufacturer's instructions to attach the fan blades. Make sure they are balanced and securely fastened.
9. Install Light Kit and Bulbs
- If your fan comes with an LED light kit, follow the instructions for installing it. Connect any remaining wires as directed, typically blue (or output from the fan switch) to the light kit wire.
10. Attach Cover and Test
- Attach any remaining coverings or globes, ensuring they're secure. Restore the power by turning on the circuit breaker. Test the fan and lights using the remote or wall switch.
11. Troubleshoot if Necessary
- If the fan or lights do not work properly, double-check the wiring connections. Ensure all wire nuts are secure and connections are correct. Test again after adjustments.
Tips:
- Read Instructions: Each fan model may have specific instructions that need to be followed closely.
- Safety First: Always work with the power off and use a sturdy ladder or scaffolding.
- Balance: If the fan wobbles, use a balancing kit that often comes with fans or may be purchased separately.
Final Checks:
- Ensure fan operates smoothly without wobble.
- Confirm lights work and switches operate as expected.
If you encounter problems that you are not comfortable solving, or if the task seems too complex, consulting a professional electrician is recommended.