Best Indoor Garden System Troubleshooting Tools to Buy in July 2026
Melphoe 25Pcs Mini Garden Hand Transplanting Succulent Tools Set, 39.4" Thickened Repotting Mat & Plant Tag, Miniature Planting Indoor Fairy Care, Potting, Cactus, Houseplant Bonsai Tool Kit (Black)
- VERSATILE: IDEAL FOR SUCCULENTS, BONSAI, CACTI, AND MORE INDOOR PLANTS.
- CONVENIENT DESIGN: WATERPROOF MAT AND EASY-TO-CLEAN TOOLS FOR HASSLE-FREE GARDENING.
- ERGONOMIC COMFORT: LIGHTWEIGHT TOOLS REDUCE WRIST PAIN FOR ENJOYABLE GARDENING.


5Pcs Succulent Tools,Mini Garden Tools,Pruning Scissors as Plant Accessories, Gardending Hand Tools Kit for Seedling Soil,Caring Succulent,Houseplent,Bonsi,Gifts for Woman and Man
- PREMIUM MATERIALS: STURDY, RUST-RESISTANT TOOLS FOR LASTING USE.
- VERSATILE USE: PERFECT FOR INDOOR PLANTS, HYDROPONICS, AND MORE!
- IDEAL GIFT: THOUGHTFUL FOR GARDENING ENTHUSIASTS ON ANY OCCASION!
Josteve Plant Repotting Mat, 5Pcs Succulent Tools Mini Garden Small Gardening Tools Indoor, Pruning Shear Gardening Scissor, Hand kit for Bonsai, Cactus, Fairy, Houseplant Transplanting, Seedling
-
ERGONOMIC DESIGN: CUT WITH EASE, REDUCE HAND STRAIN WHILE PRUNING!
-
DURABLE TOOLS: ULTRA SHARP STAINLESS STEEL FOR PRECISE TRIMMING JOB!
-
PERFECT GIFT: IDEAL PRESENT FOR GARDENING LOVERS AND BEGINNERS ALIKE!
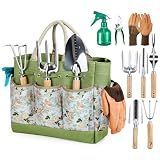
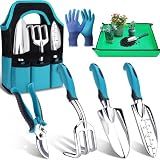
Heavy Duty Gardening Tools - Gardening Gifts for Women, Men, Mom, Dad - Durable, Ergonomic Garden Tools Set (Green)
- PERFECT GIFT FOR GARDENERS: TOOLS FOR MEN, WOMEN, AND ALL AGES!
- COMPLETE SET WITH ESSENTIAL TOOLS FOR A FLOURISHING GARDEN.
- DURABLE, ERGONOMIC DESIGN ENSURES COMFORT AND LONG-LASTING USE.
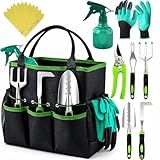
Grenebo Gardening Tools 9-Piece Heavy Duty Garden Hand Tools with Fashion and Durable Garden Tools Organizer Handbag, Rust-Proof Garden Tool Set, Ideal Gardening Gifts for Women
- DURABLE STAINLESS STEEL TOOLS RESIST RUST & DEFORMATION FOR LONGEVITY.
- ALL-IN-ONE SET: 8 ESSENTIAL TOOLS + STYLISH STORAGE BAG INCLUDED.
- ERGONOMIC HANDLES FIT ALL SIZES FOR COMFORTABLE, EFFORTLESS GARDENING.
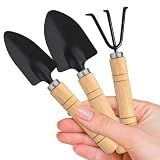
Mini Garden Tools for House Plants, Mini Shovel, Trowel & Hand Rake
- PERFECT FOR INDOOR PLANTS: COMPACT TOOLS FIT ANY SMALL GARDENING SPACE.
- DURABLE & LONG-LASTING: HIGH-QUALITY MATERIALS FOR YEARS OF GARDENING.
- ERGONOMIC DESIGN: COMFORTABLE GRIP REDUCES FATIGUE DURING USE.
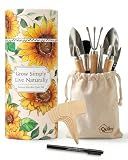
Indoor Gardening Tools, 19-Piece Small Garden Tools Set, House Plant Tools Set, Mini Garden Tools, Stainless Steel Herb Garden Tools, Succulent Tools, Indoor Plant Tools, Gardening Gifts for Women
-
BEAUTIFUL GIFT-READY PACKAGING: SUNFLOWER-THEMED BOX NEEDS NO EXTRA WRAPPING!
-
COMPLETE TOOL SET FOR CARE: ALL ESSENTIALS INCLUDED FOR PLANT MAINTENANCE.
-
DESIGNED FOR COMFORT: STURDY, USER-FRIENDLY TOOLS IDEAL FOR ANY GARDENER.
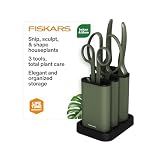
Fiskars Indoor Plant Care 3-Piece Set, Precision Gardening Tools with Nesting Storage Caddy, Detail Snips, Stem Shears & Bypass Pruner for Trimming & Shaping Houseplants, Stainless Steel Blades, Green
- COMPLETE KIT FOR EVERY PLANT STAGE; PRECISION TOOLS FOR SUCCESS.
- ERGONOMIC DESIGN REDUCES FATIGUE; PERFECT FOR EXTENDED GARDENING.
- STYLISH STORAGE KEEPS TOOLS ORGANIZED AND BLADES SAFE AT HAND.
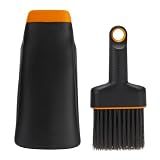
Fiskars Planting Soil Scoop & Brush Set, Dual-Sided Tool for Indoor Digging & Cleanup, Narrow Rigid End & Flexible Dustpan for Potting, Soft Bristles Sweep Debris, Recycled Plastic
- DUAL-SIDED SCOOP FOR PRECISE DIGGING AND EFFORTLESS POURING.
- SOFT BRISTLE BRUSH KEEPS SURFACES CLEAN DURING POTTING TASKS.
- ECO-FRIENDLY DESIGN WITH DURABLE RECYCLED MATERIALS FOR SUSTAINABILITY.
Kynup 7-Piece Gardening Tools Set, Heavy Duty Garden Tools Kit with Garden Trowel, Garden Hand Shovel, Repotting Mat, Rust Resistant, Gardening Essentials & Supplies, Bag, Gifts Kits for Women
-
98% CUSTOMER SATISFACTION: EXCEPTIONAL QUALITY-TO-PRICE RATIO PRAISED BY MANY!
-
DURABLE CAST-ALUMINUM TOOLS: HEAVY-DUTY, RUST-PROOF DESIGN ENSURES LONGEVITY.
-
PERFECT GIFT CHOICE: IDEAL FOR MOTHER'S DAY OR BIRTHDAYS FOR PLANT LOVERS!
When it comes to troubleshooting common issues with an indoor garden system, there are several factors that you need to consider. Here are some tips to help you identify and fix problems:
- Insufficient or uneven lighting: Poor lighting can inhibit plant growth. Check if your grow lights are positioned correctly and providing adequate coverage. Consider upgrading if necessary. Ensure that the lights are on for the appropriate duration, following the recommended light cycles for the specific plants you are cultivating.
- Improper watering: Overwatering or underwatering can lead to issues like root rot or nutrient deficiencies. Determine the correct watering needs of your plants and ensure you are following a consistent watering schedule. Consider using a moisture meter to monitor soil moisture levels.
- Nutrient deficiencies or imbalances: Plants require a proper balance of essential nutrients for healthy growth. Monitor your plants for any signs of nutrient deficiencies, such as yellowing leaves or stunted growth. Adjust your nutrient solution or fertilization routine accordingly to provide the necessary nutrients.
- Pests and diseases: Indoor gardens are not immune to pests and diseases. Keep an eye out for any signs of infestation, such as leaf damage, spots, or pests themselves. Employ organic pest control methods or appropriate treatments to address the specific issue. Isolate affected plants to prevent the spread of diseases.
- Temperature and humidity fluctuations: Extreme temperature fluctuations or excessive humidity can negatively impact your indoor garden. Ensure that your plants are kept within the recommended temperature and humidity ranges for their specific requirements. Consider using fans, heaters, or dehumidifiers to regulate the environment if deemed necessary.
- Poor air circulation: Limited air circulation can lead to stagnant, unhealthy conditions for your plants. Make sure you have proper ventilation in your indoor garden space. Use fans or air circulators to maintain airflow and prevent mold or fungal growth.
- Inadequate or incorrect pruning: Incorrect pruning can harm your plants and hinder their growth. Learn the proper techniques for pruning each specific plant to encourage healthy growth and avoid damage or disease.
- Inadequate space or overcrowding: Overcrowding your indoor garden can lead to competition for resources and restrict airflow. Make sure you provide sufficient space for each plant to grow optimally. Consider thinning out overcrowded areas or repotting plants as needed.
Remember, troubleshooting an indoor garden system may require some trial and error. Carefully observe your plants and make adjustments accordingly. Additionally, referring to plant-specific care guides or seeking advice from experienced gardeners can provide valuable assistance.
How to fix low humidity levels in an indoor garden?
To fix low humidity levels in an indoor garden, you can try the following methods:
- Use a humidifier: A humidifier is an effective way to raise humidity levels. Place it near your plants to release a fine mist of water vapor into the air.
- Group plants together: Grouping plants closely together can create a microclimate of increased humidity as water evaporates from the leaves. This can help to raise the humidity levels within the enclosed area.
- Use trays with water: Place shallow trays or bowls filled with water near the plants. As the water gradually evaporates, it will increase humidity levels. You can also place pebbles or stones in the trays to elevate the plants and avoid direct contact with the water.
- Mist the plants: Use a spray bottle to mist the leaves and surrounding air with water. This will provide temporary humidity and can be done multiple times a day, especially during hot and dry periods.
- Use a moisture-retaining medium: Use a moisture-retaining medium, such as sphagnum moss or peat moss, in your plant pots. These materials slowly release moisture into the air, increasing humidity levels around the plants.
- Create a humidity tent: Covering the plants with a transparent plastic bag or a small greenhouse can create a mini greenhouse effect, trapping moisture and increasing humidity.
- Avoid excessive airflow: Limit the use of fans or air conditioners blowing directly on the plants, as they can increase air circulation and reduce humidity levels. If necessary, redirect airflow away from the plants or provide a barrier to prevent direct exposure.
- Monitor water levels: Ensure that your plants are adequately watered, as drying out can contribute to low humidity levels. Regularly check the soil moisture and adjust watering accordingly.
Remember that optimal humidity levels can vary depending on the specific plants you are growing. Some plants prefer higher humidity, while others prefer drier conditions. It is important to research the specific needs of your plants to ensure their optimal growth and health.
How to adjust pH levels in the soil of an indoor garden?
To adjust pH levels in the soil of an indoor garden, you can follow these steps:
- Test the current pH level: Start by testing the pH level of your soil using a pH testing kit, which can be purchased at a garden supply store or online. This will help determine whether your soil is acidic, alkaline, or neutral.
- Determine the optimal pH range: Different plants have different pH preferences, so it's important to research the pH requirements of the specific plants in your indoor garden. Most plants thrive in a slightly acidic to neutral pH range (around 6 to 7).
- Lowering pH for alkaline soil: If your soil is alkaline (with a pH greater than 7), you can lower the pH by adding acidic amendments. Some common amendments include elemental sulfur, aluminum sulfate, and organic materials like pine needles or peat moss. Follow the packaging instructions for the specific amendment you choose, as quantities and application methods may vary.
- Raising pH for acidic soil: If your soil is acidic (with a pH lower than 6), you can raise the pH by adding alkaline amendments. Lime is a commonly used amendment to neutralize acidity. Like with acidic amendments, follow the instructions on the packaging for proper application.
- Apply amendments: Once you've determined whether you need to lower or raise the pH level, apply the appropriate amendment to the soil. Mixing the amendment into the soil is usually recommended, but for potted plants, you can also use a top dressing of the amendment on the soil surface. Follow the recommended application rates for the specific amendment to avoid over- or under-treating.
- Retest and monitor: After adding amendments, wait for a few weeks before retesting the soil pH to allow the amendments to take effect. Regularly monitor the pH levels throughout the growing season, as it may need adjustment over time due to nutrient absorption and other factors.
Remember that maintaining proper pH levels is crucial for nutrient availability and plant health. Understanding the pH requirements of your indoor garden plants will help ensure their optimal growth and productivity.
How to diagnose and remedy poor air circulation in an indoor garden?
Diagnosing and remedying poor air circulation in an indoor garden involves understanding the possible causes and taking appropriate actions. Here’s a step-by-step guide to help you get started:
- Identify the signs: Poor air circulation can lead to various problems in an indoor garden, including stagnant air, temperature or humidity imbalances, pest or disease outbreaks, and slow plant growth. Pay attention to these signs to determine if you have poor air circulation.
- Evaluate the space: Assess the layout and structure of your indoor garden. Check for any obstructions or physical barriers that might hinder air movement. Ensure that there is sufficient space between plants and objects to allow proper airflow.
- Ventilation system: Check your ventilation system, including fans, vents, and ductwork. Make sure they are clean, free of debris, and functioning properly. Clean or replace any clogged filters, and ensure that the fans are positioned to facilitate air movement throughout the garden.
- Placement of fans: Evaluate the placement of fans within your indoor garden. Consider positioning oscillating fans strategically to promote better air circulation, ensuring that every area receives adequate airflow. Experiment with different fan placements until you achieve improved circulation.
- Consider additional fans: If your current fans are not offering sufficient air movement, consider adding more fans to the indoor garden. Aim for a combination of ceiling fans, floor fans, and tabletop fans to create a multi-directional airflow pattern.
- Introduce air vents: If your indoor garden lacks natural ventilation, consider installing air vents or exhaust fans to bring fresh air in and push stagnant air out. This helps maintain a fresh supply of oxygen while removing excess humidity or heat.
- Clear the pathway: Ensure that there are no obstructions blocking the natural flow of air within your indoor garden. Rearrange plants, furniture, or other items that might be impeding airflow. Leave enough space between plants for air to circulate freely.
- Monitor temperature and humidity: Poor air circulation can lead to temperature and humidity imbalances. Use thermometers and hygrometers to regularly monitor the conditions in your indoor garden. Adjust your ventilation and temperature control systems accordingly to maintain optimal levels.
- Prune and thin out plants: Overcrowded plants can impede air circulation. Regularly prune and thin out your plants, removing any diseased or dead parts. Optimize plant spacing to allow air to flow freely and reduce the risk of diseases or pest infestations.
- Monitor and track progress: After implementing remedies, keep a close eye on your indoor garden to assess the impact on air circulation. Monitor the plants for improved growth, decreased pest or disease occurrence, and observe the overall comfort and freshness of the space.
By following these steps, you can diagnose and remedy poor air circulation in your indoor garden, ensuring a healthier and more productive growing environment for your plants.
How to troubleshoot and fix issues with slow seed germination?
- Review the seed packet: Check the expected germination time for the specific seed you're growing. Some seeds naturally take longer to germinate, so be patient if it's within the reasonable timeframe.
- Provide optimal conditions: Ensure that the seeds are receiving the right amount of moisture, light, and temperature. Check the seed packet or research online to determine the preferred conditions for germination. Adjust as necessary.
- Check moisture levels: Seeds need to be consistently moist but not overly soaked. Too much water can lead to rot, mold, or hinder germination. Ensure that the soil remains slightly damp, but not saturated. Consider using a spray bottle to mist the soil regularly.
- Improve soil quality: Poor soil quality can slow down germination. Make sure the soil is well-drained, properly aerated, and free from any debris. Consider adding organic matter, compost, or vermiculite to improve soil structure and provide essential nutrients.
- Scarification or stratification: Some seeds require scarification (abrasion on the seed coat) or stratification (cold treatment) to enhance germination. Research if the seeds you're growing need any pre-germination techniques.
- Check for pests and diseases: Certain pests or diseases can prevent or slow down seed germination. Inspect the seeds and seedlings for signs of damage or infestation. Take appropriate measures to control pests or diseases.
- Use bottom heat: Some seeds respond well to heat from below, which can speed up germination. Consider using a heat mat or placing the seed trays on a warm surface, such as the top of a refrigerator.
- Consider the age of the seeds: Older seeds may have a lower germination rate. If the seeds are expired or have been stored for a long time, try purchasing fresh seeds.
- Patience: Even under optimal conditions, some seeds can take longer to germinate. The germination time may vary depending on the seed type, so allow sufficient time for the process.
If you've tried all these troubleshooting steps with no success, it may be worth reaching out to a local gardening expert or contacting the seed supplier for further assistance or advice.
How to identify and treat nutrient deficiencies in plants?
Identifying and treating nutrient deficiencies in plants is essential for their healthy growth and productivity. Here are steps to help identify and treat nutrient deficiencies:
- Observe the plant: Look for visual clues such as leaf color, size, shape, and overall health. Nutrient deficiencies often manifest as specific symptoms that can vary depending on the nutrient and plant species. Common symptoms include yellowing, browning, spotting, stunted growth, or distorted foliage.
- Identify the specific symptoms: Nutrient deficiencies have characteristic symptoms associated with them. Some examples include yellowing between veins in older leaves (iron deficiency), leaf and stem brittleness (calcium deficiency), or leaf curling (potassium deficiency). Resources like gardening books, online guides, or consulting with an agricultural extension office can help you identify the specific symptoms associated with each nutrient.
- Conduct a soil test: Testing the soil can provide valuable information about its nutrient content. Several home soil test kits are available, or you can send a sample to a professional lab for a more detailed analysis. The results will indicate the nutrient levels present in the soil, which can help pinpoint any deficiencies.
- Adjust the soil pH if necessary: Nutrients are best absorbed by plants within a specific pH range. If the soil pH is too high or too low, it can affect nutrient availability. Soil amendments such as lime or sulfur can be added to adjust the pH and optimize nutrient uptake.
- Apply appropriate fertilizers: Once deficiencies are identified, you can choose the suitable fertilizer to remedy them. Fertilizers contain specific nutrients in varying proportions, such as nitrogen (N), phosphorus (P), and potassium (K), along with secondary and micronutrients. Organic fertilizers, compost, or synthetic fertilizers can be used depending on your preference and plant requirements.
- Apply foliar sprays: In some cases, nutrients can be more effectively absorbed through the leaves rather than the roots. Foliar sprays containing chelated nutrients can be applied directly to the foliage, allowing plants to quickly access the deficient nutrient. This method can provide a faster response compared to soil amendments.
- Monitor progress: After implementing corrective measures, regularly monitor the plant's progress. It may take some time for the deficiency symptoms to diminish and for plants to recover. If the symptoms persist or worsen, reassess the situation and consult with plant experts if needed.
Remember, prevention is always better than treating nutrient deficiencies. Regularly maintaining nutrient-rich soil, balanced fertilization, and proper cultural practices such as watering and sunlight can help minimize the occurrence of deficiencies in the first place.
How to manage and control pests in an indoor garden?
Managing and controlling pests in an indoor garden is essential to ensure the health and productivity of your plants. Here are some tips to help you with pest management in an indoor garden:
- Maintain cleanliness: Regularly clean your indoor garden area by removing dead leaves, debris, and any decaying organic matter. This helps eliminate pest breeding grounds and reduces the chances of infestation.
- Monitor your plants: Regularly inspect your plants for any signs of pests or damage. Look for chewed leaves, webbing, eggs, or larvae. Catching the problem early can help prevent it from spreading and causing significant damage.
- Maintain proper ventilation: Ensure proper airflow and ventilation in your indoor garden as pests thrive in warm, humid environments. Use fans, exhausts, or open windows to improve air circulation and prevent the ideal conditions for pests.
- Quarantine new plants: Before introducing new plants into your indoor garden, it is essential to quarantine them for a few weeks. This allows you to monitor them for any signs of pest infestation before they potentially spread to other plants.
- Use sticky traps: Place yellow sticky traps near your plants to catch and monitor flying pests like fungus gnats, aphids, or whiteflies. These traps help you identify the type and severity of pest infestation and act as an initial control measure.
- Consider natural predators: Introduce beneficial insects like ladybugs, lacewings, or predatory mites to your indoor garden. These insects feed on pests and help control their population naturally.
- Neem oil spray: Neem oil is an organic insecticide derived from the neem tree. Dilute neem oil according to the manufacturer's instructions and spray it on affected plants. Neem oil disrupts pests' life cycles and repels them, effectively controlling infestations.
- Use insecticidal soap: Insecticidal soaps, made with potassium salts of fatty acids, work by suffocating soft-bodied insects like aphids, mites, and whiteflies. Dilute the soap according to the instructions and spray it directly on the affected plants.
- Diatomaceous earth: Sprinkle food-grade diatomaceous earth around the soil and base of plants. The microscopically sharp particles in diatomaceous earth damage and dehydrate the exoskeletons of insects, effectively controlling pests.
- Consult professionals if necessary: If the pest problem persists or becomes overwhelming, it may be helpful to consult a professional pest control service that specializes in indoor gardens. They can provide you with expert guidance and targeted treatments.
Remember to always follow the instructions on pesticide products and opt for organic and environmentally friendly options whenever possible to minimize harm to your plants and the ecosystem.