
Best Humidifier Troubleshooting Tools to Buy in July 2026
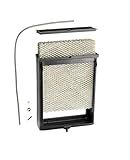
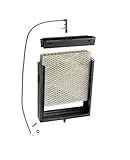
AprilAire 4839 Maintenance Kit with Water Panel Model No. 35 Replacement Filter for Whole-House Humidifier Models: 600, 600A, 600M
-
USA-MADE QUALITY: TRUST THE ORIGINAL APRILAIRE FOR SUPERIOR AIR CARE.
-
ALL-IN-ONE KIT: GET EVERYTHING NEEDED FOR PEAK HUMIDIFIER PERFORMANCE.
-
HEALTH BENEFITS: MAINTAIN OPTIMAL HUMIDITY FOR BETTER COMFORT AND HEALTH.


AprilAire 4793 Humidifier Maintenance Kit with Water Panel Model No. 10 Humidifier Replacement Filter for AprilAire Whole-House Humidifier Models: 550, 558
-
OPTIMIZE PERFORMANCE: GENUINE APRILAIRE KIT ENSURES YOUR HUMIDIFIER RUNS LIKE NEW.
-
ALL-IN-ONE SOLUTION: COMPLETE KIT INCLUDES ALL PARTS FOR HASSLE-FREE MAINTENANCE.
-
HEALTH BENEFITS: MAINTAIN 40%-60% HUMIDITY TO REDUCE ALLERGENS AND INFECTIONS.

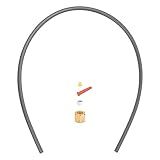
Ice Maker Supply Line and Humidifier Installation Kit for Refrigerators & Freezers, 1/4” x 25’ Poly Tubing, Includes Quick Connect Saddle Valve, Compression Fittings and Adapters
- QUICK DIY INSTALLATION - NO SHUT-OFF NEEDED; EASY STEP-BY-STEP GUIDE!
- FRESH WATER & ICE - ENJOY CRISP WATER AND CLEAR ICE WITH SAFE POLY TUBING.
- COMPLETE KIT INCLUDED - COMES WITH EVERYTHING FOR A RELIABLE, SOLID SETUP!

MIYOLO 4792 Humidifier Maintenance Kit for Humidifier 500, 500A, 500M Whole-House Humidifier Filter, with Water Panel Model No. 10 Humidifier Replacement Parts
- PERFECT FIT: DESIGNED EXCLUSIVELY FOR HUMIDIFIER 500 SERIES MODELS.
- HEALTH FOCUSED: ODORLESS ALUMINUM MESH KEEPS YOUR FAMILY SAFE.
- COMPLETE KIT: SAVE TIME AND MONEY WITH ALL ESSENTIAL PARTS INCLUDED.
Pokin 4335 Feed Tube with Sleeve for Aprilaire Humidifiers 400, 400A, 400M, 500, 500A, 500M, 600, 600A 600M,Includes #4004 in-Line Strainer #4231 Yellow Orifice,Humidifier Parts & Accessories
- COMPLETE KIT FOR EASY UPKEEP OF APRILAIRE HUMIDIFIERS-NO HASSLE!
- QUICK INSTALLATION IN MINUTES; KEEP YOUR HOME’S HUMIDITY OPTIMAL.
- DURABLE, HIGH-QUALITY PARTS; CONFIDENCE IN PERFORMANCE AND SUPPORT.
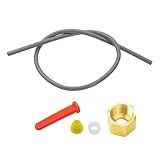
URYKEC 4335 Feed Tube Set, Includes Compression Sleeve and Nut (4335), in Line Strainer (4004), Yellow Orifice (4231), for Aprilaire Humidifier Models 400, 500, and 600.
-
COMPATIBLE WITH APRILAIRE MODELS 400, 500, AND 600 FOR EASY UPGRADES.
-
DURABLE, HIGH-QUALITY MATERIALS ENSURE LONG-LASTING PERFORMANCE AND RELIABILITY.
-
SIMPLE INSTALLATION PROCESS ENHANCES HUMIDIFIER EFFICIENCY AND EFFECTIVENESS.
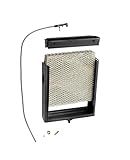
AprilAire 4837 Humidifier Maintenance Kit with Water Panel 35 for Whole-House Humidifier Models 560, 560A, 568
-
USA-MADE QUALITY: TRUST THE ORIGINAL INVENTOR OF HUMIDIFIERS!
-
ALL-IN-ONE KIT: COMPLETE COMPONENTS FOR HASSLE-FREE MAINTENANCE!
-
HEALTH BENEFITS: MAINTAIN OPTIMAL HUMIDITY FOR BETTER AIR QUALITY!

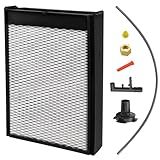
Enhon Humidifier Maintenance Kit with 1 Pcs All Aluminum Mesh 35 Humidifier Pad, Humidifier Replacement Filter Compatible with AprilAire 4839 Whole Home Humidifier Models 600, 600A, 600M Parts
- COMPLETE CARE KIT: EVERYTHING YOU NEED FOR PEAK HUMIDIFIER PERFORMANCE!
- DURABLE DESIGN: ALL-ALUMINUM FOIL PAD ENSURES LONGEVITY AND EFFICIENCY.
- EASY INSTALLATION: HASSLE-FREE SETUP WITH STEP-BY-STEP INSTRUCTIONS INCLUDED!
IHOUMEX 4837 Humidifier Maintenance Kit Complete Service Kit with Water Panel 35, Nozzle, Strainer Fits Aprilaire 560, 560A, 568 Models
- PERFECTLY COMPATIBLE WITH APRILAIRE MODELS 560, 560A, 568.
- COMPLETE KIT: ALL ESSENTIAL PARTS FOR EASY HUMIDIFIER MAINTENANCE.
- OPTIMIZED FOR 40%-60% HUMIDITY, ENHANCING COMFORT AND AIR QUALITY.
If you are having trouble with a humidifier that is not working, there are a few steps you can take to troubleshoot and try to identify the issue. Here is a general guide:
- Check the power supply: Ensure that the humidifier is properly plugged into a functioning power outlet or that the batteries are inserted correctly. If it runs on batteries, try replacing them to rule out a dead battery issue.
- Confirm the settings: Review the settings on your humidifier, such as the desired humidity level or fan speed, and ensure they are properly configured. Adjust the settings if necessary, and give the humidifier some time to see if it responds.
- Examine the water supply: Make sure that the water supply to the humidifier is not interrupted. Check if the water tank or reservoir is adequately filled and seated correctly, without any leaks or obstructions that may affect its functioning.
- Clean the humidifier: Over time, mineral deposits, mold, or other impurities might obstruct the humidifier's operation. Follow the manufacturer's instructions to clean and descale your device. Pay attention to cleaning the water tank, filter (if applicable), and the base of the unit.
- Inspect the filter: If your humidifier has a filter, check its condition. A clogged or dirty filter can obstruct airflow and prevent the humidifier from working effectively. If necessary, clean or replace the filter according to the manufacturer's instructions.
- Ensure proper positioning: Place the humidifier on a flat and stable surface. Verify that there are no objects blocking the air vents, as this can disrupt the airflow and prevent the humidifier from properly functioning.
- Check for error indicators or lights: Some humidifiers have status lights or error indicators to signal specific issues. Refer to the user manual to identify any error codes or indicators and follow the recommended troubleshooting steps.
- Reset the humidifier: In some cases, resetting the humidifier can help resolve technical glitches. This can typically be done by unplugging the unit from the power source, waiting for a few minutes, and then plugging it back in.
If, after going through these troubleshooting steps, your humidifier still does not work, it may be necessary to contact the manufacturer's customer support for further assistance or consider taking it to a professional for repair.
How to troubleshoot a humidifier that has a broken fan motor?
If your humidifier's fan motor is broken, here are some troubleshooting steps you can take:
- Power off and unplug the humidifier: This is essential for your safety while troubleshooting and making repairs.
- Remove the cover or housing: Most humidifiers have a cover or housing that needs to be opened to access the internal components. Refer to the user manual if needed to locate the screws or clips holding it in place.
- Inspect the fan motor: Once the cover is removed, locate the fan motor. Check if there are any visible signs of damage, such as a burnt smell, frayed wires, loose connections, or debris lodged in the motor. If there is significant damage, the motor may need to be replaced.
- Test the motor's electrical connections: Using a multimeter set to the appropriate voltage, check the wires leading to the fan motor for continuity or voltage. If there is no power or continuity, it might indicate an issue with the motor's wiring or the power supply. Inspect the wires for any obvious signs of disconnection or damage. Ensure that the motor is receiving power.
- Lubricate the motor: If the fan motor is getting power but not spinning, it could be due to a lack of lubrication. Apply a few drops of lubricating oil to the motor bearings. Refer to the user manual for specific instructions on lubricating the fan motor.
- Replace the fan motor: If none of the above steps solve the issue, the fan motor may need to be replaced. Consult the user manual or the manufacturer's website for the correct replacement motor. Follow the instructions provided to install the new motor properly.
- Test the humidifier: After replacing or repairing the fan motor, reassemble the humidifier and ensure all connections are securely fastened. Plug in the device and power it on to see if the fan motor is functioning correctly.
If you are unsure or uncomfortable with any of the troubleshooting steps, consider contacting the manufacturer's customer support or a professional technician for assistance.
What is the ideal humidity level for a humidifier?
The ideal humidity level for a humidifier is generally considered to be between 30% and 50%. This range helps maintain a comfortable and healthy indoor environment. Humidity below 30% can lead to dryness, while humidity above 50% can promote the growth of mold, bacteria, and dust mites. It's important to monitor the humidity level and adjust the humidifier accordingly to maintain optimal conditions.
What is the lifespan of a typical humidifier?
The lifespan of a typical humidifier can vary depending on several factors, including the type of humidifier, quality of construction, frequency of use, and maintenance. On average, a well-maintained humidifier can last anywhere from 3 to 5 years. However, some humidifiers may last longer, while others may have shorter lifespans. It is important to clean and maintain the humidifier regularly to ensure optimal performance and extend its lifespan.
What is the recommended frequency for cleaning a humidifier?
The recommended frequency for cleaning a humidifier is at least once a week. Regular cleaning helps prevent the buildup of mineral deposits, mold, and bacteria, ensuring the humidifier functions properly and maintains good air quality.
What factors can cause a humidifier to malfunction?
There can be several factors that can cause a humidifier to malfunction, including:
- Improper Maintenance: Lack of regular cleaning and maintenance can lead to mineral buildup or mold growth, which can impede the proper functioning of the humidifier.
- Incorrect Usage: Not using the humidifier according to the manufacturer's instructions, such as overfilling the water tank or using tap water that is too hard or contaminated, can impact the humidifier's performance.
- Electrical Issues: Faulty wiring, power surges, or electrical malfunctions can cause the humidifier to stop working or behave erratically.
- Clogged Filters: If the air filter or water filter in the humidifier becomes clogged with dirt, dust, or minerals, it can restrict airflow and reduce the efficiency of the device.
- Mechanical Failures: Components like motors, fans, valves, or sensors in the humidifier can malfunction or wear out over time, leading to operational issues.
- Water Quality: Using water that has a high mineral content (hard water) can cause mineral deposits to accumulate in the humidifier, obstructing the water channels and affecting its performance.
- Humidity Control Failure: In some humidifiers, a failure in the humidity control mechanism can result in the device not being able to regulate the desired humidity levels effectively.
- Age and Wear: As a humidifier ages, its parts may deteriorate or wear out, decreasing its functionality and efficiency.
- Environmental Factors: High levels of humidity in the surrounding environment or exposure to extreme temperatures can affect the overall performance of the humidifier.
It is essential to regularly clean, maintain, and use the humidifier as per the manufacturer's guidelines to minimize the risk of malfunctioning.
How to troubleshoot a humidifier that has a dislodged water tank float?
If you have a humidifier with a dislodged water tank float, you can follow these troubleshooting steps to fix the issue:
- Unplug the humidifier: Before troubleshooting or attempting to fix any issue, always unplug the device from the power source to ensure safety.
- Remove the water tank: Take out the water tank carefully from the humidifier unit and place it on a flat surface.
- Identify the float mechanism: Look for the float mechanism inside the water tank. It is typically a small plastic or metal ball that moves up and down with the water level.
- Check for dislodgment: Inspect the float mechanism to see if it has become dislodged or detached from its original position. It should be freely moving up and down with ease.
- Reattach the float: If the float is disconnected, carefully reattach it to its original position. Refer to the humidifier's user manual or manufacturer's instructions if you are unsure about the correct placement of the float.
- Test the float mechanism: After reattaching the float, gently move it up and down to ensure it is moving smoothly. It should rise as the water level in the tank increases and fall when the level decreases.
- Clean the float and tank: While troubleshooting, it is a good idea to clean the float and the water tank to remove any debris or mineral buildup. Use a mild detergent and warm water to clean them thoroughly. Rinse well and dry before reassembling.
- Reassemble the humidifier: Once the float and tank are cleaned and examined, carefully reassemble the humidifier. Ensure that the tank is securely and properly positioned in its designated spot.
- Plug in and test the humidifier: Plug the device back into the power source and turn it on. Observe and check if the float rises and falls correctly based on the water level. If the float is working correctly, the humidifier should operate normally.
If the above troubleshooting steps do not fix the issue or you face difficulties with the float mechanism, it is recommended to consult the humidifier's user manual or contact the manufacturer for further assistance or to schedule a repair.