
Best Lawn Mower Starter Tools to Buy in July 2026
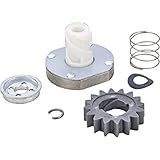
DB Electrical 220-22013 Starter Drive Kit 16 Teeth Compatible With/Replacement For Briggs & Stratton /497606, 696541
-
ENHANCED PERFORMANCE WITH PRECISE CCW ROTATION AND 16 TEETH DESIGN.
-
BACKED BY A 1-YEAR WARRANTY FOR CUSTOMER PEACE OF MIND.
-
DIRECT REPLACEMENT FOR POPULAR OEM NUMBERS ENSURES EASY FIT.


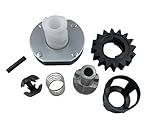
GardenP+ Starter Drive Kit Compatible with Briggs and Stratton 696540 495878 490421 396865 Toro, MTD, Murray Lawn Mower, Tractor Parts, Repl. Oregon 33-005 Sten 150-118, Starter Drive Gear Assembly
- COMPATIBLE WITH MULTIPLE BRIGGS & STRATTON ENGINE MODELS FOR VERSATILITY.
- HIGH-QUALITY COMPONENTS AT COMPETITIVE PRICES; OEM-LEVEL PERFORMANCE.
- 100% SATISFACTION WARRANTY: HASSLE-FREE RETURNS WITHIN ONE MONTH.
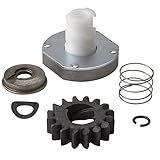
GardenP+ 696541 Starter Drive Kit,16 Teeth Drive Gear Fits Briggs and Stratton 497606, 696541; Toro Engines & Lawn Tractor; John Deere AM133635. Replaces Rotary 9854 Stens 435-859
-
COMPATIBLE WITH MAJOR BRANDS: FITS BRIGGS, TORO, AND JOHN DEERE ENGINES.
-
COMPLETE STARTER KIT: INCLUDES 6 ESSENTIAL REPLACEMENT PARTS FOR YOUR GEAR.
-
QUALITY ASSURANCE: SUPERIOR QUALITY AT COMPETITIVE PRICES WITH A 100% WARRANTY.
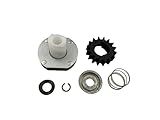
Starter Drive Kit for Briggs & Stratton 497606 696541 497595 499521 Lawn Mower Engines
- OEM REPLACEMENT FOR BRIGGS & STRATTON: SEAMLESS COMPATIBILITY.
- COMPLETE KIT: ALL PARTS INCLUDED FOR HASSLE-FREE SETUP.
- RELIABLE PERFORMANCE: RESTORES STARTS FOR YOUR LAWN CARE NEEDS.

5746N 16 Teeth New Starter Compatible with Briggs & Stratton Starter 11-25HP 795121 691262 393499 497401 494198 494990 410-22005 394943 499529 399169 490420 494148 499521 78-4340 John Deere L118 L120
- OE STANDARD ASSURANCE FOR TOP-NOTCH QUALITY AND RELIABILITY.
- COMMITMENT TO BUYER-CENTRIC SERVICE FOR YOUR PEACE OF MIND.
- HASSLE-FREE 1-YEAR WARRANTY FOR WORRY-FREE PURCHASING.
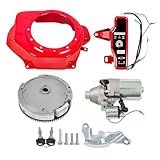
FDJ Electric Starter Motor Kit for Honda GX160/GX200 5.5HP 6.5HP Electric Start Conversion Kit
-
SEAMLESS UPGRADE FOR HONDA GX160, GX200, 5.5HP, AND 6.5HP ENGINES.
-
HIGH TORQUE MOTOR ENSURES QUICK STARTUPS IN ANY WEATHER CONDITIONS.
-
ALL-IN-ONE KIT FOR EASY INSTALLATION, ENHANCING ENGINE PERFORMANCE.
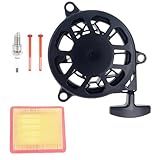
TOPREPAIR Recoil Starter Repair Kit for Craftsman 37298 37420 37295 21" 140cc Lawn Mowers Troy-Bilt TB554 TB115 TB110 TB200
- COMPATIBLE WITH POPULAR CRAFTSMAN AND TROY-BILT MOWERS!
- COMPLETE REPAIR KIT: RECOIL STARTER AND FUEL FILTER INCLUDED!
- EASY INSTALLATION FOR A HASSLE-FREE LAWN MOWER REPAIR!
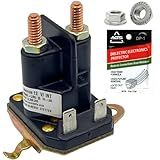
FalconSupply Genuine Replacement 12V Starter Solenoid Kit, Compatible with Craftsman Poulan Husqvarna MTD Riding Lawn Mower Tractor Replaces 192507 532192507 582042801 582042802 146154 21546294 705055
- UNMATCHED RELIABILITY: OEM-QUALITY DESIGN ENSURES LASTING PERFORMANCE.
- WIDE COMPATIBILITY: DIRECTLY REPLACES HUNDREDS OF PART NUMBERS EFFORTLESSLY.
- EFFORTLESS INSTALLATION: COMES WITH ALL HARDWARE FOR QUICK, SECURE SETUP.
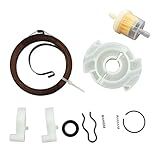
Cnfaner 28400-Z9L-014 Recoil Starter Kit for Honda GCV170 GCV200 HRX217K6 HRN216 Lawn Mower 28400-Z9L-004 28400-Z9V-004 Parts
- COMPATIBLE WITH MULTIPLE HONDA MODELS FOR VERSATILE USE.
- COMPLETE KIT INCLUDES ESSENTIAL PARTS FOR EASY INSTALLATION.
- RELIABLE PERFORMANCE BOOSTS LAWN CARE EFFICIENCY AND LONGEVITY.
Starting a push mower after winter can be a straightforward process. Here are the general steps to follow:
- Check the fuel: Start by checking the fuel level. If the mower was not emptied of fuel before winter, there's a chance that it has become stale or contaminated. If the fuel looks murky or smells foul, it's best to drain it and add fresh fuel.
- Inspect the spark plug: Remove the spark plug and inspect it for any signs of corrosion or damage. If needed, clean it with a wire brush and adjust the electrode gap according to the manufacturer's specifications. If the spark plug is worn out, it's best to replace it with a new one.
- Assess the air filter: Locate the air filter and check if it is dirty or clogged. If so, remove it and clean it thoroughly. If it's not reusable, replace it with a new one.
- Lubricate moving parts: Apply a small amount of oil or lubricant to the mower's moving parts, such as the wheels, axles, and blade. This will ensure smoother operation and prevent rust.
- Prime the engine: Locate the primer bulb or primer button and press it several times to fill the carburetor with fresh fuel, promoting easier starting.
- Set the throttle and choke: Adjust the throttle lever to the appropriate starting position, usually marked as a rabbit or turtle symbol. Set the choke to the "start" or "choke" position. Refer to the mower's manual for specific instructions.
- Pull the recoil starter cord: Grasp the recoil starter cord firmly and give it a strong pull while maintaining a firm grip on the handle. Repeat this several times if necessary until the engine starts.
- Adjust settings: Once the engine has started, allow it to warm up for a few minutes. Then, adjust the throttle lever to the desired cutting speed and move the choke lever to the "run" or "open" position.
- Test and fine-tune: Allow the mower to run for a few more minutes while idling to ensure everything is working correctly. During this time, observe the engine for any unusual sounds or vibrations. If required, make minor adjustments as needed.
It's worth noting that specific mower models may have slightly different starting procedures and maintenance requirements, so always refer to the manufacturer's instructions and guidelines for your particular mower.
How to change the oil on a push mower?
To change the oil on a push mower, follow these steps:
- Gather the necessary tools and supplies: You will need an oil container, a socket wrench or adjustable wrench, a funnel, and the appropriate type and amount of oil as specified by the manufacturer.
- Locate the oil drain plug: Look for the oil drain plug on the lower side of the mower's engine. It is usually a bolt with a square or hexagonal head.
- Prepare the mower: Before you start, make sure the mower is turned off and the engine is cool. Also, ensure the mower is on a flat surface, and remove the spark plug wire to prevent accidental starting.
- Drain the existing oil: Place the oil container underneath the drain plug to catch the oil. Unscrew the oil drain plug using the wrench, and carefully remove it. Allow the old oil to drain completely into the container.
- Inspect the drain plug and clean: While the oil is draining, inspect the drain plug for damage or excessive wear. Also, clean the plug using a cloth or a brush to remove any debris or sludge.
- Replace the oil drain plug: Once the oil has completely drained, wipe off any excess oil and reinsert the drain plug. Tighten it securely with the wrench, taking care not to overtighten.
- Add fresh oil: Using the funnel, carefully pour the recommended amount of new oil into the fill hole on the top of the engine. Refer to the mower's manual or check the oil level indicator to ensure you are adding the correct amount.
- Check oil level and cleanliness: After adding the oil, check the oil level using the dipstick or the oil level indicator. It should be within the recommended range. Additionally, inspect the oil for any dirt or contaminants. If necessary, replace the oil filter or repeat the process to ensure a clean oil change.
- Clean up: Clean up any spilled oil using a suitable absorbent material or cloth. Make sure to dispose of the used oil properly at a recycling center or an automotive shop.
- Reconnect the spark plug wire: Before using the mower again, reconnect the spark plug wire.
Always refer to the mower's manual for specific instructions and guidelines. If you are uncertain or uncomfortable performing the oil change yourself, it is recommended to consult a professional or a local mower repair service.
How to safely clean and remove grass from the push mower's underside?
To safely clean and remove grass from the push mower's underside, follow these steps:
- Disconnect the spark plug: Before working on the underside of the mower, it is important to disconnect the spark plug to prevent accidental starting.
- Turn the mower on its side: Tilt the mower on its side with the carburetor and air filter facing up to prevent oil and fuel from leaking into the muffler or air filter.
- Wear protective gloves and goggles: Put on gloves to protect your hands and goggles to shield your eyes from any debris or flying particles while cleaning.
- Scrape off excess grass: Use a plastic scraper or a putty knife to gently scrape off any excess grass or debris stuck to the underside of the mower. Be careful not to use any metal tools that could scratch or damage the mower's surface.
- Use a brush or compressed air: Use a stiff brush or compressed air to dislodge and remove any remaining grass clippings, dust, or dirt. Start at the back of the mower and work your way forward to ensure all grass clippings are removed.
- Rinse with water: If the grass clippings are stubborn or the underside is exceptionally dirty, you can lightly rinse the underside with a hose or pressure washer. Avoid using excessive water pressure to prevent water damage to the mower's components, especially the carburetor and air filter.
- Dry the mower: Once the cleaning is complete, use a dry cloth or towel to wipe the underside of the mower and remove any excess moisture. This will prevent rusting or corrosion.
- Reconnect the spark plug: Before turning the mower back over, make sure to reconnect the spark plug wire to its original position.
- Oil the mower: After cleaning, it is a good idea to apply a light coat of oil or lubricant to the underside of the mower to help reduce future grass build-up and keep the metal parts protected.
Always consult the manufacturer's manual for specific instructions on cleaning and maintenance for your particular push mower model.
How to prepare a push mower for winter storage?
Preparing a push mower for winter storage is essential in ensuring the machine's longevity and best performance. Here are the steps to prepare your push mower for winter storage:
- Clean the mower: Before storing the mower, give it a thorough cleaning. Remove any debris, grass clippings, and dirt from the cutting deck, undercarriage, and wheels. Use a brush or scraper to remove any stuck-on particles. Cleaning prevents rust formation and keeps the mower in good condition.
- Remove the spark plug: Disconnect the spark plug wire by pulling it off or removing the ignition key. This step is important to prevent accidental starts while performing other maintenance tasks.
- Drain the fuel: If your mower operates on gasoline, it's crucial to drain the fuel tank for storage. Storing fuel in the tank for an extended period can lead to carburetor issues. Run the mower until it stops to ensure there is no fuel left in the system. Alternatively, you can use a siphon or fuel extraction tool to remove the fuel. Once drained, start the engine to burn any remaining fuel from the carburetor.
- Change the oil: If your mower has a 4-stroke engine, it's beneficial to change the oil before storage. Old oil can become acidic and corrode the internal components during the winter. Follow the manufacturer's instructions to drain the old oil and add fresh oil.
- Clean or replace the air filter: If your mower has a foam or paper air filter, inspect it and clean or replace it if necessary. A dirty air filter can hinder performance and lead to engine damage over time.
- Inspect and sharpen the blade: Examine the mower blade for any signs of damage or dullness. If the blade is damaged, replace it. Dull blades result in poor cutting performance. If the blade is in good condition, you can choose to sharpen it yourself using a blade sharpener or take it to a professional to ensure a clean cut for the next mowing season.
- Lubricate moving parts: Apply a light coating of oil or lubricant to the mower's moving parts, such as the wheels, axles, and cables. Lubrication prevents rust and provides smooth operation when the mower is used again.
- Store in a dry place: Find a dry, sheltered location to store your push mower to protect it from moisture and extreme cold temperatures. Ideally, place a cover or tarp over the machine to further safeguard it from dust and debris.
By following these steps, your push mower will be well-prepared for winter storage and ready to perform optimally when the mowing season resumes.
How to remove and clean the carburetor on a push mower?
Removing and cleaning the carburetor on a push mower is a task that requires some mechanical knowledge and a few tools. Here's a step-by-step guide on how to do it:
- Gather the necessary tools: You will need a socket wrench or adjustable wrench, a screwdriver, a carburetor cleaner, a small brush, a container to hold the cleaner, and a clean cloth.
- Prepare the mower: Disconnect the spark plug wire from the spark plug to prevent any accidental starting while working on the carburetor.
- Locate the carburetor: The carburetor is usually found at the side or front of the engine. It's a metal part with various fuel lines connected to it.
- Disconnect the fuel line: Locate the fuel line that connects to the carburetor and use your wrench to loosen and remove the clamp or nut securing it. Be careful as some fuel might spill out, so place a container underneath to catch any fuel.
- Remove the carburetor: Use your wrench or screwdriver to remove the bolts or screws holding the carburetor in place. Carefully lift the carburetor off the mower's engine.
- Disassemble the carburetor: Once removed, take note of how the various parts are connected and disassemble the carburetor. You may need to use a screwdriver or a small socket to remove the bolts or screws holding it together.
- Clean the carburetor components: Spray the carburetor cleaner onto all the internal parts of the carburetor, including the jets, float bowl, and needle valve. Use a small brush to scrub away any dirt or debris. Ensure all the clogged passages are thoroughly cleaned.
- Soak the carburetor: If the carburetor is heavily clogged, you can soak it in a container of carburetor cleaner following the manufacturer's instructions. This will help dissolve stubborn debris and buildup.
- Rinse and dry the carburetor: After cleaning, rinse the carburetor and its components with clean water to remove any remaining cleaner. Allow it to air dry completely or use compressed air if available.
- Reassemble and reinstall the carburetor: Put all the cleaned carburetor parts back together in their original positions. Tighten the bolts or screws to secure the carburetor and reattach the fuel line using the wrench.
- Reconnect the spark plug wire: Make sure the spark plug wire is properly connected to the spark plug.
- Test the mower: Start the mower and let it run for a few minutes to ensure that the carburetor is working properly and the fuel is flowing correctly.
By following these steps, you will be able to remove and clean the carburetor on your push mower successfully. Always refer to your mower's user manual for specific instructions and safety precautions.
How to properly engage the blades on a push mower?
To properly engage the blades on a push mower, follow these steps:
- Prepare the mower: Ensure that the mower is on a flat surface and that the cutting height is set to the desired level. It's also important to check the oil and fuel levels and ensure the spark plug is properly connected.
- Safety precautions: Before engaging the blades, it's crucial to adhere to safety precautions. Make sure you're wearing closed-toe shoes, eye protection, and hearing protection if necessary. Also, ensure that there are no obstacles or people in the mowing area.
- Locate the control lever: Most push mowers have a control lever to engage the blades. It is typically located on the handle of the mower, close to the grip. Look for a lever labeled with blade engagement or a similar indication.
- Understand the lever positions: The control lever usually has two positions: engaged and disengaged. When the lever is in the engaged position, the blades are activated, and when it is in the disengaged position, the blades remain inactive.
- Engage the blades: To engage the blades, hold the mower's handle with one hand and use your other hand to move the control lever into the "engaged" position. You may need to squeeze or hold the lever while pushing or maneuvering the mower.
- Test the engagement: Once the blades are engaged, gently push the mower a few steps forward to ensure that they are rotating properly. If you feel any abnormal vibrations or hear unusual noises, immediately disengage the blades and inspect the mower for any issues.
Remember to disengage the blades when you want to stop mowing or move the mower between different areas. To do this, release the control lever, allowing it to return to the disengaged position.
What is the recommended maintenance schedule for a push mower?
The recommended maintenance schedule for a push mower can vary depending on the specific model and manufacturer. However, here is a general guideline for a push mower's maintenance:
- Before each use: Check the fuel level and add fresh gasoline if necessary. Inspect the oil level and add or change oil as needed. Clean any debris or grass clippings from the mower deck and engine.
- After each use: Empty the grass clippings bag or clean the mower deck if necessary. Inspect the blade for any damage or dullness and sharpen or replace it if needed. Clean the air filter and replace it if dirty or damaged. Check the wheels for proper inflation and damage, and lubricate any wheel bearings if required. Clean any debris or grass clippings from the underside of the mower deck.
- Monthly or as needed: Clean or replace the spark plug if it appears worn or dirty. Inspect and clean the carburetor and fuel system if the engine performance is poor. Check the throttle and control cables for proper operation and lubricate if necessary.
- Annually or as recommended by manufacturer: Change the engine oil and replace the oil filter (if applicable). Inspect and replace the air filter and fuel filter (if applicable). Replace the spark plug. Inspect and replace any worn or damaged belts. Perform any other maintenance tasks recommended by the manufacturer, such as adjusting the blade height or checking the ignition system.
Always refer to the specific owner's manual or manufacturer's recommendations for the most accurate and detailed maintenance schedule for your push mower.