Best Outdoor Coolers with Wheels to Buy in July 2026
VINGLI 80 Quart Rolling Ice Chest, Portable Patio Party Bar Drink Cooler Cart, with Shelf, Beverage Pool with Bottle Opener,Grey
- MASSIVE CAPACITY: HOLDS 80 QUARTS FOR 96 ALUMINUM CANS-PERFECT FOR PARTIES!
- EASY MOBILITY: ROLLING WHEELS AND LOCKING CASTERS FOR EFFORTLESS TRANSPORT.
- VERSATILE USE: KEEPS ITEMS COOL FOR 48HRS OR WARM FOR 8HRS-INDOORS & OUT!


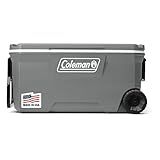
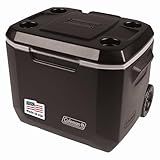
Coleman Classic Series Insulated Portable Rolling Cooler with Wheels, Leak-Resistant Outdoor Hard Cooler Keeps Ice up to 5 Days, 100-Quart
- KEEPS ICE FOR 5 DAYS, EVEN AT 90°F-PERFECT FOR ANY ADVENTURE!
- HEAVY-DUTY WHEELS AND HANDLES MAKE TRANSPORT A BREEZE.
- CUP HOLDERS FIT 30-OZ TUMBLERS-SPILL-FREE ENJOYMENT GUARANTEED!
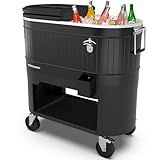
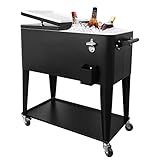
Permasteel 120-Qt Rolling Ice Chest, Portable Patio Party Bar Drink Cooler Cart with Wheels, Drink Dividers - Perfect for Outdoor or Indoor Entertaining, and Parties, Black
-
120-QT CAPACITY HOLDS 150-185 CANS FOR ENDLESS OUTDOOR FUN.
-
STYLISH FARMHOUSE DESIGN COMPLEMENTS ANY MODERN OUTDOOR DECOR.
-
EFFORTLESSLY MOBILE WITH LOCKING WHEELS FOR STABILITY AND EASE.
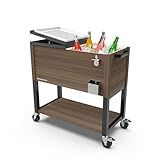
Permasteel 80-Quart Rolling Patio Cooler with Wood Grain Finish – Outdoor Beverage Cooler with Wheels & Insulated Ice Chest for Backyard, Deck, and Poolside Parties – Brown
- MASSIVE 80-QUART CAPACITY: HOLDS 110 CANS OR 50 BOTTLES PLUS ICE!
- SMOOTH MOBILITY & STABILITY: 4 CASTERS WITH 2 LOCKING WHEELS FOR EASE.
- CHILLS DRINKS FOR 36 HOURS: KEEP BEVERAGES COLD WITH ICE PACKS!

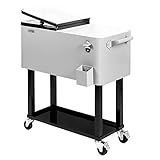
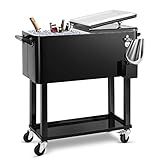
Best Choice Products 80-Quart Outdoor Steel Rolling Cooler Cart w/Ice Chest, Bottle Opener, Catch Tray, Drain Plug, Locking Wheels - Gray
- PORTABLE DESIGN: STEEL STAND WITH WHEELS & LOCKS FOR EASY MOBILITY.
- HIGH CAPACITY: FITS UP TO 50 BOTTLES OR 70 CANS FOR ALL YOUR NEEDS.
- ALL-IN-ONE FEATURES: BUILT-IN BOTTLE OPENER AND STORAGE SHELF INCLUDED.
EDOSTORY 80 Quart Black Rolling Ice Chest Cooler Cart,Patio Backyard Party Drink Beverage Bar Stand Up Cooler Trolley with Ice Scoop
- VERSATILE TEMPERATURE CONTROL: KEEPS DRINKS COLD FOR 24 HRS & WARM FOR 8.
- SPACIOUS CAPACITY: STORE 100+ CANS OR 55+ BOTTLES FOR ANY EVENT.
- EASY MOBILITY: 360° ROLLING WHEELS AND DUAL ACCESS LIDS FOR CONVENIENCE.
Nattork Portable Rolling Cooler Cart 80 Quart Ice Chest Cart Black Trolley Rolling Cooler with Wheels, Outdoor Beverage Ice Chest for Patio with Shelf, Water Pipe and Bottle Opener
-
LARGE CAPACITY: STORE 70+ CANS/50+ BOTTLES-IDEAL FOR EVENTS!
-
EXTENDED COOLING: KEEPS DRINKS COOL FOR 48HRS; WARM FOR 8HRS.
-
EASY MOBILITY: 360° WHEELS & HANDLES FOR EFFORTLESS TRANSPORT.
Coleman Xtreme 50qt Rolling Cooler with Wheels, Extra-Walled Insulation Keeps Ice up to 5 Days, Portable Wheeled Hard Chiller
- UP TO 5 DAYS ICE RETENTION: KEEP DRINKS COLD FOR LONG ADVENTURES.
- HOLDS 84 CANS: PERFECT FOR BEACH TRIPS AND CAMPING GEAR NEEDS.
- EASY TRANSPORT & STORAGE: DURABLE WHEELS AND TELESCOPING HANDLE INCLUDED.
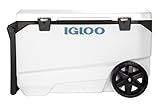
Igloo Marine Ultra 90 QT Cooler, Insulated Cooler Chest with Soft Ride Wheels, Leak-Proof Outdoor Hard Cooler, 5-Day Ice Retention, 137 Can Capacity
- ALL-TERRAIN OVERSIZED WHEELS FOR UNBEATABLE MOBILITY.
- EASY LIFT WITH COMFORT SWING-UP REAR HANDLE.
- ADVANCED INSULATION SHOWS 5-DAY PERFORMANCE.
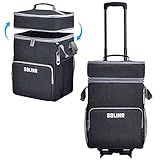
SDLINR 72-Can Large Rolling Cooler, Leakproof Insulated Soft Cooler Bag with Wheels and Handle Collapsible for Beach Camping Patio Travel Outdoor
- STURDY ROLLING DESIGN WITH DETACHABLE CART FOR EASY TRANSPORT.
- DUAL-COMPARTMENT COOLER BAGS FOR VERSATILE, EVERYDAY USE.
- 100% LEAKPROOF AND INSULATED FOR LONG-LASTING TEMPERATURE RETENTION.
To retrofit an outdoor cooler with wheels for easy mobility, follow these steps:
- Assess the cooler: Start by examining the cooler to determine the most suitable location for attaching the wheels. Consider the size, weight, and overall structure of the cooler.
- Gather necessary materials: Obtain a set of wheels suitable for outdoor use. Look for wheels that are durable, corrosion-resistant, and capable of supporting the weight of the cooler. Additionally, you may need a drill, screws, and a measuring tape.
- Measure and mark: Use a measuring tape to determine the exact placement of the wheels on the cooler. Mark the spots where you will attach the wheels, ensuring they are evenly spaced and situated for optimal mobility.
- Prepare for drilling: With a drill in hand, select a drill bit that matches the size of the mounting holes on the wheels. Wear safety goggles and gloves to protect yourself during this process.
- Drill mounting holes: Position the drill bit on each marked spot and carefully drill through the cooler's exterior. Apply even pressure while drilling and avoid applying too much force to prevent damage.
- Attach the wheels: Align the mounting holes on the wheels with the drilled holes on the cooler. Insert screws through the holes, securing the wheels firmly in place. Use a screwdriver to tighten the screws securely, ensuring the wheels are stable and won't detach easily.
- Test the mobility: Once the wheels are attached, lift the cooler and test its mobility. Push it in different directions to check if the wheels rotate smoothly and support the weight properly. If any issues arise, double-check the attachment points and screws for firmness.
- Consider additional modifications: Depending on your needs, you may want to make other modifications to enhance the cooler's mobility. For instance, you could attach a handle or strap to make it easier to pull the cooler along when it becomes too heavy to lift.
Remember to regularly inspect the wheels and screws for any signs of wear or loosening. By retrofitting your outdoor cooler with wheels, you'll gain the convenience of easy mobility for various outdoor activities.
How to ensure proper weight distribution when retrofitting an outdoor cooler?
To ensure proper weight distribution when retrofitting an outdoor cooler, you can follow these steps:
- Determine the weight capacity of your cooler: Before retrofitting, check the manufacturer's specifications or label to find out the maximum weight the cooler can handle. This will help you understand the weight distribution you need to maintain.
- Select the right location for retrofitting: Choose a spot on your cooler that can evenly distribute the weight. Look for areas that can withstand additional weight without compromising the cooler's structural integrity.
- Distribute weight evenly: Avoid concentrating all the weight in one area of the cooler. Instead, distribute the weight across multiple sections, considering both vertical and horizontal distribution.
- Use appropriate materials: When retrofitting, make sure to use materials that are lightweight yet durable. Avoid adding too much unnecessary weight, as it can strain the cooler's structure.
- Securely fasten the retrofitting materials: Whether you're attaching brackets, shelves, or other additions, ensure they are firmly and securely fastened to the cooler. Loose or wobbly attachments can cause uneven weight distribution.
- Regularly check for balance: After retrofitting, occasionally check the cooler for balance. If you notice any tilting or instability, redistribute the weight accordingly.
- Test the cooler: Place the cooler on a stable surface and fill it with an appropriate load, such as ice or beverages. Allow it to sit for some time and observe if the weight is distributed evenly. Adjust as needed.
- Avoid overloading: Do not exceed the maximum weight capacity of the cooler when retrofitting. Overloading can lead to instability, damage, or even failure of the cooler.
Remember, it's crucial to use common sense and take necessary precautions while retrofitting to ensure the safety and proper functioning of your outdoor cooler.
How to choose wheels with a locking mechanism for added security?
When choosing wheels with a locking mechanism for added security, there are several factors you should consider. Here are some steps to help you make an informed decision:
- Determine your needs: Consider the purpose of adding a locking mechanism to your wheels. Are you looking for added security to deter theft, or do you need to prevent unauthorized movement of your equipment?
- Assess the locking mechanism options: There are various types of locking mechanisms available for wheels, including combination locks, key locks, and electronic locks. Research and understand the pros and cons of each type, considering factors such as convenience, reliability, and potential vulnerabilities.
- Quality and durability: Look for locks made from sturdy materials that are resistant to tampering or cutting. Check customer reviews and ratings to ensure the locks are reliable for long-term use.
- Compatibility: Ensure that the locking mechanism you choose is compatible with the size and design of your wheels. Consider the weight, dimensions, and load capacity of your equipment to ensure the lock can adequately secure it.
- Ease of installation: Check if the locking mechanism is easy to install and doesn't require complex procedures or professional assistance. If possible, look for options that offer straightforward installation instructions or video tutorials.
- Consider key management: If you opt for key locks, evaluate how many keys are provided and how easy it would be to obtain replacements if needed. Assess whether the locking mechanism allows for master keys or alternative access methods for emergency situations.
- Portability and convenience: Take into account the convenience of using and transporting equipment with locking wheels. Consider how easily the locking mechanism can be engaged and disengaged, as well as any potential impact on the mobility or maneuverability of your equipment.
- Budget: Determine your budget range and compare different options within that range. Remember that higher quality and more secure locking mechanisms may require a larger investment, but they may also provide better protection and peace of mind.
- Consult experts or product guides: When in doubt, reach out to manufacturers, retailers, or industry experts for recommendations based on your specific requirements and equipment type. They can provide valuable insights and suggest suitable options.
By following these steps, you should be able to choose wheels with a locking mechanism that best fits your needs for added security.
What is the average time required to retrofit an outdoor cooler with wheels?
The average time required to retrofit an outdoor cooler with wheels can vary depending on the complexity of the cooler design and the skill level of the person performing the retrofitting. However, a simple retrofitting process can usually be completed within 30 to 60 minutes. More complicated modifications may take longer, possibly up to 2 hours or more. It is best to refer to the specific instructions provided by the cooler manufacturer or seek guidance from a professional if unsure.
What types of wheels are suitable for retrofitting an outdoor cooler?
When retrofitting an outdoor cooler, there are a few types of wheels that are suitable, depending on the specific requirements of the cooler and its intended use. Here are some options:
- All-terrain wheels: If the cooler is meant to be used on uneven or rough surfaces like grass, gravel, or sand, all-terrain wheels are a good choice. These wheels usually have larger diameters with sturdy treads that provide stability and mobility on various terrains.
- Pneumatic wheels: Pneumatic wheels, often associated with bicycles or wheelbarrows, are filled with air and offer excellent shock absorption and smooth rolling. They are suitable for outdoor coolers that will be used on bumpy or rough surfaces, as the air-filled tires provide cushioning and improve maneuverability.
- Solid rubber wheels: Solid rubber wheels are durable, low-maintenance, and perform well on smooth and flat surfaces. They are a good option for outdoor coolers used on sidewalks, pavement, or other even terrains, as they offer stability and reduce the risk of punctures.
- Swivel wheels with brakes: Swivel wheels provide enhanced maneuverability, allowing the cooler to easily change direction. If mobility and maneuvering in tight spaces is important, swivel wheels are a good choice. Additionally, wheels with built-in brakes can provide added safety and stability when the cooler needs to be stationary.
- Locking wheels: If you want to ensure that the cooler stays in place and does not move unintentionally, locking wheels are suitable. These wheels have a mechanism that can be engaged to keep them stationary, preventing any accidental rolling or sliding.
Ultimately, the choice of wheels will depend on factors such as the outdoor terrain, mobility requirements, load capacity, and personal preferences.