
Best Garden Shovels to Buy in July 2026

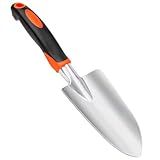
Fiskars Ergo Garden Trowel for Digging and Planting, Heavy Duty Gardening Hand Tool with Hanging Hole
-
HEAVY-DUTY ERGONOMIC DESIGN FOR ALL YOUR GARDENING TASKS.
-
CAST-ALUMINUM HEAD ENSURES POWER, PRECISION, AND RUST RESISTANCE.
-
DURABLE AND RELIABLE, BACKED BY A LIFETIME WARRANTY.


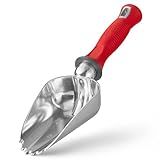
Garden Shovel Garden Hand Trowel, Heavy Duty Hand Shovel with Ergonomic Handle, Small Gardening Tools for Digging, Rust Resistant Gardening Spade Trowel Tools, Orange
-
DURABLE ALUMINUM ALLOY: STURDY DESIGN FOR LONG-LASTING, EFFICIENT DIGGING.
-
ERGONOMIC COMFORT GRIP: REDUCES FATIGUE FOR EASY, ENJOYABLE GARDENING SESSIONS.
-
VERSATILE & COMPACT: PERFECT FOR VARIOUS TASKS; EASY TO STORE AND CARRY.

Hooyman Spade Shovel with Heavy Duty Carbon Steel Head Construction, Ergonomic No-Slip H-Grip Handles, D Handle, and Oversized Steps for Gardening, Land Management, Yard Work, Farming and Outdoors
-
HEAVY-DUTY BUILD: 1050MN CARBON STEEL FOR UNMATCHED DURABILITY AND TOUGHNESS.
-
SECURE GRIP: NO-SLIP H-GRIP HANDLE PROVIDES SAFETY IN ALL WEATHER CONDITIONS.
-
EFFORTLESS LEVERAGE: OVERSIZED FLANGES OFFER ENHANCED CONTROL FOR ANY TASK.
Garden Weasel Potting Scoop - Oversized | Dig and Transport | Planting and Gardening Hand Digging Tools, Heavy Duty Soil Scoop, Mini Gardening Shovel | 91362
-
SERRATED TIP DESIGN: EFFORTLESSLY DIG, CUT, AND SCOOP SOIL FOR PLANTING.
-
LIFETIME GUARANTEE: ENJOY PEACE OF MIND WITH OUR “NO HASSLE” WARRANTY.
-
TOP SELLER: TRUSTED BY GARDENERS FOR UNMATCHED PERFORMANCE AND DURABILITY.
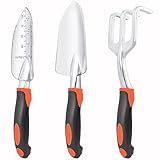
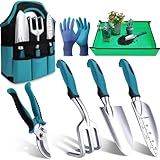
Garden Tools Set, 3 Pack Heavy Duty Gardening Tools Set Include Garden Shovel, Transplant Trowel and Hand Rake with Ergonomic Handle, Aluminum Alloy Lawn for Planting, Orange
- DURABLE ALUMINUM ALLOY ENSURES LONG-LASTING, RUST-RESISTANT TOOLS.
- ERGONOMIC GRIPS REDUCE HAND FATIGUE FOR COMFORTABLE GARDENING.
- IDEAL GIFT SET FOR GARDENING ENTHUSIASTS OF ALL AGES AND SKILL LEVELS.
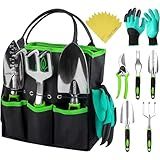
GROWIT Heavy Duty Gardening Tools - 22-Piece Gardening Gifts for Women, Men, Mom, Dad - Durable, Ergonomic Garden Tools Set
-
ULTIMATE GIFTS FOR GARDENING ENTHUSIASTS-PERFECT FOR ANY OCCASION!
-
COMPLETE 22-PIECE SET ENSURES YOU HAVE EVERY TOOL FOR YOUR GARDEN.
-
ERGONOMIC DESIGN REDUCES FATIGUE, MAKING GARDENING ENJOYABLE AND EASY!
Kynup Garden Tools 7-Piece, Gardening Hand Tools, Gardening Tools Set Cultivators with Rust-Proof,Stainless Steel, Aluminum Alloy Material, Gardening Supplies Set Ideal Gift
- COMPREHENSIVE SET: ALL-IN-ONE KIT FOR COMPLETE GARDEN MAINTENANCE.
- DURABLE & LIGHTWEIGHT: STRONG ALUMINUM ALLOY TOOLS FOR LASTING USE.
- ERGONOMIC COMFORT: DESIGNED TO REDUCE FATIGUE DURING LONG GARDENING.
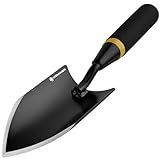
Heavy Duty Gardening Hand Trowel - Carbon Steel Garden Trowel with Rubberized Handle, Ideal for Soil Planting, Digging, Transplanting
- QUENCHED 65-MANGANESE STEEL WITHSTANDS TOUGH SOIL AND ROOTS.
- ERGONOMIC, NON-SLIP HANDLE ENSURES COMFORTABLE, SECURE GRIP.
- HAND-WELDED FOR UNMATCHED DURABILITY AND LONGEVITY IN USE.
To clean and maintain a garden shovel, start by removing any excess dirt and debris from the blade and handle after each use, which will prevent rust and damage. You can use a stiff brush to scrub off any stubborn soil. Rinse the shovel with water and dry it thoroughly with a clean cloth to avoid moisture, which can lead to rust. Periodically inspect the blade for any signs of rust and use sandpaper or a wire brush to remove it if necessary. Applying a thin coat of oil, such as linseed oil for wooden handles or a light machine oil for metal parts, can protect against rust and keep the metal and wood in good condition. Check the handle for any cracks or splinters and sand it down if needed, or consider replacing it if it's severely damaged. Sharpening the blade regularly will keep it effective for digging and cutting. Store the shovel in a dry place, preferably hanging up, to prevent any unnecessary wear and tear.
How to repair a broken garden shovel handle?
Repairing a broken garden shovel handle can be a straightforward process if you follow these steps:
Materials Needed:
- Replacement handle (wooden or fiberglass, depending on preference and availability)
- Hammer
- Chisel or screwdriver
- Drill
- Wood glue (if using a wooden handle)
- Screws or rivets (depending on original assembly)
- Sandpaper
- Varnish or wood sealer (if using a wooden handle)
- Safety goggles and gloves
Instructions:
- Safety First: Wear safety goggles and gloves to protect yourself from splinters and debris.
- Remove the Broken Handle: Detach from the Shovel Blade: If the handle is broken near the shovel blade, use a hammer and chisel to carefully remove any wood remnants from the socket. For fiberglass, you can usually use a drill to remove any remains. Loosen Screws/Rivets: If there are screws or rivets holding the handle in place, remove them using a screwdriver or drill to detach the handle completely.
- Prepare the New Handle: Fit the Handle: Ensure the new handle fits snugly into the socket of the shovel blade. Drill Holes: If necessary, drill new holes in the handle and blade socket to match the original fastening points.
- Attach the New Handle: With Wooden Handles: Apply wood glue to the part of the handle that fits into the socket for extra stability. Insert the handle into the socket. Secure the Handle: Use the original screws or rivets to secure the handle to the shovel blade. Ensure everything is tightly fastened.
- Finish the Handle: Sand the Handle: Use sandpaper to smooth any rough areas, which will prevent splinters. Apply Varnish/Sealer (for Wooden Handles): To protect the wood from weather, apply a coat of varnish or wood sealer. Let it dry completely before use.
- Test the Shovel: Ensure the handle is securely fitted and feels sturdy. Give it a few test digs to confirm its integrity.
Additional Tips:
- Consider using a fiberglass handle for more durability and resistance to weather elements.
- If the original handle was riveted, replacing with screws can make future replacements easier.
- Choose a handle length and thickness that feels comfortable and matches the size of the original handle for optimal balance and grip.
How to clean and maintain a garden hose?
Cleaning and maintaining a garden hose is relatively straightforward and can help extend its lifespan. Here are some steps to follow:
Cleaning Your Garden Hose
- Detach the Hose: Disconnect the hose from the faucet or spigot to ensure no water is running through it during cleaning.
- Drain the Water: Lift the hose in sections starting from one end to force out any remaining water. This prevents mildew and mold from growing inside the hose.
- Flush the Hose: Attach one end of the hose back to the spigot and slowly turn on the water to flush out any dirt or debris inside. If the hose is particularly dirty, consider adding a bit of vinegar or mild soap to the water.
- Clean the Exterior: Use a sponge or cloth with a mixture of mild soap and water to wipe down the outside of the hose, removing dirt or grime. Rinse thoroughly with clean water.
- Inspect for Damage: Check the entire length of the hose for cracks, splits, or leaks. Pay special attention to the connections and fittings.
- Clean the Fittings: Use a small brush to clean any dirt or debris from the fittings. If there’s mineral buildup, soak them in vinegar to loosen it.
Maintaining Your Garden Hose
- Store Properly: Coil the hose neatly and store it on a hose reel or hanger. Keeping it off the ground prevents damage from lawn equipment or sharp objects.
- Avoid Kinks: Store the hose in large loops rather than tight coils to minimize kinks that can weaken the hose over time.
- Protect from Sun: Sunlight can degrade the material over time. Store your hose in a shaded area or use a hose reel with a cover.
- Protect from Freezing: In colder seasons, drain the hose and store it indoors or in a frost-free location to prevent cracking from frozen water inside.
- Regular Inspections: Periodically inspect the hose and fittings for wear and tear. Replace washers and repair leaks as needed.
- Use the Hose Gently: Avoid dragging the hose across rough surfaces and be cautious of sharp bends, which can cause damage over time.
By regularly cleaning and properly maintaining your garden hose, you’ll ensure that it serves you well for many seasons.
How to restore old garden tools?
Restoring old garden tools can help prolong their life, improve their functionality, and maintain their appearance. Here’s a step-by-step guide:
- Assessment: Examine the tool for rust, damaged wood, bent metal, or broken parts. Determine if the tool is salvageable or if parts need replacement.
- Cleaning: Remove any dirt or debris with a wire brush or stiff bristle brush. For grimy or sticky residues, use warm soapy water and a scrub brush, then rinse and dry thoroughly.
- Rust Removal: Use sandpaper or a wire brush to remove surface rust from metal parts. For heavy rust, apply a rust remover or soak the tool in a solution of vinegar and water overnight, then scrub off loosened rust. Rinse and dry the tool thoroughly after rust removal to prevent further oxidation.
- Sharpening: Sharpen blades with a file or sharpening stone. Follow the original bevel and maintain a consistent angle. For tools like hoes and shovels, use a file to sharpen the edges. Ensure you wear safety gloves while sharpening.
- Wooden Handle Restoration: Sand wooden handles with medium then fine-grit sandpaper to smooth out and remove splinters. Wipe off any dust with a damp cloth. Apply linseed oil or a wood conditioner to nourish and protect the wood. Allow it to soak in before applying additional coats if needed.
- Metal Protection: Apply a light coat of oil, such as mineral oil or a multi-purpose oil like WD-40, to the metal parts to prevent future rusting. Wipe away excess oil with a cloth.
- Reassembly and Final Check: If parts were removed for cleaning or repair, reassemble the tool and ensure all connections are tight and secure. Test the tool to ensure it functions correctly and safely.
- Preventive Maintenance: Store tools in a dry place. Clean and oil tools after each use to maintain their condition. Regularly check tools for signs of wear and address issues promptly.
By following these steps, you can effectively restore and maintain your garden tools, ensuring they remain in good working condition for years to come.
How to extend the life of garden tools?
Extending the life of garden tools involves regular maintenance and proper storage. Here are some steps you can take to ensure your tools remain in good working condition:
- Clean Tools After Use: Remove dirt, sap, and plant materials after each use with water and a brush or cloth. For tools with stubborn sap or residue, use a solvent like mineral spirits.
- Dry Thoroughly: Always dry tools completely after cleaning to prevent rust. A cloth or towel works well for this.
- Sharpen Blades: Regularly sharpen pruners, shears, and other cutting tools using a sharpening stone or file. Maintaining sharp blades makes cutting easier and reduces strain on the tool.
- Oil Moving Parts: Lubricate moving parts on tools like pruners and shears with oil (e.g., WD-40 or a light machine oil) to prevent rust and ensure smooth operation.
- Check for Damage: Regularly inspect tools for any signs of damage such as cracks or bent parts and repair as needed. Tighten any loose screws or bolts.
- Rust Prevention: For metal parts, apply a thin coat of oil to prevent rust. Linseed oil works well for wooden handles and helps preserve them.
- Replace Handles: Replace wooden handles if they become cracked or splintered. Consider using fiberglass or metal handles that may be more durable.
- Proper Storage: Store tools in a dry place, such as a shed or garage, to keep them away from moisture. Use a pegboard or tool rack to hang tools, preventing any unnecessary pressure or bending.
- Seasonal Maintenance: At the end of each gardening season, do a thorough clean and inspection. Apply protective coatings, sharpen blades, and ensure everything is in good condition before storing for the winter.
- Use Tools Properly: Avoid using tools for tasks they are not designed for to prevent damage. Follow the manufacturer's guidelines for use and care.
By following these steps, you can enhance the longevity and performance of your garden tools.
What is the difference between a spade and a shovel?
The terms "spade" and "shovel" are often used interchangeably, but they refer to different tools with distinct designs and purposes:
- Blade Shape and Function: Spade: A spade typically has a flat, rectangular or slightly curved blade with a straight edge. It is designed primarily for cutting into soil, edging, and digging with precision. Spades are useful for tasks that require clean lines and control, such as transplanting plants or defining garden beds. Shovel: A shovel generally has a broader, more curved blade with a pointed or rounded tip. Its design is geared towards moving materials, such as soil, gravel, or snow, rather than cutting. Shovels are better suited for scooping and lifting.
- Handle Design: Spade: Spades usually have shorter handles with a D- or T-shaped grip, which provides better leverage and control for cutting tasks. This design helps users apply downward force when digging. Shovel: Shovels often have longer, straight handles, allowing for more efficient scooping and lifting. This length provides greater leverage for moving materials.
- Typical Uses: Spade: Best for digging precise holes, cutting sod, and edging garden beds. Shovel: Ideal for moving loose materials like soil, sand, gravel, or snow.
Understanding these differences can help you choose the right tool for your specific gardening, landscaping, or construction needs.
How to safely use a garden shovel?
Using a garden shovel safely involves several key practices to ensure you avoid injury and work effectively. Here are some tips to consider:
- Choose the Right Shovel: Select a shovel that is appropriate for the task you're doing. For example, use a digging shovel for breaking ground and a trenching shovel for narrow spaces. Ensure it's the right size for your height to avoid unnecessary bending or stretching.
- Check the Shovel Condition: Inspect the shovel for any cracks or damage before use. Ensure that the handle is securely attached. If the handle or blade is worn out or damaged, repair or replace the shovel to avoid accidents.
- Use Proper Posture: Stand with your feet shoulder-width apart to maintain balance. Bend your knees slightly and keep your back straight to avoid strain. Use your legs, not your back, to lift the shovel.
- Grip the Shovel Correctly: Use both hands for a firm grip, with one hand on the handle's end and the other closer to the blade for control. Make sure your grip is firm but relaxed to prevent hand strain.
- Be Mindful of Your Surroundings: Be aware of any obstacles or hazards in your work area, such as rocks or tree roots. Make sure others are at a safe distance to avoid accidental contact with the shovel.
- Lift Loads Correctly: Avoid overloading the shovel; take smaller loads to prevent muscle strain. Lift using your legs and pivot with your feet instead of your back when moving the load.
- Blade Awareness: Be cautious of the blade's sharpness. Wear gloves to protect your hands from cuts. Store the shovel with the blade facing down when not in use to prevent accidents.
- Weather Considerations: Avoid using a shovel during wet or icy conditions as it may become slippery. Dress appropriately for the weather to maintain comfort and dexterity.
- Take Breaks: Take regular breaks to prevent fatigue, especially during long periods of shoveling. Stay hydrated and rest if you start feeling tired.
- Proper Storage: After use, clean the shovel to prevent rust and damage. Store it in a dry place, away from the elements.
By following these guidelines, you can effectively and safely use a garden shovel for your gardening tasks.