
Best Patio Gliders to Buy in July 2026
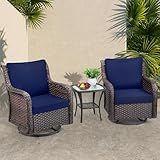
Towallmark Outdoor Swivel Wicker Glider Patio Chairs with Table Set, 3 Pieces Outdoor Bistro Set with 4”Thick Cushions and Coffee Table for Porch, Balcony, Deck (Blue)
-
EFFORTLESS 360° SWIVEL AND ROCKING FOR ULTIMATE RELAXATION OUTDOORS.
-
PLUSH 4 THICK CUSHIONS ENSURE COMFORT FOR LONG HOURS OF USE.
-
STYLISH WOODEN SIDE TABLE OFFERS DUAL STORAGE FOR ADDED CONVENIENCE.


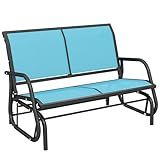
Outsunny 2-Person Outdoor Glider Bench, Patio Double Swing Rocking Chair Loveseat w/Powder Coated Steel Frame for Backyard Garden Porch, Blue
- ULTIMATE COMFORT: WATER-RESISTANT SLING FABRIC KEEPS YOU COZY ALL SUMMER.
- STURDY DESIGN: SUPPORTS UP TO 440 LBS WITH A DURABLE STEEL FRAME.
- SMOOTH GLIDING: ENJOY QUIET ROCKING WITH WEAR-RESISTANT METAL PARTS.
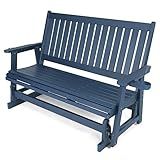
HIPS Patio Glider with Cup Holders, Durable Poly Lumber Material, All-Weather Resistant, High Backrest and Deep Contoured Seat, Heavy Duty 900 LB, for Outdoor, Porch, Patio (Navy Blue, 3-Seat)
- DURABLE HIPS MATERIAL: WEATHER-RESISTANT, LONG-LASTING, AND RUST-FREE.
- ULTIMATE COMFORT DESIGN: CURVED SEAT AND BACKREST FOR OPTIMAL RELAXATION.
- ECO-FRIENDLY LOOK: STYLISH IMITATION WOOD GRAIN THAT OUTLASTS TRADITIONAL OPTIONS.
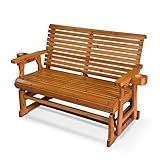
Fortune Candy Patio Glider with Cup Holders, High Roll Back and Deep Contoured Seat, Heavy Duty 800 Lb (Brown, 2-Seater)
- WEATHERPROOF PROTECTION: DURABLE PU PAINT ENSURES ALL-WEATHER RESILIENCE.
- STURDY & SAFE: SUPPORTS UP TO 800 LBS WITH THICK, SHARP-EDGE-FREE SLATS.
- COMFORTABLE DESIGN: ERGONOMIC CONTOURS PROVIDE EXCELLENT BACK AND THIGH SUPPORT.
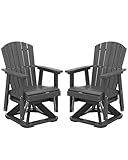
SERWALL Adirondack Swivel Glider Chair, HDPE Patio Swivel Glider Set of 2, All-Weather Glider Chair for Porch, Balcony, Slate Grey
-
UNMATCHED COMFORT: WIDE ARMRESTS AND ERGONOMIC DESIGN FOR ULTIMATE RELAXATION.
-
EFFORTLESS MOVEMENT: SMOOTH 360-DEGREE SWIVEL GLIDING FOR ENHANCED LEISURE.
-
DURABLE BUILD: ALL-WEATHER CONSTRUCTION ENSURES LONGEVITY IN ANY CLIMATE.
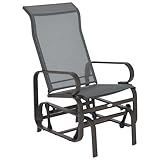
Outsunny Outdoor Glider Chair, Gliders for Outside Patio with Smooth Rocking Mechanism and Lightweight Construction for Backyard, Brown/Gray
- ERGONOMIC NECK SUPPORT AND 28-INCH BACKREST FOR ULTIMATE COMFORT.
- DURABLE, HEAT-RESISTANT DESIGN GUARANTEES YEAR-ROUND OUTDOOR USE.
- BREATHABLE, QUICK-DRY MESH KEEPS YOU COOL AND COMFORTABLE OUTDOORS.
Choosing the right size patio glider for your outdoor space is essential to ensure comfort and functionality. Here are some factors to consider when selecting the appropriate size:
- Dimensions: Measure the available area where you plan to place the patio glider. Consider both the width and depth of the space to determine how much room you have. This will provide a guideline for the maximum size of the glider that can fit comfortably without overcrowding the area.
- Capacity: Determine how many people will typically use the glider at once. This will help you choose the appropriate size based on the number of seats needed. Keep in mind that some patio gliders come with two seats, while others may have three or four seats. Consider your regular gathering size to accommodate everyone comfortably.
- Comfort: It's important to ensure that the glider size provides enough space for individuals to sit and move around comfortably. Remember to account for cushions or pillows if you plan to use them, as they can add thickness to the seating area. Allow enough room for people to relax without feeling cramped.
- Style and Design: Consider the overall aesthetic of your outdoor space and the glider's design. If you have a smaller patio, choosing a compact glider might be more suitable to maintain a balanced appearance. Alternatively, for larger areas, you can opt for a bigger glider to make a statement or accommodate more seating.
- Functionality: Evaluate how you plan to use the patio glider. Are you looking for a cozy spot to read a book alone or a comfortable seating option for entertaining guests? Your intended use will help determine the appropriate size. Additionally, think about whether you'd like to place side tables or other accessories nearby, as this may impact the available space for the glider.
- Maneuverability: Consider the practicality of moving the patio glider around, especially if you have a smaller space or like to rearrange your outdoor furniture. Ensure that the glider's dimensions do not make it too bulky or heavy to move easily when required.
By considering the dimensions, capacity, comfort, style, functionality, and maneuverability, you can choose the right size patio glider that suits your needs, enhances your outdoor space, and provides a comfortable seating experience.
What is the recommended weight capacity for a patio glider?
The recommended weight capacity for a patio glider can vary depending on the manufacturer and specific model. However, a typical weight capacity for a patio glider is around 250-350 pounds. It's important to check the manufacturer's specifications for the specific glider you are interested in to ensure it can support the intended weight.
What is the recommended maintenance frequency for a patio glider?
The recommended maintenance frequency for a patio glider depends on various factors such as the material of the glider, local climate conditions, and usage. However, as a general guideline, it is recommended to perform regular maintenance every 6 to 12 months. Here are a few maintenance tasks to consider:
- Cleaning: Regularly clean the glider to remove dirt, debris, and stains. Use a mild soap or detergent with water to gently clean the surface. For specific material and stain removal instructions, refer to the manufacturer's guidelines.
- Inspect Moving Parts: Check the moving parts of the glider such as the hinges, springs, and rollers for any signs of wear or damage. Lubricate the moving mechanisms with an appropriate lubricant if necessary.
- Tighten Screws: Over time, screws and nuts may become loose due to repeated use and exposure to weather conditions. Inspect and tighten any loose screws to ensure the glider remains stable and secure.
- Repainting/Refinishing: If your patio glider has a painted or stained finish and it starts to show signs of fading or peeling, consider repainting or refinishing it. This can help protect the glider from further damage and extend its lifespan.
- Protective Covers: When not in use, especially during harsh weather conditions, consider using a protective cover to shield the patio glider from excessive sunlight, rain, or snow. This can help prevent damage and minimize the frequency of maintenance.
Remember, these are general recommendations, and it's always best to refer to the specific manufacturer's guidelines for your patio glider for the most accurate maintenance instructions.
What is the best frame material for a patio glider?
The best frame material for a patio glider depends on the specific needs and preferences of the user. Some common frame materials for patio gliders include:
- Aluminum: Aluminum frames are lightweight, durable, and weather-resistant. They do not rust and are easy to maintain. Aluminum patio gliders are a popular choice due to their versatility and ability to withstand outdoor conditions.
- Steel: Steel frames provide excellent strength and stability, making them suitable for heavy-duty use. They are typically powder-coated to prevent rusting and offer good durability. However, steel frames may require more maintenance and are heavier than other materials.
- Wicker/Rattan: Wicker or rattan frames offer a natural and aesthetically pleasing look. They are typically made from synthetic materials such as resin or PVC that mimic the appearance of natural wicker. Wicker patio gliders are lightweight, but they may not be as durable as metal frames.
- Wood: Wooden frames, such as teak or cedar, provide a classic and warm look to a patio glider. Wood is naturally resistant to decay and insects, but it requires regular maintenance, staining, or sealing to protect it from weather elements.
Ultimately, the best frame material for a patio glider depends on factors like the desired style, durability, weight, maintenance requirements, and budget.
What is the average lifespan of a patio glider?
The average lifespan of a patio glider can vary depending on various factors such as quality of materials, construction, and level of maintenance. However, a well-maintained patio glider made of durable materials like aluminum, steel, or teak wood can typically last anywhere from 5 to 15 years or even longer. Regular cleaning, protection from harsh weather conditions, and periodic maintenance can help extend the lifespan of a patio glider.
How to consider the warranty information when selecting a patio glider?
When selecting a patio glider, it is important to consider the warranty information to ensure that you are making a wise investment. Here are some steps to consider:
- Research the warranty terms: Review the manufacturer's website or product manual to understand the details of the warranty. Look for information on the length of coverage, what aspects of the glider are covered, and any conditions or limitations that may apply.
- Length of warranty: Take note of the length of the warranty offered. Longer warranties generally indicate that the manufacturer has confidence in the durability and quality of their product.
- Coverage details: Pay attention to what aspects of the glider are covered by the warranty. This may include structural defects, workmanship issues, or malfunctioning parts. Ensure that the warranty covers the key components of the glider you are interested in, such as the frame, cushions, and moving parts.
- Exclusions and limitations: Look for any exclusions or limitations mentioned in the warranty. Some warranties may not cover damages caused by misuse or normal wear and tear. It's important to understand what circumstances may void the warranty.
- Customer reviews and reputation: Research the manufacturer's reputation for honoring their warranties. Read customer reviews and feedback to determine if they have a history of providing excellent customer service and support.
- Additional protection plans: Consider if the manufacturer or retailer offers additional protection plans or extended warranties for an extra cost. These plans may offer additional coverage beyond the standard warranty, providing you with more peace of mind.
By considering the warranty information, you can make an informed decision when selecting a patio glider and choose a product that offers the best protection and support.
How to consider the ease of assembly when choosing a patio glider?
When considering the ease of assembly when choosing a patio glider, there are several factors to keep in mind. Here are some tips to help you in this process:
- Check the product description: Look for patio gliders that specifically mention easy assembly or require minimal effort to put together. Manufacturers sometimes highlight this feature to attract customers.
- Read customer reviews: Take the time to read customer reviews and ratings for the patio glider you are interested in. Look for comments about the assembly process to get an idea of the ease or difficulty encountered by other customers.
- Look for clear instructions: Consider whether the product comes with clear and detailed assembly instructions. Some patio gliders may include step-by-step guides or video tutorials that make the assembly process easier and more manageable.
- Assess the required tools: Before purchasing a patio glider, check if any specific tools are needed for assembly. Opt for gliders that require basic tools that are commonly available in most households, as it will make the assembly process more convenient.
- Consider pre-assembled options: If you want to minimize assembly time and effort, look for patio gliders that come partially or fully pre-assembled. These options may have fewer parts to put together, reducing the complexity of assembly.
- Seek professional assembly: If you are concerned about the assembly process, consider purchasing the glider from a store that offers professional assembly services. This option ensures that experts will assemble the patio glider for you, eliminating any potential difficulties.
By considering these factors, you can choose a patio glider that offers ease of assembly and saves you time and frustration during the setup process.