
Best DIY Outdoor Storage Shed Shelving Solutions to Buy in July 2026

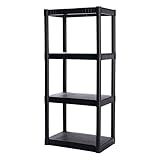
IRIS USA 4-Tier Shelving Unit, 48'' Fixed Height, Medium Storage Organizer for Home, Garage, Basement, Shed and Laundry Room, 24''W x 12''D x 48''H, Made with Recycled Materials, Black (510024)
- TOOL-FREE ASSEMBLY WITH INTEGRATED LEGS FOR EASY STORAGE.
- MADE IN THE USA FROM RECYCLED MATERIALS FOR DURABILITY.
- SUPPORTS UP TO 200LBS WITH VERSATILE USE FOR ANY ROOM.


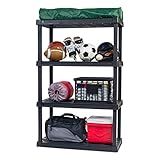
Plano 4-Shelf Plastic Storage Shelves, 48” x 23” x 14”, 200lb Capacity, Pantry, Office, Closet and Garage Shelves, Easy to Assemble, Durable Plastic Shelving Unit
- MAXIMIZE STORAGE: 200LB CAPACITY WITH 4 HEAVY-DUTY SHELVES.
- DURABLE DESIGN: IMPACT-RESISTANT PLASTIC ENSURES LONG-LASTING USE.
- INTERLOCK UNITS: EXPAND STORAGE EFFORTLESSLY IN ANY SPACE!
IRIS USA 4-Shelf Heavy Duty Plastic Storage Shelves, 600lb Capacity, 56"H x 36"W x 18"D, Large Modular Shelving Unit Storage Organizer for Garage, Home, Warehouse & Gym, Storage Rack - Black
- TOOL-FREE ASSEMBLY WITH SNAP-IN LEGS FOR EASY SETUP AND STORAGE.
- BUILT IN THE USA WITH RECYCLED MATERIALS FOR DURABILITY AND QUALITY.
- SUPPORTS UP TO 600LBS; PERFECT FOR HEAVY-DUTY AND HOME USE.
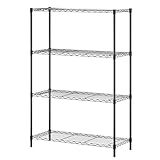
BestOffice | 4-Tier Wire Storage Shelves | 36x14x54 | Black | with Adjustable Racks | Heavy-Duty Metal Shelf, Holds Upto 1000 lbs | No-Tool Assembly | Ideal for Home & Garage Shelving
- CUSTOMIZE YOUR STORAGE WITH ADJUSTABLE TIERS FOR ANY NEED!
- HEAVY-DUTY DESIGN SUPPORTS UP TO 1000 LBS FOR VERSATILE USE.
- EASY, TOOL-FREE ASSEMBLY PERFECT FOR ANY TIGHT SPACE!
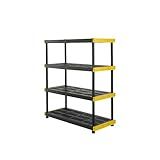
BLACK & YELLOW, 4-Tier Heavy Duty Plastic Storage Shelving Unit, 200lbs/shelf (55"H x 48"W x 20"D), for Indoor/Outdoor Organization, Modular Rack
- MAXIMIZE SPACE: STORE 8 CONTAINERS WITH HEAVY-DUTY 200LB CAPACITY.
- ECO-FRIENDLY: MADE IN THE USA WITH RECYCLED, SAFE MATERIALS.
- VERSATILE DESIGN: EASY ASSEMBLY & ADJUSTABLE FEET FOR UNEVEN SURFACES.
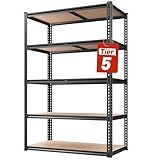
REIBII 2020LBS Storage Shelves 5 Tier Garage Shelving Heavy Duty, Adjustable Metal Shelving Unit, Garage Shelves for Basement, Warehouse, Pantry, Closet, Kitchen 72" H x 35.55" W x 16" D, Black
-
HEAVY DUTY DESIGN: HOLDS 2020 LBS WITH 404 LBS PER SHELF!
-
VERSATILE USE: PERFECT FOR GARAGE, PANTRY, OFFICE, AND MORE!
-
QUICK ASSEMBLY: SET UP IN JUST 10 MINUTES, NO TOOLS NEEDED!
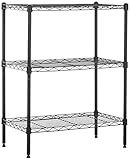
Amazon Basics 3-Shelf Adjustable Heavy Duty Steel Wire Rack Storage Shelving Organizer for Kitchen, Garage, 23.2" L x 13.4" W x 30" H, Black
- DURABLE STEEL DESIGN WITH 750 LB CAPACITY FOR HEAVY TOOLS.
- ADJUSTABLE SHELVES FOR CUSTOMIZABLE STORAGE IN ANY SPACE.
- QUICK, TOOL-FREE ASSEMBLY FOR HASSLE-FREE SETUP!
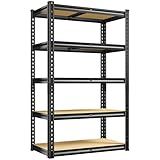
REIBII Storage Shelves 5 Tier Adjustable Garage Shelving Heavy Duty Metal Shelving 2020LBS Metal Shelf 59.8" H Pantry Shelf for Garage Pantry Closet Kitchen Basement 28" W x 12" D x 59.8" H, Black
-
VERSATILE USE: PERFECT FOR GARAGE, PANTRY, OFFICE, OR ANY SPACE!
-
HEAVY-DUTY CAPACITY: SUPPORTS UP TO 2020 LBS WITH ADJUSTABLE SHELVING.
-
QUICK SETUP: INSTALLS IN JUST 10 MINUTES WITH NO NUTS OR BOLTS NEEDED.
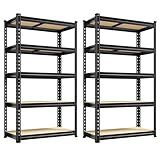
REIBII Set of 2 Storage Shelves 5 Tier Garage Shelving Heavy Duty Metal Shelving 2000LBS Garage Shelves Adjustable Metal Shelf for Kitchen Warehouse Pantry Closet, 27.6" W x 11.8" D x 60" H
- HEAVY DUTY DESIGN: HOLDS 400 LBS PER SHELF, TOTAL 2000 LBS CAPACITY!
- VERSATILE USE: PERFECT FOR ANY SPACE - GARAGE, KITCHEN, OR OFFICE!
- EASY ASSEMBLY: QUICK 10-MINUTE SETUP WITH NO NUTS OR BOLTS NEEDED!
To build shelves in an outdoor storage shed, you will need some basic materials and tools:
- Measure the space: Determine the height, width, and depth of the area where you want to install the shelves. This will help you plan the size and number of shelves you can accommodate.
- Prepare the materials: Purchase lumber boards that are suitable for outdoor use, such as pressure-treated wood or cedar. Choose boards of appropriate thickness and width based on your measurements. Also, gather other materials like screws, brackets, a saw, drill, level, and measuring tape.
- Mark the placements: Use a measuring tape and level to mark the desired height at which you want the shelves to be installed. Make sure to mark the same height on both opposite walls of the shed to ensure the shelves are level.
- Cut the shelf boards: Measure the width and depth of the shelves and cut the boards accordingly using a saw. Ensure they fit snugly within the marked height on the walls.
- Install support brackets: Install support brackets under each shelf. Use a level to ensure they are straight and a drill to attach them securely to the shed walls. Make sure to position the brackets at equal distances on both walls for stability.
- Attach the shelves: Place the cut shelf boards onto the support brackets. Use screws to secure the boards to the brackets for added stability.
- Repeat for additional shelves: If you want multiple shelves, repeat the above steps for each shelf. Make sure to space them appropriately based on your storage needs.
- Test stability: Once all the shelves are installed, check their stability by placing some weight on them. Make sure they are secure and can hold the intended items without sagging or wobbling.
- Optional finishing touches: If desired, you can paint or stain the shelves to protect them from outdoor elements or match the aesthetics of your shed.
Remember to always follow safety precautions while handling tools and materials. Additionally, consult any relevant building codes or guidelines specific to your location to ensure compliance.
How to build shelves that can be folded or collapsed when not in use?
To build shelves that can be folded or collapsed when not in use, you will need some basic tools, materials, and hardware. Here is a step-by-step guide on how to build such shelves:
Materials and Tools:
- Wood boards or plywood
- Screws
- Hinges
- Screws
- Measuring tape
- Saw
- Drill
- Sandpaper
- Level
- Pencil
- Paint or stain (optional)
Step 1: Measure and cut the boards Measure the desired height, width, and depth of your shelves. Using a saw, cut the wood boards or plywood into pieces according to your measurements. Make sure to have enough pieces to create both the shelf sides and the actual shelves.
Step 2: Sand and finish the boards (optional) If desired, sand the cut boards to smooth out any rough edges or surfaces. You can also paint or stain them to match your preference or the surrounding decor. Allow the finish to dry completely before moving on to the next step.
Step 3: Attach hinges On one end of each shelf side piece, attach hinges using screws. Make sure to align them properly and ensure that the hinges are sturdy enough to support the weight of the shelves.
Step 4: Mount the shelf sides Decide where you want to install the shelves and mark the positions on the wall. It is important to find studs or use sturdy wall anchors for secure installation. Use a level to make sure the sides are straight, then screw them into the wall at the marked positions. Ensure that the hinges are facing inward.
Step 5: Attach shelves Place the shelves on top of the shelf sides, making sure they are level. Use screws to secure the shelves to the sides. You can adjust the spacing between shelves according to your needs, leaving enough room for items you plan to store on the shelves.
Step 6: Test and fold the shelves Once everything is securely attached and level, carefully fold the shelves to the closed position. Ensure that all hinges are folding smoothly and everything is holding into place.
Now your collapsible shelves are ready to use! When you want to fold or collapse the shelves, simply lift them up and fold them against the wall. This design allows you to save space when the shelves are not in use, making it ideal for small rooms or areas where occasional shelves are needed.
What is the recommended weight capacity for the shelves in an outdoor storage shed?
The recommended weight capacity for shelves in an outdoor storage shed can vary depending on the material and design of the shelves. However, as a general guideline, it is recommended to choose shelves that can support at least 50 pounds per linear foot. This means that if you have a 4-foot shelf, it should be able to handle a weight of around 200 pounds. It is always best to consult the manufacturer's instructions or guidelines for the specific shed and shelf you are using to ensure you do not exceed the recommended weight capacity.
What is the proper spacing between shelves in a shed for easy access?
The proper spacing between shelves in a shed for easy access can vary depending on the type of items you plan to store and the height of your shelves. However, a general guideline is to leave a minimum vertical clearance of 12-16 inches (30-40 cm) between each shelf.
This clearance allows enough space to easily view and access items on each shelf without the risk of knocking them over or damaging them. If you intend to store larger items, such as bins or boxes, you may need to increase the spacing accordingly to accommodate their size.
Additionally, consider leaving space for taller items on the top shelf, ensuring they do not touch the ceiling or obstruct access to the lower shelves. Adjusting the shelf spacing according to your specific storage needs and the available vertical space in your shed will ensure easy access and efficient organization.
How to incorporate a workbench along with the shelves in the shed?
To incorporate a workbench along with the shelves in your shed, follow these steps:
- Determine the space available: Measure the shed's dimensions and decide where you want to place the workbench and shelves. Consider leaving enough space for movement and working comfortably.
- Select the workbench design: Choose a workbench design based on your needs and available space. Consider a wall-mounted workbench if you have limited space or a freestanding one if you have more room.
- Install the workbench: Based on the chosen design, follow the installation instructions to mount or assemble the workbench. Make sure it is sturdy and securely fixed to the shed walls or floor.
- Plan shelf placement: Decide where you want the shelves to be installed, keeping in mind their purpose, storage requirements, and accessibility. Consider adjustable shelves for versatility.
- Install the shelves: Use shelf brackets or supports that match the style, size, and load capacity of the shelves you've chosen. Ensure they are properly attached to the shed walls or framework.
- Organize and stock the shelves: Depending on your shed's purpose, start organizing your tools, supplies, and other items on the shelves. Group similar items together and ensure everything is easily accessible.
- Customize the workbench: Add hooks, pegboards, or tool hangers to the workbench area to keep frequently used tools within reach. Install a small vice or clamp if needed for your work projects.
- Optimize storage: Consider utilizing the space beneath the workbench for additional storage. Install drawers, containers, or bins to keep smaller items organized and close at hand.
- Keep it clean and tidy: Regularly clean and organize the workbench and shelves to maintain efficiency and ease of use. Remove clutter, label items, and establish a system that works for you.
Remember to regularly assess and adapt the layout and storage solutions to meet your changing needs.