
Best Gas Fire Pit Components to Buy in July 2026
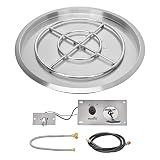
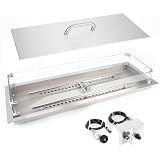
Stanbroil 31 Inch Drop-in Round Gas Fire Pit Kit with Spark Ignition Kit, 304 Stainless Steel Gas Firepit Burner Insert for DIY Fire Pit Table, Max 296,000 BTU - Natural Gas Version
-
MASSIVE 31-INCH PAN WITH 296,000 BTU FOR POWERFUL OUTDOOR COOKING!
-
DURABLE 304 STAINLESS STEEL CONSTRUCTION ENSURES LONG-LASTING USE!
-
EASY INSTALLATION WITH ALL GAS CONNECTIONS AND IGNITION INCLUDED!


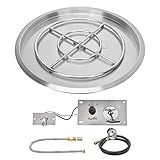
Stanbroil 31 Inch Drop-in Round Fire Pit with Spark Ignition Kit, Gas Firepit Insert for DIY Project, Propane Gas Version,304 Stainless Steel
- HIGH BTU POWER: 296,000 BTUS FOR INTENSE OUTDOOR HEATING!
- DURABLE DESIGN: MADE FROM 304 STAINLESS STEEL FOR LASTING USE!
- EASY SETUP: COMES PRE-INSTALLED WITH HASSLE-FREE IGNITION SYSTEM!
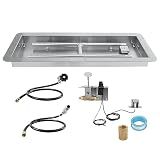
VEVOR 36 x 12 inch Drop-in Fire Pit Pan, Rectangular Stainless Steel Fire Pit Burner Kit, Propane Fire Pan 150,000 BTU with H-Burner for Indoor or Outdoor Use
-
ALL-IN-ONE SET: INCLUDES EVERYTHING NEEDED FOR EASY, SAFE SETUP.
-
SAFETY FIRST: CSA CERTIFIED WITH LEAK PREVENTION AND DRAINAGE FEATURES.
-
VERSATILE SIZES: THREE OPTIONS FIT ANY SPACE, FROM INDOORS TO OUTDOORS.
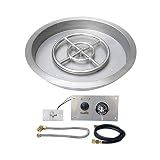
FAHKNS 25" Stainless Steel Fire Pit Pan, Drop-in Fire Pit Pan with Burner Ring and Spark Ignition Kit, for Indoor or Outdoor Fireplace, Natural & Propane Gas, 147000 BTU
-
MAXIMIZE HEAT EFFICIENCY: ACHIEVES UP TO 147,000 BTUS FOR INTENSE WARMTH.
-
DURABLE STAINLESS STEEL: WEATHER-RESISTANT 304 STAINLESS STEEL FOR LONGEVITY.
-
VERSATILE FUEL OPTIONS: COMPATIBLE WITH PROPANE AND NATURAL GAS, SMOKE-FREE!
GRISUN Upgraded 36" x 12" Drop-in Fire Pit Burner Kit, Gas Fire Pit Kit with Glass Wind Guard & Lid, Linear Fire Pit Pan Insert with Spark Ignition for Fire Pit Tables
-
ALL-IN-ONE KIT: INCLUDES EVERYTHING FOR EASY DIY FIRE PIT SETUP.
-
MODERN LINEAR DESIGN: CREATES A STUNNING CENTERPIECE FOR OUTDOOR SPACES.
-
SAFETY FIRST: TEMPERED GLASS WIND GUARD ENSURES STEADY FLAMES OUTDOORS.
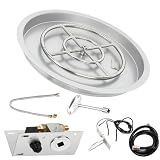
Stanbroil 25 Inch Drop-in Round Natural Gas Fire Pit Kit with Spark Ignition,304 Stainless Steel Fire Pit Burner for Outdoor DIY Firepit - Natural Gas Version
- RUGGED 304 STAINLESS STEEL: BUILT TO LAST IN OUTDOOR ENVIRONMENTS.
- HIGH POWER: 147,000 BTUS FOR EXCEPTIONAL COOKING PERFORMANCE.
- EASY SETUP: ALL CONNECTIONS INCLUDED FOR HASSLE-FREE IGNITION.
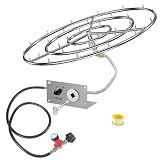
Skyflame 36" Stainless Steel Burner Ring Installation Kit, Round Jet Burner Ring with All Complete Connection Accessories, Outdoor DIY Round Gas Fire Pit Kit
- ENSURE PROPER IGNITER PLACEMENT FOR EASY, SUCCESSFUL IGNITION!
- HIGH-POWERED JET NOZZLES CREATE STUNNING FLAMES FOR YOUR BACKYARD!
- COMPLETE KIT INCLUDED, NO EXTRA PURCHASES NEEDED FOR QUICK SETUP!
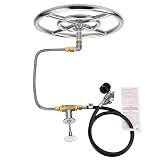
Stanbroil LP Propane Gas Fire Pit Stainless Steel Burner Ring Installation Kit, 12-inch
- DURABLE 304 STAINLESS STEEL ENSURES LONG-LASTING PERFORMANCE.
- STYLISH CROSS-BAR DESIGN PROMOTES BETTER GAS DISTRIBUTION.
- COMPLETE PACKAGE FOR EASY INSTALLATION AND USE WITH PROPANE.
Building a gas fire pit can be a rewarding project that allows you to enjoy a cozy ambiance outdoors. Here is a step-by-step guide on how to build a gas fire pit:
- Plan your design: Determine the size, shape, and location of your fire pit. Consider factors such as surrounding area, safety, and any local regulations or codes.
- Gather the necessary materials: You will need a fire pit kit, which typically includes a burner, ignition system, gas valve, and other components. Additionally, gather stones or bricks for the fire pit wall, sand, gravel, a shovel, a level, and safety equipment like gloves and goggles.
- Prepare the area: Clear the designated area and ensure it is level. Mark the footprint of the fire pit by outlining it with chalk or spray paint.
- Dig the base: Dig a hole within the marked area that is slightly wider and deeper than the size of your fire pit kit. Aim for a depth of approximately 6 to 8 inches.
- Add gravel and sand: Place a layer of gravel into the hole for drainage. Spread a layer of sand on top to help level the base and provide stability.
- Assemble the fire pit kit: Follow the manufacturer's instructions to assemble the gas fire pit kit. This typically involves connecting the burner, ignition system, and gas valve.
- Place the kit in the hole: Carefully set the assembled fire pit kit into the hole, ensuring it is level. Adjust the depth by adding or removing sand or gravel as needed.
- Build the fire pit wall: Using stones or bricks, construct a wall around the fire pit kit. Lay the stones in a circular or square pattern, bonding them together with mortar or construction adhesive.
- Finish the wall: Continue stacking stones or bricks until reaching your desired height. Ensure the wall is stable and secure.
- Connect the gas supply: Consult a professional to connect the gas line to the fire pit kit, ensuring it is done safely and according to local regulations.
- Test the fire pit: Turn on the gas and test the ignition system to ensure the fire pit is functioning properly. Ensure there are no leaks and that the flames are consistent.
- Add final touches: Decorate the fire pit area with decorative stones, rocks, or seating to enhance its appearance and comfort.
Remember to always prioritize safety when building and operating a gas fire pit. Familiarize yourself with local regulations and fire safety guidelines before starting the project, and consult a professional if needed.
How to prepare the ground for a gas fire pit?
Preparing the ground for a gas fire pit involves several steps. Here is a general guide to help you:
- Choose a suitable location: Select an area that is flat, away from any flammable materials, and adheres to local building codes and regulations. Ensure you have enough space for the fire pit and any seating arrangements around it.
- Mark the area: Use stakes and string to mark the perimeter of the fire pit. Take into account the dimensions of the fire pit and allow some additional space for safety and aesthetic purposes.
- Clear the area: Remove any grass, plants, debris, or rocks within the marked area. Dig out the top layer of soil to create a level surface.
- Excavate the hole: Dig a hole that is slightly larger than the dimensions of the fire pit, ensuring the depth is appropriate for your specific model's requirements. Typically, a depth of around 6-12 inches is sufficient for the base.
- Lay the base: Pour a layer of gravel or crushed stone into the excavated hole. This base will provide proper drainage and prevent the fire pit from sinking into the ground. Level the gravel layer using a rake or shovel.
- Compact the base: Use a tamper, hand compactor, or plate compactor to compact the gravel base. This step is crucial to ensure stability and prevent shifting over time.
- Install the gas line (if applicable): If using a gas fire pit, you will need to run a gas line to the pit. It is recommended to consult a professional for this step, as it involves dealing with gas lines. Ensure the gas line is installed safely and according to local regulations.
- Cover the base: Place a fire pit ring or a metal fire pit insert on top of the gravel base. Make sure it is leveled and centered within the hole.
- Test the setup: Before finalizing the installation, make sure to test the gas connections (if applicable) and ensure everything is in working order. Follow the manufacturer's instructions for testing and operating the gas fire pit.
- Finish and decorate: Surround the fire pit with decorative stones, pavers, or a custom seating area. Consider adding seating, a fire pit table, or other features to enhance the overall appearance and functionality.
Always refer to the manufacturer's instructions and local building codes for specific guidelines, as they may vary depending on the type and model of the gas fire pit you choose.
How to build a stone fire pit surround for a gas fire pit?
Building a stone fire pit surround for a gas fire pit can be a great addition to your backyard. Here are the steps to build one:
- Gather materials: You will need stones or pavers to create the surround, concrete mix, gravel, sand, a level, measuring tape, a shovel, a tamper or plate compactor, and a rubber mallet.
- Plan the layout: Decide on the size and shape of your fire pit surround. Measure and mark the area where the stones will be placed. Ensure you have enough space for the gas fire pit and any seating you plan to add.
- Dig the foundation: Dig a shallow trench within the marked area that is deep enough to accommodate the height of your stones. This will create a stable base for your fire pit surround.
- Level and compact the foundation: Use a level and a tamper or plate compactor to ensure the foundation is level and compact. This will prevent any sinking or shifting of the stones in the future.
- Add a layer of gravel: Pour a layer of gravel into the trench to provide good drainage. Compact the gravel using the tamper or plate compactor.
- Prepare the mortar mix: Mix the mortar according to the manufacturer's instructions. The mortar will act as a bonding agent between the stones.
- Lay the first layer of stones: Start at one corner and lay the first row of stones along the trench, applying mortar to the bottom of each stone. Use a rubber mallet to gently tap each stone into place and ensure they are level.
- Continue building the surround: Repeat the process for each subsequent row, placing stones tightly together and adding mortar as needed. Ensure each row is level and use a level to check periodically.
- Allow mortar to dry: Let the mortar dry according to the manufacturer's instructions before proceeding.
- Finish the edges: If desired, add a coping stone or capstone to give your fire pit surround a finished look. Apply mortar and carefully place the capstones on top of the final row of stones.
- Connect the gas fire pit: Following the manufacturer's instructions, install the gas fire pit in the center of the surround, ensuring it is level.
- Test the gas fire pit: Before using the gas fire pit, ensure that all connections are secure and test it to make sure it works correctly.
Remember to always follow safety guidelines and consult local codes or regulations when installing a gas fire pit.
How to dig the hole for a gas fire pit?
Digging a hole for a gas fire pit requires careful planning and consideration of various factors. Here's a step-by-step guide to help you:
- Choose the location: Select a suitable spot for your gas fire pit. Ensure it is away from any structures, trees, or combustible materials. Also, check local regulations or guidelines regarding fire pit placement.
- Mark the area: Use spray paint or stakes and string to mark the area for your fire pit. Consider the size and shape of the fire pit you want to install while marking.
- Determine the dimensions: Measure the dimensions of the fire pit, including its width, length, and depth. These measurements will help you determine the size of the hole you need to dig.
- Acquire necessary materials: Gather the required materials, including a shovel or an excavator, safety gloves, safety glasses, a measuring tape, and a wheelbarrow.
- Start digging: Begin by digging out the perimeter of the fire pit. Remove the top layer of grass, soil, or any other surface material. Excavate it to the desired depth, which is typically around 6 to 8 inches, depending on the manufacturer's instructions for your gas fire pit. Ensure the sides of the hole are straight and level.
- Prepare the base: Create a base for your fire pit to sit on. Lay a few inches of gravel or crushed stone in the hole and compact it using a hand tamper or a plate compactor. This will provide a stable and level surface for your fire pit.
- Install gas lines (if required): If your gas fire pit requires a gas line, consult a professional to handle the installation. Ensure that all gas lines and connections are properly installed and adhere to local codes and safety standards.
- Set the fire pit: Follow the manufacturer's instructions to properly assemble and install your gas fire pit. Place the fire pit securely on the prepared base, ensuring it is level and stable.
- Cover the hole: If desired, you can backfill around the fire pit with additional gravel or decorative stone, leaving a small gap around the edge to allow for drainage.
- Test the fire pit: Conduct a test run of your gas fire pit to ensure it is functioning correctly and safely. Check for gas leaks and make any necessary adjustments or repairs.
Remember, it is crucial to prioritize safety and adhere to local regulations and guidelines when installing a gas fire pit. If you are unsure or uncomfortable with any step, consult a professional to assist you.
How to build a gas fire pit from scratch?
Building a gas fire pit from scratch involves several steps. Here is a basic guide to help you get started:
- Safety First: Ensure you have a safe location for your fire pit, away from any structures, overhanging trees, or flammable materials. Check with local building codes and obtain any necessary permits.
- Gather Materials: You will need a steel fire pit ring or burner kit, a propane tank, a regulator with hose, lava rocks or fire glass, pavers or stones for the pit's base and a metal or stone enclosure for the fire pit.
- Dig the Pit: Use a shovel to dig a hole in the desired location for your fire pit. Make sure it is deep enough to accommodate the burner kit and provide space for ventilation.
- Create a Base: Lay a layer of gravel or sand in the pit to provide a stable base. You can also create a sturdy base using concrete slabs.
- Install the Burner Kit: Follow the manufacturer's instructions to install the burner kit. Place it in the center of the pit, leaving sufficient space for airflow.
- Connect Propane Tank: Attach the propane regulator and hose to the propane tank. Consult the instructions provided with the burner kit for specific details.
- Test for Leaks: Before lighting the fire pit, conduct a leak test to ensure there are no gas leaks. Apply a soap and water solution to all connections and look for bubbles. If bubbles appear, tighten the connections or seek professional assistance.
- Add Fire Media: Place lava rocks or fire glass over the burner to create a visually appealing fire bed. Ensure the fire media covers the entire burner evenly.
- Build Enclosure: Construct an enclosure using bricks, stones, or metal to surround and protect the fire pit area. Make sure it is sturdy and provides proper ventilation.
- Ignite the Fire: Open the gas valve on the propane tank and use an extended lighter or match to ignite the fire. Adjust the flame height as desired using the regulator.
Remember to always follow safety guidelines and consult professional advice if needed. Enjoy your newly built gas fire pit carefully and responsibly.
What is the ideal gas pressure for a fire pit?
There is no fixed or ideal gas pressure for a fire pit as it can vary depending on the specific design and manufacturer recommendations. However, most fire pits typically operate at a gas pressure between 5 and 7 inches of water column (WC). It is recommended to consult the user manual or contact the manufacturer to determine the specific gas pressure requirements for your fire pit.