
Best Fire Pit Bricks to Buy in July 2026
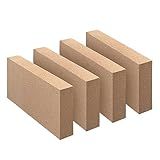
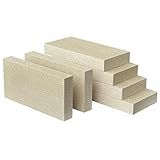
Fire bricks, Food Grade Woodstove Firebricks, 3000F, Size 9″ x 4-1/2″ x 1-1/4″, 4-Pack, Insulating Fire Bricks, Clay Firebricks Replacement for Wood Stoves, Fireplaces, Fire Pit, Kiln, Pizza Oven
- FOOD SAFE: DIRECT CONTACT WITH FOOD, PERFECT FOR OVENS AND SMOKERS!
- HIGH TEMP RESISTANCE: WITHSTANDS UP TO 3000°F FOR VERSATILE USE!
- DURABLE DESIGN: STRONG, WATERPROOF BRICKS MADE TO LAST OUTDOORS!


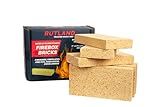
Rutland Fire Bricks, Properly Cured High Temperature FireBrick, USA-Made Residential Fire Clay Replacement for Wood Stove, Fireplace, & Pizza Oven, Size 9" x 4.5" x 1.25", 6-Pack, Tan
- UNIQUE TAN COLOR SIGNIFIES SUPERIOR CURING PROCESS AND QUALITY.
- HEAT-RATED TO 2700°F, SURPASSING ALL RESIDENTIAL STANDARDS.
- PRECISION SIZING ENSURES MINIMAL COLOR VARIATION AND DURABILITY.
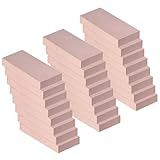
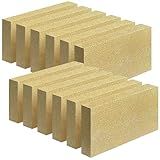
Fire Bricks, Woodstove Firebricks, High Temperature Resistant Clay Firebricks for Wood Stoves, Fireplaces, Pizza Ovens and BBQ Smokers, Size 9" X 4-1/2" X 1-1/4", Pack of 24, Red Color
-
HIGH-QUALITY CLAY FOR MAXIMUM HEAT RESISTANCE AND SAFETY.
-
INSULATING DESIGN SAVES ENERGY AND REDUCES HEATING COSTS!
-
LONG-LASTING DURABILITY ENSURES A COST-EFFECTIVE INVESTMENT.
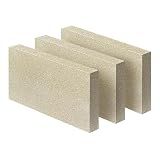
Woodstove Firebricks, Fire Bricks, Size 9" X 4-1/2" X 3/4", High Temperature Resistant Fire Bricks Replacement for Wood Stoves, 3 Pieces
- CUSTOMIZABLE: EASILY CUT AND DRILL TO FIT ANY SPACE OR DESIGN.
- SUPERIOR INSULATION SAVES WOOD AND MONEY FOR YOUR FIREPLACE.
- HIGH-TEMP DURABILITY ENSURES LONG-LASTING PERFORMANCE AT 2200°F.

Zzuvjoy 36 Inch Fire Pit Ring, Large Outdoor Campfire Pit for Patio Backyard Garden, Smokeless Steel Firepit with Air Vent for Efficient Burning & Anti-Rust Coating, Black Steel
-
SUPERIOR RUST RESISTANCE ENSURES LONG-LASTING OUTDOOR DURABILITY.
-
DUAL AIRFLOW SYSTEM BOOSTS EFFICIENCY, REDUCES SMOKE, AND WASTE.
-
LARGE 36-INCH CAPACITY PERFECT FOR COZY GATHERINGS AND CAMPING TRIPS.

HGD (6 Pack) Magic Campfire Fire Color Changing Packets for Fire Pit, Indoor/Outdoor Fireplace, Bonfire - Rainbow Magical Flame, Camping Accessory, Compatible with Wood
- TRANSFORM FIRES WITH VIBRANT, COLORFUL FLAMES!
- SAFE AND EASY FOR UNFORGETTABLE OUTDOOR GATHERINGS!
- MULTIPLE PACK SIZES FOR ENDLESS MAGICAL MOMENTS!
Protalwell Woodstove Firebricks, Upgrade Fire Bricks Replacement for US Stove FBP6, Size 9" x 4-1/2" x 1-1/4", 6-Pack
- HIGH-TEMPERATURE RESILIENCE: WITHSTANDS UP TO 2200°F FOR ULTIMATE DURABILITY!
- STRONG & RELIABLE: HIGH-STRENGTH MATERIAL WON'T CHIP OR PEEL AFTER USE.
- PERFECT FIT: COMMON SIZE ENSURES EASY INSTALLATION FOR STOVES & FIREPLACES.
Fire Bricks, FireBrick, High Temperature Insulated Firebricks for Wood Stoves, Fireplaces, Size 9" X 4-1/2" X 1-1/4", Pack of 12, Wood Stove Bricks, Fireplace Brick
-
HIGH HEAT RESISTANCE IDEAL FOR WOOD STOVES & FIREPLACES.
-
INSULATING DESIGN SAVES HEATING COSTS & BOOSTS EFFICIENCY.
-
DURABLE, LONG-LASTING INVESTMENT FOR ALL HEATING APPLICATIONS.
Building a fire pit with bricks is a fairly simple and straightforward project that can enhance the aesthetics and functionality of your backyard or outdoor space. Here's a step-by-step guide on how to build a fire pit using bricks:
- Foundation and location: Choose a suitable spot in your backyard that is away from any flammable structures or overhanging trees. Clear the area of any debris or vegetation. Dig a shallow foundation, around 6-8 inches deep and slightly wider than the desired size of the fire pit.
- Level the foundation: Use a level to ensure that the foundation is even and flat. This will ensure stability and prevent the fire pit from shifting or cracking.
- Prepare the bottom layer: Place a layer of gravel or crushed stone in the foundation. This will allow for drainage and prevent moisture from accumulating inside the fire pit.
- Set the first layer of bricks: Start placing the bricks around the perimeter of the foundation, following a circular or square pattern. Use a masonry saw or chisel to cut bricks if needed. Apply a layer of heat-resistant adhesive mortar on the foundation before positioning each brick.
- Create subsequent layers: Stack additional layers of bricks on top of the first layer, making sure to stagger the joints to create a stable structure. Use a level to ensure that each layer is straight and even.
- Build the walls: Continue adding layers of bricks until you achieve the desired height for your fire pit. Aim for a height of at least 12-18 inches to create a safe and contained fire. Remember to stagger the joints for each layer to maintain stability.
- Optional design elements: If desired, you can add decorative elements to your fire pit using different colored bricks or patterns. Be creative and consider adding a ledge for seating or a grill grate for cooking.
- Allow for ventilation: Leave small gaps between the bricks to provide proper airflow, which is crucial for efficient burning and preventing excessive smoke.
- Cure and finish: Once the fire pit is completed, allow it to cure for a week by avoiding any fires. This will allow the adhesive mortar to set properly. After the curing period, you can apply a weather-resistant sealant to protect the bricks and enhance their appearance.
- Fire safety: Always prioritize safety when using your fire pit. Keep a water source nearby to extinguish the fire if needed, and never leave the fire unattended. Follow local regulations and guidelines regarding fire safety.
By following these steps, you can build your own fire pit with bricks and enjoy cozy outdoor fires with family and friends.
What is the curing time for mortar in a brick fire pit?
The curing time for mortar in a brick fire pit can vary depending on a few factors such as temperature, humidity, and the specific type of mortar being used. In general, it is recommended to allow the mortar to cure for at least 24-48 hours before exposing it to any heat or use. However, for optimal strength and durability, it is advisable to wait up to 7 days or longer before lighting a fire in the fire pit. Always refer to the manufacturer's instructions or consult with a professional to determine the appropriate curing time for the specific mortar product being used.
How to build subsequent layers of bricks for the fire pit?
To build subsequent layers of bricks for a fire pit, follow these steps:
- Gather the necessary materials: bricks, concrete or mortar mix, trowel, level, rubber mallet, and safety gear such as gloves and safety glasses.
- Assess the base layer: Ensure that the base layer of bricks is securely in place, perfectly level, and well-aligned. If needed, make any adjustments to ensure a solid foundation.
- Prepare the mortar mix: Follow the instructions on the mortar bag to mix the appropriate amount of mortar or concrete mix. Aim for a consistency that is workable but not too runny.
- Apply mortar: Use a trowel to scoop mortar onto the top of the base layer of bricks. Apply a generous layer of mortar along the entire length of the new brick, ensuring it covers the entire bottom surface of the brick.
- Position the brick: Gently place the brick onto the mortar bed, pressing it down to ensure proper adhesion. Wiggle it slightly to distribute the mortar evenly and remove any air pockets.
- Level the brick: Use a level to ensure the brick is level and aligned with the preceding layer. Make any necessary adjustments by tapping with a rubber mallet.
- Fill mortar joints: Once the brick is leveled, use a trowel to neatly fill the joints between the bricks with mortar. Ensure the joints are fully filled without any voids or gaps.
- Repeat the process: Continue the process for each subsequent layer of bricks, making sure to stagger the bricks for stability. Apply mortar and position each brick, ensuring proper leveling, alignment, and mortar joint filling.
- Allow curing: After completing each layer, allow the mortar to cure as per the manufacturer's instructions. Typically, this process takes about 24 hours.
- Clean excess mortar: As you work, periodically clean off any excess mortar from the bricks using a brush or sponge. This will help maintain a clean and professional appearance.
- Complete the desired height: Continue adding subsequent layers until you reach the desired height for your fire pit. Remember to maintain proper alignment, leveling, and mortar joint filling.
- Finish off the top layer: For the top layer, consider using fire-resistant bricks or capstones to provide a heat-resistant and visually appealing surface.
Always refer to local building codes and regulations before constructing a fire pit to ensure compliance and safety.
What is the recommended depth for a brick fire pit?
The recommended depth for a brick fire pit is typically between 12 to 18 inches. This depth allows for proper airflow and ventilation to support combustion while also providing a safe distance between the fire and the surrounding structures or materials. It is important to consult local building codes and regulations to ensure compliance and safety guidelines specific to your area.
How to apply mortar between the bricks in a fire pit?
Applying mortar between the bricks in a fire pit is not only important for aesthetic purposes but also for the strength and stability of the structure. Here's a step-by-step guide on how to apply mortar:
- Gather the necessary tools and materials: Mortar mix: You can choose between premixed mortar or mix your own using sand, cement, and water. Trowel: A pointed trowel is recommended for better control while applying mortar. Masonry brush: Used to clean excess mortar from the surface of the bricks. Bucket and water: For mixing the mortar and cleaning the tools. Safety glasses and gloves: To protect yourself while working with mortar.
- Prepare the mortar mix: Follow the instructions on the packaging if using a premixed mortar. If mixing your own mortar, use a 3:1 ratio of sand to cement. Add water gradually, mixing well until you achieve a consistency similar to peanut butter.
- Clean the joints: Use a masonry brush to remove any loose debris or dust from the joints between the bricks. This will ensure better adhesion of the mortar.
- Wet the bricks: Lightly dampen the bricks with water. This will prevent them from absorbing too much moisture from the mortar, resulting in weaker adhesion.
- Apply the mortar: Load a small amount of mortar onto the trowel and begin applying it to the vertical joints between the bricks. Use the edge of the trowel to push the mortar into the joint, ensuring it fills the space completely. Avoid applying an excessive amount of mortar, as it can ooze out and create a messy appearance. Continue the process until all vertical joints are filled.
- Strike the mortar: Use the edge of the trowel, a striking tool, or a jointing tool to shape and compact the mortar in the joints. Properly struck joints will provide a clean, finished appearance and improve the structural integrity of the fire pit.
- Clean excess mortar: Wait for about 30 minutes or until the mortar has slightly hardened but is still workable. Then, use a damp sponge or brush to remove any excess mortar smudges or stains on the surface of the bricks.
- Cure the mortar: Allow the mortar to dry and cure for at least 24 to 48 hours before using the fire pit. This will ensure the mortar achieves its maximum strength.
Remember to consult the manufacturer’s instructions for specific guidelines related to the mortar mix you are using. Safety precautions, such as wearing glasses and gloves, are essential when working with mortar.
What materials are needed to build a fire pit with bricks?
To build a fire pit with bricks, you will need the following materials:
- Bricks: Choose fire-rated bricks or fire bricks as they can withstand high temperatures without cracking or crumbling.
- Concrete mix: Used to create a sturdy base for the fire pit.
- Gravel: Used as a bed for the fire pit, ensuring proper drainage.
- Sand: Used for leveling the base and filling gaps between bricks.
- Steel fire ring or liner: Provides a protective barrier between the fire and the brick structure.
- Landscape fabric: Placed on the bottom of the pit to prevent weeds from growing through the gravel layer.
- Shovel: Used for digging the hole for the fire pit and for moving and spreading materials.
- Wheelbarrow or buckets: Used for mixing and transporting concrete, gravel, and sand.
- Spirit level: Used to ensure the fire pit is level during construction.
- Trowel: Used for applying and smoothing concrete and mortar.
- Masonry hammer: Used for cutting bricks to fit the desired shape or size.
- Masonry saw (optional): Useful for large-scale brick cutting.
- Gloves: Provide protection for your hands during construction.
- Safety glasses: Protect your eyes from dust and debris while cutting bricks.
- Protective clothing: Wear appropriate clothing to shield yourself from any mess or injury during construction.
- Fire-resistant adhesive or mortar: Adheres bricks together and provides structural support.
- Firewood: Required for starting and maintaining the fire in the pit.
- Fire extinguisher or a bucket of water: Essential safety measures to have on hand in case of emergencies.
Please note that depending on your specific design and requirements, additional materials may be needed.