
Best Cooler Enclosures to Buy in July 2026
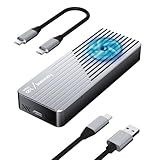
fanxiang SSD Enclosure with Cooling Fan, USB 3.2 Gen 2 (10 Gbps), M.2 NVME/SATA SSD Enclosure, USB Adapter/Reader, M.2 Enclosure, Supports M and B+M Keys and Size 2230/2242/2280 SSDs, MD85
-
BLAZING FAST DATA TRANSFERS: ACHIEVE SPEEDS UP TO 10GBPS WITH USB 3.2.
-
UNIVERSAL COMPATIBILITY: WORKS WITH NVME/SATA SSDS ON VARIOUS DEVICES.
-
ROBUST AND PORTABLE DESIGN: LIGHTWEIGHT, SHOCK-RESISTANT, AND EASY TO TRANSPORT.


CENMATE Aluminum Dual Bay Hard Drive Enclosure with Cooling Fan for 2.5“/3.5" SATA HDD/SSD with USB A/C 3.0, Support Hot Swappable, Daisy Chain Expansion, Tool-Free HDD Enclosure, DAS(NO RAID/NAS)
-
MASSIVE 20TB CAPACITY: PERFECT FOR PERSONAL AND ENTERPRISE STORAGE NEEDS!
-
LIGHTNING-FAST TRANSFERS: TRANSFER 1GB FILES IN JUST 3-5 SECONDS!
-
TOOL-FREE DESIGN: EFFORTLESS INSTALLATION AND SWAPPING-NO TOOLS NEEDED!
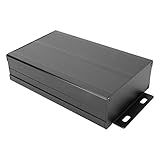
Enclosure Project Box 40x97x150mm Electronic DIY Circuit Board Protective Box Cooling Case Enclosure Split Body Case for Power Amplifier Aluminum Box GPS Analyzer Housing Black
- EFFICIENT HEAT DISSIPATION PREVENTS CIRCUIT BURNOUT FOR LONGEVITY.
- DURABLE 6063-T5 ALUMINUM ENSURES A ROBUST AND STYLISH ENCLOSURE.
- VERSATILE DESIGN SUITS VARIOUS DIY AND ELECTRONIC APPLICATIONS EASILY.
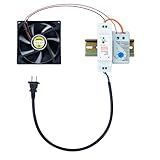
Electrical Cabinet Cooling Fan and Thermostat Set for Electrical Box Enclosures
- HASSLE-FREE SETUP: EASY INSTALLATION WITH PRE-CONNECTED CABLES!
- VERSATILE 4-IN-1 SET: INCLUDES FAN, THERMOSTAT, AIR SWITCH, AND PLUG.
- CUSTOMIZABLE COMFORT: ADJUSTABLE TEMPERATURE RANGE FROM 0-60°C!
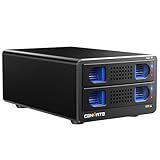
CENMATE Aluminum Dual Bay 10Gbps Hard Drive Enclosure with Cooling Fan for 2.5“/3.5" SATA HDD/SSD with USB A/C 3.2 Gen 2, Support Hot Swappable, Daisy Chain Expansion, Tool-Free, DAS(NO RAID/NAS)
-
BLAZING FAST TRANSFERS: ACHIEVE 10GBPS SPEEDS FOR QUICK DATA ACCESS.
-
EXPANDABLE STORAGE: DAISY CHAIN UP TO 120TB WITH MULTIPLE ENCLOSURES.
-
HOT SWAPPABLE DESIGN: EASILY SWAP DRIVES WITHOUT POWERING DOWN.
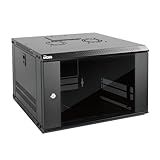
Tecmojo 6U Wall Mount Server Cabinet IT Network Rack Enclosure Lockable Door and Side Panels Black, Cooling Fan, Standard Glass Door, 450mm Depth, for 19” IT Equipment, A/V Devices
-
SPACE-SAVING DESIGN: COMPACT 6U WALL MOUNT CABINET FREES UP FLOOR SPACE.
-
SECURE ACCESS: LOCKABLE GLASS DOORS KEEP NETWORK EQUIPMENT SAFE.
-
USER-FRIENDLY SETUP: ADJUSTABLE RAILS AND EASY CABLE ACCESS SIMPLIFY INSTALLATION.
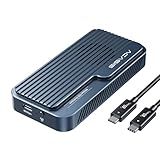
ACASIS 80Gbps M.2 NVMe SSD Enclosure, with Cooling Fan, Compatible with Thunderbolt5/USB4 V2.0, Back Compatible with Thunderbolt4/3/USB4 V1.0, USB3.2/3.1/3.0, Support SSD B+M M-Key (TB501 Pro)
-
ULTRA-FAST SPEEDS: UP TO 6000 MB/S FOR CONTENT CREATORS AND GAMERS!
-
UNIVERSAL COMPATIBILITY: WORKS WITH THUNDERBOLT 5 AND USB4 DEVICES!
-
SEAMLESS SETUP: PLUG & PLAY FOR INSTANT ACCESS, NO DRIVERS NEEDED!
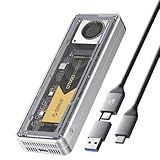
ORICO 40Gbps M.2 NVMe SSD Enclosure with Cooling Fan, Tool-Free Installation Aluminum Crystal NVMe Case, Support 2280 M2 Solid State Drive, Compatible with Thunderbolt 3/4 USB4/3.2/3.1/3.0
-
EXPERIENCE 40GBPS SPEEDS-TRANSFER 3GB IN JUST 1 SECOND!
-
ADVANCED COOLING TECH KEEPS SSD PERFORMANCE STABLE UNDER PRESSURE.
-
SNAP-ON DESIGN FOR EASY SSD ACCESS-INSTALL WITHIN SECONDS!
Building a custom cooler enclosure for outdoor use requires certain materials and steps to ensure its durability and functionality. Here's a breakdown of the process:
- Research and Planning: Before starting the project, research different cooler enclosure designs and materials to find the one that suits your needs. Take measurements of your cooler to determine the size of the enclosure.
- Gather Materials: You will need the following materials to build the enclosure: Weather-resistant wood or PVC boards for the frame. Exterior-grade plywood or a similar material for the walls. Waterproof paint or sealant to protect the enclosure. Hinges, latches, or locks for the door. Weatherstripping to seal gaps.
- Frame Construction: Begin by constructing a sturdy frame that will hold the enclosure together. Measure and cut the wood or PVC boards to match the dimensions of your cooler. Use screws or nails to assemble the frame.
- Wall Installation: Attach the exterior-grade plywood or similar material to the frame to create the walls. Measure and cut the boards to fit and secure them to the frame. Leave an opening for the door.
- Door Installation: Create a door that will fit the opening left in the enclosure. Measure and cut plywood to match the size of the opening. Attach hinges to the door and the enclosure, allowing it to swing open and closed. Install a latch or lock to secure the door.
- Finishing Touches: Apply a weatherproof sealant or paint to all exposed surfaces of the enclosure, including the walls, frame, and door. This will protect the wood from moisture and ensure its longevity. Additionally, attach weatherstripping around the door frame to prevent any gaps that may allow heat or pests to enter the enclosure.
- Test and Inspect: Once the enclosure is complete, test it by placing the cooler inside and ensuring it fits properly. Inspect for any gaps, leaks, or issues that may need addressing.
Remember to personalize your cooler enclosure based on your needs. You could include shelves, hooks, or even a built-in bottle opener. Customization allows you to make the enclosure more functional and tailored to your requirements.
Building a custom cooler enclosure for outdoor use requires attention to detail, knowledge of basic woodworking techniques, and patience. By following these steps, you can create a durable and functional enclosure that will protect your cooler and enhance your outdoor experiences.
What is the recommended clearance around a custom cooler enclosure?
The recommended clearance around a custom cooler enclosure can vary depending on several factors, including ventilation requirements, heat dissipation capabilities of the enclosure, and the specific components of the cooler system. However, as a general guideline, it is recommended to leave at least 6 inches (15 cm) of clearance on all sides of the enclosure. This allows for adequate airflow and helps prevent heat buildup, which can affect the efficiency and lifespan of the cooler system. It is also important to follow the manufacturer's recommendations and guidelines specific to the custom cooler enclosure being used.
How to incorporate drainage in a custom cooler enclosure?
Incorporating drainage in a custom cooler enclosure is essential to ensure that any water or melted ice can be properly drained out. Here are some steps to consider when designing and implementing drainage in a custom cooler enclosure:
- Design the Enclosure: Start by designing the cooler enclosure, taking into account factors such as the material, size, and shape of the enclosure. Consider leaving some space at the bottom or on the sides for drainage purposes.
- Determine Drainage Points: Identify the best locations for drainage points within the enclosure. Typically, it is beneficial to have multiple drainage points to ensure efficient draining.
- Create Drainage Holes: Drill or cut appropriately sized holes at the predetermined locations to allow water to flow out. Ensure that the holes are evenly spaced and large enough to prevent clogging.
- Install Drainage Tubes or Fittings: Attach suitable drainage tubing or fittings to the holes to enable water to flow out of the enclosure. Choose tubing that is easy to clean and resistant to molds or mildew.
- Slope the Enclosure: Create a slight slope inside the enclosure, towards the drainage holes, to facilitate water flow and prevent pooling. This could be achieved by adjusting the internal structural design or by using custom-built ramps or platforms.
- Insert Drainage Trays or Pans: Place drainage trays or pans underneath the drainage holes on the outside of the enclosure. These containers will collect the water that is drained from the cooler. Ensure that the trays are large enough to accommodate anticipated amounts of water.
- Direct the Drainage: Consider where you want the drained water to be directed. It can be as simple as directing it towards a nearby drain or a designated area for moisture disposal. Make sure that the predetermined area can handle the amount of drained water.
- Test the Drainage System: Before using the custom cooler enclosure, test the drainage system by pouring some water inside the enclosure and monitoring if it drains properly through the drainage holes and trays.
By following these steps, you can incorporate effective drainage in a custom cooler enclosure, providing a way for water or melted ice to be properly drained out and preventing any potential issues associated with excess moisture.
What is the expected lifespan of a custom cooler enclosure?
The expected lifespan of a custom cooler enclosure can vary depending on several factors:
- Material: The type of material used to build the enclosure can significantly affect its lifespan. High-quality materials like stainless steel or aluminum are known for their durability and can last for many years. On the other hand, materials like plastic or lower-grade metals may degrade more quickly over time.
- Maintenance: Regular maintenance and care can extend the lifespan of a cooler enclosure. Cleaning, removing debris, and addressing any signs of damage or wear can prevent premature deterioration.
- Environmental conditions: The surrounding environment can also impact the lifespan of a cooler enclosure. Exposure to harsh weather conditions, extreme temperatures, humidity, or corrosive agents can accelerate deterioration.
- Usage: The frequency and intensity of usage can affect the lifespan of the enclosure. If it experiences heavy usage or rough handling, it may wear out more quickly compared to a lightly used enclosure.
Considering these factors, a well-built and well-maintained custom cooler enclosure can typically last anywhere from 10 to 20 years or even longer. However, it is important to note that this is a general estimate, and individual circumstances may vary.
How to maintain and clean a custom cooler enclosure?
Maintaining and cleaning a custom cooler enclosure is essential to ensure its longevity and optimal performance. Here are some steps to follow:
- Regular Inspection: Conduct a visual inspection at least once a month to check for any signs of damage, wear, or malfunctions. Look for cracks, loose parts, and any issues with insulation, seals, or hinges.
- Unplug and Empty: Before cleaning, make sure to unplug the cooler and remove any items stored inside. Empty all contents, including ice, water, or any leftover beverages or food.
- Wipe Exterior Surfaces: Use a damp cloth or sponge to wipe down the exterior surfaces of the enclosure. If there are sticky or stubborn stains, you can use a mild detergent mixed with water. Avoid using abrasive cleaners or scouring pads, as they can damage the surface.
- Clean the Interior: Inspect the interior for any spills, molds, or stains. Wipe the interior surfaces using a mixture of mild detergent and warm water. For stubborn stains or odors, you can use a baking soda solution or a vinegar-water mixture. Scrub gently with a soft brush or cloth and rinse thoroughly.
- Sanitize: To ensure a hygienic environment, sanitize the interior periodically. Use a food-safe sanitizing solution or a mixture of bleach and water (1 tablespoon of bleach per gallon of water). Apply the solution, let it sit for a few minutes, then rinse thoroughly with clean water.
- Clean the Seals and Gaskets: Inspect the seals and gaskets on the lid or door of the cooler. Wipe them with a damp cloth to remove any dirt, grime, or mildew. If the seals are damaged or not sealing properly, consider replacing them to maintain proper insulation.
- Dry Completely: After cleaning, make sure all surfaces, including the interior and exterior, are completely dry before closing and storing the cooler. Moisture can lead to mold growth and damage the enclosure.
- Store in a Clean and Dry Area: Store the custom cooler enclosure in a clean, dry location to prevent dust buildup, pests, and exposure to extreme temperatures or weather conditions. Covering the enclosure with a protective cover can further ensure its cleanliness.
By following these steps, you can effectively maintain and clean your custom cooler enclosure, keeping it in excellent condition and prolonging its lifespan.
What is the ideal size for a custom cooler enclosure for outdoor use?
The ideal size for a custom cooler enclosure for outdoor use can vary depending on the specific needs and preferences of the individual. However, some common dimensions for a custom cooler enclosure can range from approximately 3 feet (0.9 meters) to 6 feet (1.8 meters) in height, 2 feet (0.6 meters) to 4 feet (1.2 meters) in width, and 1.5 feet (0.45 meters) to 3 feet (0.9 meters) in depth. These dimensions can accommodate various sizes of coolers and provide enough space for insulation and ventilation. Ultimately, the ideal size should be based on the size of the cooler to be enclosed, the available space, and personal preferences.