
Best Hedge Trimmer Blade Adjustments to Buy in July 2026
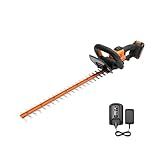
WORX WG261 22" 20V Cordless Hedge Trimmer, Battery & Charger Included
- LIGHTWEIGHT ERGONOMICS: COMFORTABLE DESIGN FOR EFFORTLESS TRIMMING.
- 22 CUTTING REACH: PERFECT LENGTH FOR FLAT TOPS AND EASY CORNERING.
- EXPANDABLE POWER: VERSATILE BATTERY FOR 75+ WORX TOOLS.


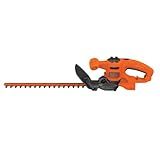
BLACK+DECKER Electric Hedge Trimmer, 17-Inch (BEHT150)
- DUAL-ACTION BLADE REDUCES VIBRATION FOR SMOOTHER TRIMMING.
- 3.2 AMP MOTOR EASILY HANDLES BRANCHES UP TO 5/8 INCH.
- LIGHTWEIGHT DESIGN MINIMIZES FATIGUE FOR PROLONGED USE.

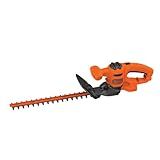
BLACK+DECKER BEHT350FF 22" Electric Hedge Trimmer
- DUAL-ACTION BLADE FOR SMOOTHER TRIMMING WITH LESS VIBRATION.
- 4.0 AMP MOTOR EFFORTLESSLY CUTS BRANCHES UP TO 3/4 IN. THICK.
- LIGHTWEIGHT DESIGN FOR EASY MANEUVERABILITY AND REDUCED FATIGUE.
BLACK+DECKER Electric Hedge Trimmer, 16-Inch (BEHT100)
-
LIGHTWEIGHT DESIGN: EFFORTLESSLY TRIM SMALL HEDGES & SHRUBS.
-
ENHANCED CONTROL: BULK-FREE BUILD & T-HANDLE FOR COMFORT & PRECISION.
-
POWERFUL & RELIABLE: ENDLESS RUNTIME WITH DUAL-ACTION BLADE FOR EFFICIENCY.
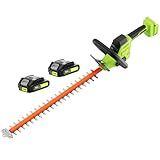
SUNCHERS 20V Max Hedge Trimmer Cordless, 22 Inch Tree Trimmer with 2 Batteries and Charger, Handheld Electric Trimmers, Grass Shrub Pruning Cutter, Lightweight & Compact Hedge Shear for Garden, Lawn
- POWERFUL 22 BLADES & 2800SPM FOR EFFICIENT TRIMMING
- TWO BATTERIES FOR 60-MINUTE CONTINUOUS OPERATION
- DUAL SWITCH DESIGN ENHANCES SAFETY DURING USE
20'' Hedge Trimmer Cordless with Battery, Electric Handheld Bush Clipper with 2 Pack Rechargeable Batteries, 3000RPM 180° Rotatable Head, 2/3'' Blade Gap
- POWERFUL 1000W MOTOR: FASTER CUTS WITH 3000RPM EFFICIENCY.
- LIGHTWEIGHT DESIGN: ONLY 4.4 LBS FOR EASY HANDLING AND COMFORT.
- MULTIPLE SAFETY FEATURES: ENSURES SAFE OPERATION FOR ALL USERS.
Adjusting hedge trimmer blades is a simple process that ensures efficient and effective trimming. Here's how you can do it:
- Start by disconnecting the power source to ensure your safety. If you're using a corded trimmer, unplug it from the electrical outlet. For cordless trimmers, remove the battery.
- Locate the adjustment knobs or screws on the trimmer. These are typically located close to the blades. They may vary depending on the model and manufacturer.
- To begin, place the trimmer in a secure position, such as on a workbench or a stable surface. This will make it easier to access the blades.
- Loosen the adjustment knobs or screws that secure the blades. Most trimmers have two knobs or screws that need to be loosened to allow blade adjustment. Use the appropriate tool, such as a screwdriver or an Allen wrench, depending on the type of fastener.
- Once the knobs or screws are loose, you can adjust the blades. Carefully move the blades while ensuring they are aligned properly. The cutting edges of the blades should be parallel to each other, ensuring a clean and precise cut.
- After adjusting the blades, tighten the adjustment knobs or screws firmly. This will secure the blades in their new position and prevent any movement during operation.
- To check the blade alignment, slowly spin the blades by hand to ensure smooth movement without any contact or rubbing. If you notice any friction or contact between the blades, re-adjust them until they rotate smoothly.
- Once you are satisfied with the blade adjustment, reconnect the power source or insert the battery back into the trimmer.
Remember, following the manufacturer's instructions specific to your hedge trimmer is always important. If you're uncertain about any step, refer to the user manual or contact the manufacturer for guidance. Regularly inspecting and adjusting the blades ensures optimal performance and prolongs the lifespan of your hedge trimmer.
What is the process of adjusting hedge trimmer blades for a clean cut?
To adjust hedge trimmer blades for a clean cut, follow these steps:
- Safety first: Ensure the hedge trimmer is turned off and disconnected from any power sources before starting the adjustment process.
- Inspect the blades: Check the blades for any damage or signs of wear. If the blades are worn or have nicks or bends, they may need to be sharpened or replaced before adjusting.
- Loosen the blade assembly: Most hedge trimmers have a blade assembly that can be loosened for adjustment. Refer to the manufacturer's manual for specific instructions on how to loosen the blade assembly.
- Alignment: Hold the hedge trimmer up to the light and check to see if the blades are aligned properly. The cutting edges should be parallel to each other with no gaps or overlaps.
- Adjusting the gap: Many hedge trimmers have an adjustable gap, which determines how close the blades come together while cutting. Adjusting the gap allows for a clean cut by ensuring the blades meet properly. Check the manufacturer's manual to see how to adjust the gap on your particular model. Usually, it involves tightening or loosening screws or bolts on the blade assembly.
- Lubrication: Apply lubricant to the blade edges to ensure smooth movement and reduce friction. This helps in achieving a clean cut and prevents the blades from getting jammed or stuck while cutting.
- Tighten the blade assembly: Once the blades are aligned and the gap is adjusted, tighten the blade assembly securely.
- Test cut: After adjusting the blades, test the trimmer on a small test area of a hedge to ensure a clean cut. Pay attention to any vibrations or unusual sounds, which might indicate further adjustments or maintenance is needed.
Remember to always refer to the manufacturer's manual for specific instructions on adjusting your particular hedge trimmer model.
What is the correct angle for hedge trimmer blades?
The correct angle for hedge trimmer blades is typically between 0 and 15 degrees. This angle helps to optimize cutting performance and efficiency while minimizing the risk of damage to the hedge. However, it is important to refer to the manufacturer's instructions for your specific hedge trimmer model, as the recommended angle may vary.
What is the impact of incorrect blade adjustment on hedge trimmer efficiency?
Incorrect blade adjustment can have a significant impact on hedge trimmer efficiency. Here are a few potential effects:
- Reduced Cutting Performance: If the blades are not properly adjusted, they may not cut through the branches effectively. This can result in a jagged or uneven cut, which can make the trimming process more difficult and time-consuming.
- Increased Strain on the Motor: When the blades are not properly adjusted, it can cause the motor to work harder than necessary. This additional strain can lead to increased wear and tear on the motor, potentially shortening its lifespan.
- Uneven Trimming: Misaligned blades can lead to an uneven trimming job. The hedge may end up with uneven heights, resulting in an unattractive appearance.
- Safety Concerns: Improper blade adjustment can increase the risk of accidents. The blades may not be properly secured, which could result in them detaching during operation. Additionally, if the blades are not aligned correctly, they may pull branches in unpredictable directions, making it harder to control the movement and potentially causing injury.
- Reduced Battery Life (for cordless trimmers): In the case of cordless hedge trimmers, incorrect blade adjustment can drain the battery faster. The added strain on the motor may require increased power consumption, resulting in shorter battery life and reduced runtime.
To ensure optimal efficiency and safety, it is important to regularly check and adjust the blades according to the manufacturer's instructions.
How to troubleshoot common issues related to hedge trimmer blade adjustment?
Here are some steps to troubleshoot common issues related to hedge trimmer blade adjustment:
- Check for loose or misaligned blades: Inspect the blades to ensure they are securely fastened and properly aligned. If they are loose or misaligned, tighten the blade bolts or screws using the appropriate tools. Refer to the trimmer's user manual for specific instructions on adjusting the blades.
- Clean the blades: Accumulated debris, sap, or resin can stick to the blades, causing them to become clogged or sticky. Clean the blades with a brush or rag, removing any debris. Use a fine-grit sandpaper to remove any stubborn residue. Apply lubricating oil to the blades after cleaning to ensure they operate smoothly.
- Check for blade wear: Over time, the blades can become dull or damaged, leading to poor cutting performance. Check the blades for signs of wear, such as nicks, chips, or a dull cutting edge. If the blades are worn, they may need to be sharpened or replaced. Sharpening can be done at home using a sharpening stone or wheel, or you can take them to a professional.
- Adjust blade tension: To ensure optimal cutting performance, the blades should have the proper tension. Refer to the user manual for instructions on adjusting the blade tension, as it may vary depending on the model. Typically, there will be adjustment screws or bolts located near the blades that can be tightened or loosened to achieve the desired tension.
- Lubricate the blades: Proper lubrication is essential for smooth operation and to prevent rusting. Apply a light coating of lubricating oil to the blade edges, pivot points, and other moving parts. Be cautious not to over-lubricate, as excess oil can attract more debris and cause clogging.
- Test the trimmer: After performing the necessary adjustments, clean the trimmer of any debris and test it. Determine if the blade movement is smooth and whether it is cutting efficiently. If the issue persists, consult the user manual for additional troubleshooting steps or consider taking the trimmer to a professional for further inspection and repair.
Remember to always follow safety precautions when working with hedge trimmers, such as wearing protective eyewear and gloves, disconnecting the power source, and ensuring the trimmer is turned off before making any adjustments.