
Best Indoor Herb Growing Kits to Buy in July 2026
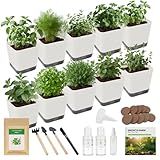
10-Set Indoor Herb Garden Starter Kit, 7 Seeds Growing into Basil, Parsley, Thyme, Mint, Cilantro, Dill, Oregano Including 10 White Pots, Markers, Nutritional Soil, Ideal Christmas Gifts for Women
- COMPLETE KIT WITH 7 PREMIUM HERBS AND ALL ESSENTIAL TOOLS INCLUDED!
- FREE LAB-DEVELOPED NUTRIENTS ENSURE ROBUST PLANT GROWTH AND VITALITY.
- PERFECT GIFT FOR PLANT LOVERS, OFFERING FRESH HERBS YEAR-ROUND!


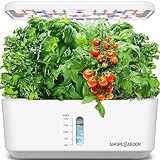
Ahopegarden Indoor Garden Hydroponics Growing System: 10 Pods Plant Germination Kit Herb Vegetable Growth Lamp Countertop with LED Grow Light - Hydrophonic Planter Grower Harvest Lettuce
- EFFORTLESS INDOOR GARDENING: GROW HERBS & VEGGIES FASTER WITH HYDROPONICS!
- 10 PODS FOR VARIETY: EASILY CULTIVATE MULTIPLE PLANTS WITH CLEAR WATER GAUGE.
- HEIGHT-ADJUSTABLE LIGHT: CUSTOMIZABLE GROW LIGHT FOR PLANTS UP TO 14.5 INCHES!

Christmas Gifts for Mom, Women, Her - 9 Herb Indoor Garden Starter Kit with Pots, Soil & Tools - Unique Birthday Gifts for Women, Housewarming Present for Wife - Grow Kitchen Windowsill Herbs
- 🌱 COMPLETE KIT FOR THRIVING HERBS-NO GREEN THUMB NEEDED!
- 💎 PREMIUM SEEDS & SOIL FOR ROBUST, PESTICIDE-FREE GROWTH!
- 🎁 PERFECT GIFT FOR CULINARY ENTHUSIASTS-FRESH FLAVORS YEAR-ROUND!
Ahopegarden Indoor Garden Hydroponics Growing System: 10 Pods Plant Germination Kit Herb Vegetable Growth Lamp Countertop with LED Grow Light - Hydrophonic Planter Grower Harvest Lettuce
- FAST, HEALTHY GROWTH WITH HYDROPONIC EFFICIENCY!
- TEN PODS & WATER LEVEL WINDOW FOR EASY MONITORING!
- ADJUSTABLE LIGHT & TWO MODES FOR DIVERSE PLANT GROWTH!

Hydroponics Growing System Indoor Garden: Herb Garden Kit Indoor with LED Grow Light Quiet Smart Water Pump Automatic Timer Healthy Fresh Herbs Vegetables - Hydroponic Planter for Home Kitchen Office
-
GROW INDOOR HERBS YEAR-ROUND: FAST, EFFICIENT HYDROPONICS SYSTEM!
-
QUIET OPERATION: SILENT WATER PUMP ENSURES PEACEFUL GARDENING!
-
HASSLE-FREE SETUP: EVERYTHING YOU NEED FOR EASY INDOOR GARDENING!
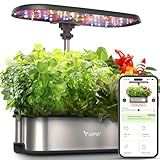
LetPot LPH-SE Hydroponics Growing System, 12 Pods Smart Herb Garden Kit Indoor, Indoor Garden, APP & WiFi Controlled, with 24W Growing LED, 5.5L Water Tank, Pump System, Automatic Timer
-
CONTROL GROWTH WITH THE LETPOT APP; PERFECT LIGHT ANYTIME, ANYWHERE!
-
ACHIEVE 40% FASTER GROWTH WITH OUR ADVANCED 24-WATT LED SYSTEM!
-
COMPLETE INDOOR GARDEN KIT: 12 CUPS, NUTRIENTS, & ADJUSTABLE LIGHTING!

Hydroponics Growing System Kit - 12 Pods Indoor Herb Garden with LED Grow Light, Adjustable Height up to 17", Auto Timer - Perfect Home, Birthday & Mother’s Day Gift for Women
- GROW 12 PLANTS EFFORTLESSLY WITH MINIMAL MAINTENANCE AND MAX HEIGHT.
- FAST-GROWING HERBS WITH SILENT PUMP AND SMART AUTO FUNCTIONS.
- FULL-SPECTRUM LED LIGHT PROMOTES YEAR-ROUND INDOOR GARDENING SUCCESS.
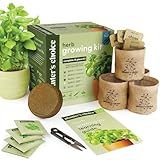
Planters' Choice Indoor Herb Garden Starter Kit - Coolest Gifts for Women - Birthday for Her - House Warming Gift New Home for Plant Lovers - Womens, Wife, Mom Presents - Gardening Herbs
- EASY-TO-USE KIT ENSURES HIGH GROWTH SUCCESS FOR ALL SKILL LEVELS.
- PERFECT GIFT FOR ANY OCCASION-DELIGHT LOVED ONES WITH FRESH HERBS!
- COMPREHENSIVE GUIDE INCLUDED-NO GREEN THUMB NEEDED TO THRIVE!
Growing herbs indoors can vary in duration depending on the type of herb, the growing conditions, and care provided. Generally, most herbs such as basil, mint, and parsley reach a harvestable size in about 6 to 8 weeks. Some herbs, like chives and cilantro, might be ready a bit sooner, often within 4 to 6 weeks. Factors that influence growth include light exposure, temperature, humidity, watering practices, and soil quality. Providing a consistent light source, such as a sunny windowsill or grow lights, along with proper watering and temperature management, can help ensure healthy and timely growth. Regularly harvesting herb leaves can also promote further growth and extend the plant's productive life indoors.
How to grow herbs indoors all year round?
Growing herbs indoors year-round is a rewarding way to have fresh flavors at your fingertips anytime you cook. Here’s a guide on how to successfully cultivate herbs indoors:
1. Choose the Right Herbs
Beginner-friendly herbs such as basil, mint, chives, parsley, cilantro, thyme, oregano, and rosemary generally do well indoors. Different herbs have slightly different needs, so it’s helpful to research each one’s specific care requirements.
2. Provide Adequate Light
- Natural Light: Place your herbs near a south or west-facing window that gets at least 6-8 hours of sunlight daily.
- Artificial Light: If natural light is insufficient, use grow lights. LED grow lights are energy-efficient and can be placed 4-12 inches above the plants. Keep the lights on for about 12-16 hours a day depending on your herbs’ needs.
3. Maintain Proper Temperature and Humidity
- Temperature: Most herbs thrive at temperatures between 65°F and 75°F (18°C to 24°C).
- Humidity: Indoor heating and cooling systems can dry out the air, so consider using a humidity tray or a humidifier to maintain adequate moisture levels. Misting the herbs occasionally can also help.
4. Choose Suitable Containers
- Pot Size: Small pots or containers with good drainage work well for herbs. A pot that is 4-6 inches deep is suitable for most small herb plants.
- Drainage: Ensure your pot has drainage holes to prevent waterlogging. Use a saucer to catch any excess water.
5. Use Quality Potting Mix
- Soil: Use a high-quality, well-draining potting mix. Avoid garden soil, as it is often too dense and may contain pests.
- Fertilizer: Feed your herbs with a balanced, water-soluble fertilizer every 4-6 weeks during the growing season. Reduce feeding in the winter when growth usually slows.
6. Watering Practices
- Consistency: Water herbs thoroughly, but allow the top inch of soil to dry out between waterings to prevent root rot.
- Observation: Adjust your watering schedule based on the season, humidity, and temperature. Herbs in small pots may need more frequent watering than those in larger containers.
7. Pest Management
- Monitoring: Routinely check your herbs for pest activity. Common indoor pests include aphids, spider mites, and whiteflies.
- Natural Remedies: Use natural pest control methods like insecticidal soap or neem oil if necessary. Regularly rinsing the leaves can also help deter pests.
8. Regular Pruning and Harvesting
- Pruning: Regularly prune your herbs to encourage bushier growth and prevent them from becoming leggy.
- Harvesting: As a general rule, only take about one-third of the plant at a time, especially with annual herbs like basil. This encourages continual growth without stressing the plant.
9. Rotation and Repotting
- Rotation: Rotate your plants regularly if placed near a window to ensure even growth.
- Repotting: Transplant your herbs to slightly larger pots as they outgrow their containers to ensure continued healthy growth.
By paying attention to these aspects, you can successfully grow and maintain a thriving indoor herb garden throughout the year. Enjoy the fresh flavors in your cooking!
How to maintain indoor herb plants?
Maintaining indoor herb plants can be a rewarding endeavor, providing you with fresh herbs year-round. Here are some tips to ensure your indoor herbs thrive:
- Light: Most herbs need at least 6-8 hours of bright light daily. A south or southwest-facing window is ideal. If natural light is limited, consider using grow lights. LED grow lights are energy-efficient and effective.
- Watering: Herbs generally prefer to be kept moist but not waterlogged. Water when the top inch of soil feels dry. Ensure pots have drainage holes to prevent waterlogging, which can cause root rot.
- Soil: Use a well-draining potting mix. You can mix in some perlite or sand to improve drainage if necessary. Avoid garden soil, as it's too dense and may contain pests.
- Pot Selection: Use pots with adequate drainage. Terra cotta pots are a good choice as they allow the soil to dry out between waterings. Make sure the size of the pot accommodates the growth of the herb; too large a pot can lead to overwatering issues.
- Temperature and Humidity: Most herbs prefer temperatures between 60-75°F (15-24°C). Maintain moderate humidity. If your home is dry, consider using a pebble tray with water under the pots or a humidifier.
- Fertilization: Fertilize every 4-6 weeks during the growing season with a balanced, water-soluble fertilizer. Avoid over-fertilizing, especially in winter when growth slows down.
- Pruning and Harvesting: Regularly prune your herbs to encourage bushy growth and prevent them from becoming leggy. Harvest herbs by cutting just above a pair of leaves; this encourages new growth.
- Pest Management: Check regularly for pests like aphids or spider mites. You can remove them by hand or treat them with insecticidal soap. Maintain good air circulation to prevent fungal diseases.
- Rotation: Occasionally rotate your plants so that all sides receive equal light and promote even growth.
- Specific Needs: Research the specific needs of each type of herb since some, like rosemary, prefer drier conditions, while others, like basil, thrive in moist soil.
By providing the right care, your indoor herb plants can flourish and provide fresh flavors to your cooking endeavors.
How to propagate herbs indoors from cuttings?
Propagating herbs indoors from cuttings is a great way to expand your herb garden and save on buying new plants. Here’s a step-by-step guide to help you propagate herbs successfully:
- Choose the Right Herbs: Some herbs are better suited for propagation from cuttings. Common herbs suitable for this method include basil, mint, rosemary, thyme, oregano, sage, and parsley.
- Select Healthy Parent Plants: Choose a healthy, mature plant for taking cuttings. Avoid plants that look diseased or stressed.
- Use Clean Tools: Use a sharp, clean pair of scissors or pruning shears to take your cuttings. This helps prevent infection or damage to the plant.
- Take the Cuttings: Cut a 4-6 inch long piece from a healthy stem. Make your cut just below a leaf node (the point where a leaf meets the stem), as roots tend to emerge from these nodes. Remove the leaves from the lower third of the cutting. This part will be submerged in water or planted in soil.
- Water Method (Optional): Place the cuttings in a glass of water, ensuring that the stripped portion of the stem is submerged. Change the water every few days to keep it fresh. Place the glass in a warm, indirect sunlight location. Roots should start to develop within a week or two.
- Soil Method: Prepare a small pot with a well-draining potting mix. Dip the cut end of the stem in rooting hormone (optional, but it can encourage root growth). Plant the cutting in the soil, ensuring that the part with removed leaves is buried. Firm the soil gently around the base of the cutting. Water the cutting gently to moisten the soil without drowning the stem.
- Provide Proper Conditions: Keep the cuttings in a warm spot with indirect sunlight. Direct sunlight might be too intense for the new cuttings. Maintain high humidity around the cuttings by covering them with a clear plastic bag or a propagation dome. Make sure it doesn’t touch the plant by using sticks or supports.
- Monitor Growth: Check the cuttings regularly to ensure they are not drying out or getting too much moisture, which can cause rot. In the case of the water method, once roots are a couple of inches long, transplant them into soil.
- Transplanting: Once the cuttings have developed a healthy root system, they can be transplanted into larger pots with regular potting soil. Gradually acclimate them to direct sunlight by increasing their exposure slowly over a week or two.
- Ongoing Care: Water the plants appropriately depending on the herb species and indoor conditions. Consider fertilizing lightly every few weeks to promote healthy growth.
By following these steps, you’ll be able to successfully propagate a variety of herbs indoors and enjoy your expanded herb garden!
How to dry herbs grown indoors for preservation?
Drying herbs grown indoors is a great way to preserve them for future use. Here are some simple methods to dry your indoor-grown herbs effectively:
- Air Drying: Choose the Right Herbs: Air drying works best for herbs with low moisture content, like rosemary, thyme, oregano, and dill. Harvest: Cut stems in the morning after the dew has evaporated but before the sun is too hot. Prepare the Herbs: Remove any damaged leaves. Wash the herbs gently under cool water if needed, and pat them dry thoroughly with a paper towel. Bundle and Hang: Gather the stems in small bunches (about 5-10 stems depending on thickness) and tie them with string or a rubber band. Hang these bundles upside down in a warm, dry, and well-ventilated area away from direct sunlight. A pantry, attic, or kitchen corner works well. Drying Time: This can take from one to two weeks, depending on the humidity.
- Using a Dehydrator: Prepare the Herbs: Rinse and gently dry the herbs as you would for air drying. Layer in Dehydrator: Spread the herbs out in a single layer on the dehydrator trays, ensuring good airflow around each item. Dehydrate on Low Heat: Set the dehydrator to around 95°F (35°C). If your machine doesn’t go that low, use the lowest setting available. Drying generally takes between 1 to 4 hours. Monitor: Check the herbs periodically. They should feel crisp and dry when done.
- Oven Drying: Prepare the Herbs: Clean and dry as you've done with other methods. Arrange on a Baking Sheet: Spread the herbs in a single layer on a baking sheet lined with parchment paper. Use Low Temperature: Set your oven to the lowest possible temperature and prop the door open slightly with a wooden spoon to allow moisture to escape. Check Regularly: Let the herbs dry for about 2-4 hours, turning them occasionally. Keep an eye on them to prevent burning. They should be dry and crumble easily when rubbed between your fingers.
- Microwave Drying: Prepare the Herbs: Ensure the herbs are clean and dried. Layer in Microwave: Place a single layer of herbs between paper towels on a microwave-safe plate. Microwave in Short Bursts: Use medium heat and microwave for 30-second intervals, checking after each to avoid over-drying or burning. This method is best for small quantities.
Storage Tips:
- Once completely dry, remove the leaves from the stems and store the herbs in airtight containers.
- Label each container with the herb’s name and date of drying.
- Store in a cool, dark place like a cupboard or pantry. Sunlight, moisture, and heat can degrade their quality.
By using these methods, you can extend the life of your indoor-grown herbs and enjoy them for months to come.