
Best Ceiling Fan Maintenance Tools to Buy in July 2026
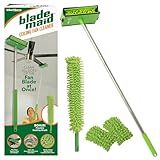
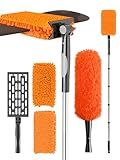
Blade Maid Ceiling Fan Blade Cleaner & Duster | Extendable Pole for High Ceilings, Moldings, Blinds, Walls & Cars, Corner Cleaning Tool, with Reusable Microfiber Pads | Size 3 feet (Pack of 1)
- EFFORTLESS CLEANING: REACH HIGH SPOTS WITHOUT LADDERS OR STRAIN.
- TIME-SAVING DESIGN: COLLECT DUST ON ALL SIDES IN ONE SMOOTH PASS.
- ECO-FRIENDLY: WASHABLE PADS ENSURE LONG-LASTING, REUSABLE CLEANING.


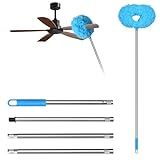
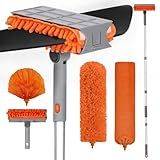
Storystore Ceiling Fan Cleaner Duster - Adjustable Duster with Extension Pole,Dusters for Cleaning Fan Blade, Walls and Cobweb (Blue)
-
VERSATILE CLEANING: TACKLE DUSTING FOR HOMES, CARS, AND HIGH SPACES EASILY.
-
SAFE REACH: CLEAN HIGH CEILINGS SAFELY WITHOUT USING LADDERS.
-
BENDABLE DESIGN: ACCESS TIGHT SPOTS WITH A FLEXIBLE HEAD FOR EFFECTIVE DUSTING.

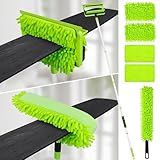
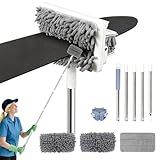
Zavrski Ceiling Fan Cleaner Duster with 6 Ft/72'' Extension Pole High Ceiling Fan Blade Cleaning Tool Microfiber Duster Reusable Pads for Cleaning Ceiling Fan, Baseboard, Blind, Cobweb, Molding
- CLEAN CEILING FANS & MORE WITHOUT LADDERS-72 LONG HANDLE INCLUDED!
- UNIQUE FOUR-SIDED HEAD TRAPS DUST & GRIME IN ONE EASY SWOOP!
- MACHINE WASHABLE PADS LET YOU CLEAN EFFORTLESSLY, WET OR DRY!
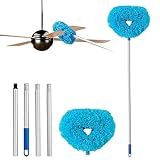
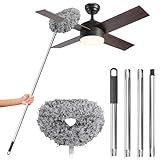
Ceiling Fan Cleaner Duster with 75'' Extension Pole, Flexible High Ceiling Fan Blades Cleaning Tool, Reusable Skinny Duster for Tight Spaces
-
NO LADDERS NEEDED: EFFORTLESSLY CLEAN HIGH CEILING FANS SAFELY FROM THE GROUND.
-
MULTI-PURPOSE DUSTER: VERSATILE TOOL FOR FANS, APPLIANCES, WALLS, AND FLOORS.
-
WASHABLE & REPLACEABLE HEADS: ECO-FRIENDLY AND COST-EFFECTIVE CLEANING SOLUTION.
Ceiling Fan Cleaner Duster Reusable Microfiber Ceiling Fan Blade Cleaner Removable Duster with Extension Pole Adjusts 13 to 49.7 Inch for Cleaning Walls Bookshelves Furniture Door Window Top (Blue)
-
REUSABLE MATERIAL: SOFT POLYESTER FOR EFFICIENT DIRT REMOVAL AND CARE.
-
ADJUSTABLE LENGTH: EXTENDS FROM 13 TO 49.7 INCHES-NO LADDERS NEEDED!
-
DOUBLE-SIDED DESIGN: CLEANS ALL FAN AREAS THOROUGHLY, LEAVING NO DUST BEHIND.
FEXIA Ceiling Fan Cleaner Duster Kit with 6FT Extension Pole, Fan Blade Cleaner Microfiber Cleaning Tool, Reusable Chenille Mops for Blinds Baseboard Wall Cobwebs Bookshelves Door Window Top
-
EXTENDABLE HANDLE: REACH 87.8 INCHES-CLEAN HIGH AREAS WITHOUT LADDERS.
-
STURDY HEAD DESIGN: CLEANS CEILINGS, FURNITURE, AND NOOKS EFFICIENTLY.
-
DUAL-SIDED MICROFIBER PAD: WASHABLE, REUSABLE, AND VERSATILE FOR ALL SURFACES.
Ceiling Fan Cleaner Duster with 72‘’ Extendable Long Handle Cleaning Duster Kit, Reusable Chenille & Microfiber Mop Head for High Ceiling Fan Blade Wall Blinds Cobweb
-
VERSATILE CLEANING TOOL: CLEANS FANS, WALLS, BLINDS & MORE EASILY!
-
ADJUSTABLE 6 FT HANDLE: REACH HIGH SPOTS EFFORTLESSLY WITH EASE.
-
360° FLEXIBLE DESIGN: BEND TO EVERY ANGLE FOR THOROUGH CLEANING.
Ceiling Fan Cleaner Duster with 80'' Extendable Long Handle Pole - Microfiber Chenille Pads for Blades, Baseboards, Walls, Floors, Blinds & Cobwebs - Reusable & Washable
-
CLEAN HIGH CEILINGS SAFELY FROM THE GROUND WITH AN 80 EXTENSION POLE.
-
CONQUER DUST AND COBWEBS EFFORTLESSLY IN HARD-TO-REACH CORNERS.
-
VERSATILE 2-IN-1 DESIGN FOR COMPREHENSIVE CLEANING ON MULTIPLE SURFACES.
DRQ Ceiling Fan Cleaner Duster, Reusable Microfiber Duster with Extension Pole, 13 to 48 Inch Fan Blade Cleaner, Removable Dusters for Cleaning Walls Bookshelves Door Window Top (Grey)
-
SPACE-SAVING DESIGN: FEATURES A HANGING HOLE FOR EASY STORAGE AND DRYING.
-
ADJUSTABLE CONVENIENCE: EXTENDS FROM 13 TO 48 INCHES FOR ANY CLEANING HEIGHT.
-
EFFECTIVE CLEANING POWER: SOFT FIBERS REACH EVERY CORNER WITHOUT SCRATCHING.
To maintain your ceiling fan for optimal performance, start by regularly cleaning the fan blades to prevent dust accumulation, which can unbalance the fan and reduce airflow efficiency. Ensure you turn off the fan and use a gentle cleaner or a damp cloth for cleaning. Occasionally check if the fan is wobbling or making unusual noises, as this can indicate loose screws or imbalances. Tighten any loose screws and ensure the fan is securely attached to the ceiling. It's also important to periodically check the fan's motor, either by listening for unusual sounds or feeling for excessive heat, which could indicate a need for lubrication or professional repair. Adjust the fan's direction seasonally-counterclockwise during the summer for a cooling effect and clockwise during the winter to redistribute warm air. Finally, inspect any remote or wall controls to ensure they function properly, replacing batteries or components as needed. Regular maintenance not only ensures optimal performance but also extends the life of your ceiling fan.
How do I check for electrical issues in a ceiling fan?
Checking for electrical issues in a ceiling fan involves a few steps. Before you begin, make sure to turn off the power to the fan at the circuit breaker to avoid any electrical hazards. Here's a general guide:
- Visual Inspection: Check Connections: Remove the fan canopy and verify that all wire connections are secure. Look for loose wires, exposed conductors, or damaged wire insulation. Examine Fan Blades and Housing: Ensure the blades and fan housing are not rubbing against anything, as mechanical issues can sometimes be mistaken for electrical ones.
- Inspect the Switch: Wall Switch: Test the wall switch to ensure it is functioning correctly. You can try replacing the switch with a new one to rule out switch failure. Pull Chains: If your fan has pull chains, ensure they are not damaged and are functioning properly.
- Test Electrical Supply: Use a voltage tester or multimeter to check that power is reaching the fan. Test the wires at the ceiling box where the fan is connected. You should see the appropriate voltage (usually 120V in North America). If there is no voltage, check the circuit breaker or fuse that controls the fan. Reset the breaker or replace the fuse if necessary.
- Check Capacitor: The capacitor in the fan's motor can fail and prevent the fan from running. If you're comfortable with electronics, you can use a multimeter with a capacitance setting to test it. Otherwise, consider calling a professional for assistance.
- Examine the Remote Control (if applicable): Replace the remote control batteries. Ensure the remote is paired correctly with the fan. If the remote is faulty, you may need to replace it or try operating the fan manually or with a direct wall switch to rule out a faulty remote.
- Motor and Bearings: Listen for any unusual noises coming from the motor, which might indicate a mechanical issue rather than an electrical one. Grinding or humming noises can suggest problems with the motor bearings.
- Try Different Speed or Direction Settings: If the fan operates at some speeds but not others, or if it has trouble reversing direction, the issue might be with the fan's internal control switch.
If after these steps the fan still does not operate correctly, it may be time to consult a professional electrician to diagnose and repair the issue, as handling electrical components without proper knowledge can be dangerous.
How do I troubleshoot a noisy ceiling fan?
Troubleshooting a noisy ceiling fan involves a systematic approach to identify and fix the source of the noise. Here’s how you can go about it:
- Safety First: Turn off the fan and ensure the blades have come to a complete stop. If necessary, turn off the power at the circuit breaker to work on the fan safely.
- Inspect for Loose Parts: Check all screws and bolts on the fan, including those on the blades, light fixture (if applicable), and canopy, to ensure they are tight. Look for any parts that might be loose or rattling and tighten them as needed.
- Blade Balance: Inspect blades for warping or damage. Replace damaged blades if necessary. Check if the blades are level and balanced. You can use a blade balancing kit (often included with ceiling fans) to adjust weight on the blades and ensure uniform motion.
- Check the Blades for Dirt and Dust: Clean the fan blades, which can accumulate dust and unbalance the fan. Use a damp cloth to wipe off dust and debris.
- Examine the Mounting: Ensure the fan is mounted securely to the ceiling. Make sure the mounting box is secured to a ceiling joist or brace and isn’t moving or vibrating.
- Test Different Speeds: Run the fan at different speeds to see if the noise changes or persists. This can help identify whether the problem is related to the motor or the balance of the blades.
- Listen for Different Types of Noises: Grinding or humming: This could indicate a motor issue. Ceiling fan motors are generally not repairable; replacement may be necessary. Rattling: Often caused by loose parts. Re-tighten components. Squeaking: Could be caused by a lack of lubrication or worn bearings. Unfortunately, many modern fan motors are sealed and cannot be lubricated without disassembly.
- Examine Light Fixtures: If your fan has an integrated light fixture, check to see if any of the bulbs or covers are loose and tighten as needed.
- Check for Electrical Issues: If the fan noise is accompanied by flickering lights or intermittent operation, you may need to inspect the wiring. If you’re not comfortable handling electrical issues, consult a professional.
- Consult the Manual: Refer to the manufacturer’s instruction manual for specific troubleshooting advice related to your model. Some problems could be unique to particular fan designs.
- Seek Professional Help: If troubleshooting doesn’t resolve the issue, consider contacting a professional for a more thorough inspection or repair.
By systematically isolating parts and observing the fan's performance, you can likely identify the cause of the noise and apply the appropriate fix.
How often should ceiling fan screws be tightened?
Ceiling fan screws should generally be checked and tightened every 6 to 12 months. This routine maintenance helps ensure the fan operates smoothly and reduces the risk of wobbling or noise due to loose screws. However, if you notice unusual noises, vibrations, or wobbling at any point, you should inspect and tighten the screws immediately. Additionally, after installing a new fan, it's a good idea to check the screws after the first few weeks of use, as they may loosen initially.
How do I replace a ceiling fan light bulb?
Replacing a ceiling fan light bulb is a relatively straightforward task, but it's important to ensure safety and choose the correct type of bulb for your fixture. Here's a step-by-step guide to help you through the process:
- Turn Off Power: Before you begin, turn off the power to the fan and light at the circuit breaker to prevent any risk of electrical shock.
- Let the Bulb Cool: If the light has been on recently, give the bulb some time to cool down to avoid burns.
- Gather Necessary Tools: Depending on your ceiling fan design, you might need a screwdriver. Keep a ladder or step stool handy to safely reach the fan.
- Remove the Light Fixture Cover: Glass Dome/Cover: If your fan has a glass cover, it may be secured with screws or a locking mechanism. Use a screwdriver or gently twist the cover counterclockwise to remove it. No Cover: If there is no cover, proceed to the next step.
- Remove the Old Bulb: Carefully unscrew the old bulb by turning it counterclockwise. Be gentle to avoid breaking the bulb.
- Check Type and Wattage: Before installing the new bulb, check the old bulb's specifications or the fan's manual to ensure that you are using a bulb with the correct base size and wattage.
- Install the New Bulb: Screw the new bulb into the socket by turning it clockwise until it is snug-but avoid overtightening as this could damage the fixture or bulb.
- Replace the Cover: If you removed a cover, replace it by securing any screws or twisting it back into place.
- Restore Power: Once everything is securely in place, turn the power back on at the circuit breaker.
- Test the Light: Turn on the light switch to test the new bulb.
Always double-check your ceiling fan manual for specific instructions or considerations related to your particular model, as some fans may have unique configurations or requirements.
What is an energy-efficient ceiling fan?
An energy-efficient ceiling fan is designed to use less electricity compared to standard ceiling fans, while providing effective air circulation and cooling. There are several features and technologies that can make a ceiling fan more energy-efficient:
- Energy Star Certification: Fans that earn the Energy Star label meet strict energy efficiency criteria set by the U.S. Environmental Protection Agency. These fans typically use a third less energy than conventional models.
- Efficient Motor Design: DC motors are commonly used in energy-efficient ceiling fans. They are more efficient than traditional AC motors, using up to 70% less energy.
- Blade Design: The shape, angle, and materials of the fan blades can significantly impact efficiency. Aerodynamic designs reduce drag and improve airflow, allowing the fan to move more air with less energy.
- Optimal Blade Size and Balance: Appropriately sized and balanced blades for the intended room size can enhance efficiency. An overly large or small fan for a room might lead to unnecessary energy consumption.
- Reversible Motor: An energy-efficient ceiling fan often includes a reversible motor, allowing you to change the direction of the blades. In the summer, the fan should rotate counterclockwise to create a cooling breeze. In the winter, clockwise rotation can help distribute warm air that rises to the ceiling, reducing heating costs.
- Variable Speeds: Energy-efficient fans typically offer multiple speed settings to optimize energy use based on your cooling needs.
- Smart Features: Some modern ceiling fans come with smart technology, allowing for more precise control over fan speed and operation through remote controls, smartphone apps, or voice-activated assistants.
Switching to an energy-efficient ceiling fan can lead to significant savings on electricity bills and contribute to a reduced environmental footprint.
How often should I clean my ceiling fan?
It's generally recommended to clean your ceiling fan every three months. However, if the fan is located in a room that tends to accumulate more dust, such as a kitchen or a room with a fireplace, it might be a good idea to clean it more often, possibly every one to two months. Regular cleaning helps maintain the fan's efficiency and improves air quality by reducing dust circulation. During each cleaning, make sure to dust the blades and the motor housing, and check for any buildup that might affect its operation.