
Best Customizable Outdoor Pizza Ovens to Buy in July 2026
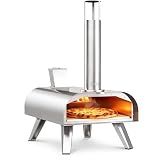
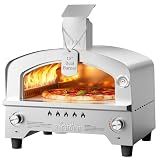
BIG HORN 12" Multi-Fuel Outdoor Pizza Oven Reach up to 1110℉– 3-in-1 Wood,Gas&Electric Compatible(Burners Sold Separately),Pellet Pizza Oven Portable Pizza Maker for Backyard,Camping&Tailgating,Silver
-
PREMIUM STAINLESS STEEL: DURABLE, SAFE, AND PERFECT FOR ANY CUISINE.
-
3-IN-1 FUEL OPTIONS: VERSATILE COOKING WITH AUTHENTIC WOOD-FIRED FLAVOR.
-
ULTRA-PORTABLE DESIGN: LIGHTWEIGHT, EASY ASSEMBLY FOR ON-THE-GO COOKING.


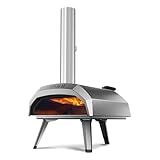
Ooni Karu 12 Multi-fuel Outdoor Portable Pizza Oven - Reaches 950°F and Cooks 12 Inch Pizzas in 60 Seconds. Versatile Wood or Propane Gas Fired Grill with Pizza Stone
-
RAPID COOKING: MAKE AUTHENTIC PIZZA IN JUST 60 SECONDS AT 950°F!
-
VERSATILE FUEL OPTIONS: COOK WITH WOOD, CHARCOAL, OR THE GAS BURNER ATTACHMENT.
-
LIGHTWEIGHT & PORTABLE: WEIGHING ONLY 26.4 LBS FOR EASY OUTDOOR COOKING ADVENTURES!
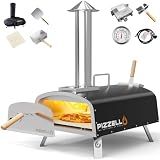
PIZZELLO 16" Outdoor Pizza Oven Propane and Wood Fired Stainless Steel Pizza Grill with Gas Burner, Wood Tray Pizza Stone, Pizza Peel, Carry Bag, Pizzello Forte Gas (Black)
-
DUAL-FUEL FLEXIBILITY: SWITCH BETWEEN GAS AND WOOD FOR ULTIMATE CONVENIENCE.
-
LIGHTNING-FAST COOKING: COOK A PERFECT PIZZA IN JUST 60 SECONDS!
-
PORTABLE PARTY ESSENTIAL: EASY TO TRANSPORT FOR BACKYARD OR CAMPING FUN!
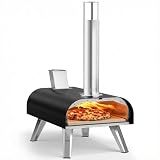
BIG HORN 12" Multi-Fuel Outdoor Pizza Oven Reach up to 1110℉– 3-in-1 Wood,Gas&Electric Compatible(Burners Sold Separately),Pellet Pizza Oven Portable Pizza Maker for Backyard, Camping&Tailgating,Black
- PREMIUM STAINLESS STEEL: BUILT TO LAST, SAFE FOR ALL COOKING TYPES.
- 3-IN-1 VERSATILITY: ENJOY WOOD-FIRED FLAVOR OR SWITCH TO GAS/ELECTRIC.
- ULTRA-PORTABLE DESIGN: LIGHTWEIGHT, EASY SETUP, PERFECT FOR ANY OCCASION.
BIG HORN Gas Pizza Oven, Portable Propane Pizza Oven with 15 inch Pizza Stone, Stainless Steel Pizza Maker for Outdoor Cooking
- COOK PERFECT PIZZAS IN JUST 60 SECONDS-NO ROTATION NEEDED!
- LARGE 15 CAPACITY FITS PIZZAS AND OTHER GRILLED FAVORITES!
- DURABLE, EASY-TO-CLEAN DESIGN FOR EFFORTLESS OUTDOOR COOKING!
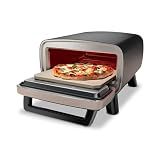
Ninja Artisan Electric Outdoor Pizza Oven with Stone | 12-inch Pizza in 3-minutes | 700F Max Temp | 5-in-1 Functionality – Pizza, Bake, Broil, Proof & Warm | Makes Full Meals | Gray | MO201
- BAKE ARTISAN PIZZA IN JUST 3 MINUTES, NO TURNING NEEDED!
- 5 SETTINGS FOR PERFECTLY CUSTOMIZED PIZZAS EVERY TIME!
- COOK FULL MEALS OUTDOORS-PIZZA & SIDES SIMULTANEOUSLY!
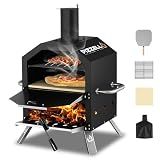
Pizzello Outdoor Pizza Oven Wood Fired 2-Layer Pizza Ovens Outside Pizza Maker with Stone, Pizza Peel, Cover,Removable Cooking Rack for Camping Backyard BBQ (Black)
-
HUGE CAPACITY: COOK 2 PIZZAS OR A WHOLE CHICKEN SIMULTANEOUSLY!
-
PORTABLE DESIGN: WEIGHS ONLY 24.2 LBS-PERFECT FOR CAMPING TRIPS!
-
EFFICIENT COOKING: SERVE MORE GUESTS FASTER WITH DOUBLE PIZZA CAPACITY!
Yes, outdoor pizza ovens can be customized or modified to suit individual preferences or needs. Some common modifications include adding extra insulation for better heat retention, installing a thermometer for more accurate temperature control, or adding a chimney extension for improved ventilation. Many outdoor pizza oven manufacturers also offer customization options such as choosing different finishes or colors, adding casters for mobility, or upgrading the cooking surface to a different material like stone or steel. Overall, there are various ways to customize or modify an outdoor pizza oven to enhance its performance or appearance.
How do I add additional features to my outdoor pizza oven?
There are several ways you can add additional features to your outdoor pizza oven:
- Add a rotisserie attachment: This will allow you to cook a variety of different meats, such as whole chickens or roasts, in addition to pizza.
- Install a temperature gauge: This will allow you to monitor the temperature inside the oven more accurately, ensuring your pizzas are cooked to perfection.
- Add a smoker box: If you enjoy smoked meats and vegetables, you can add a smoker box to your pizza oven to infuse your dishes with delicious smoky flavor.
- Install a side table or workspace: Having a side table or workspace next to your pizza oven will make it more convenient and functional for preparing and serving your pizzas.
- Add a light or built-in LED lighting: If you like to cook pizzas in the evening or at night, adding a light or built-in LED lighting to your pizza oven will make it easier to see what you're cooking.
- Install a wood storage compartment: To keep your firewood organized and easily accessible, you can add a wood storage compartment to your pizza oven.
By adding these additional features to your outdoor pizza oven, you can enhance your cooking experience and make your outdoor kitchen more versatile and functional.
How to create a custom pizza stone for an outdoor pizza oven?
To create a custom pizza stone for an outdoor pizza oven, you will need the following materials:
- Unglazed ceramic tile or unglazed quarry tiles (make sure they are food-safe)
- Tape measure
- Pencil
- Tile cutter or tile nipper
- Oven to heat the tiles
Here are the steps to create a custom pizza stone:
- Measure the dimensions of your outdoor pizza oven where the pizza stone will be placed. Make sure to leave some space around the edges for airflow.
- Use the tape measure and pencil to mark the dimensions on the ceramic tiles. If you need to cut the tiles to fit the dimensions, use a tile cutter or nipper to cut the tiles accordingly.
- Once you have all your tiles cut and ready, preheat your oven to the highest setting (usually around 500-550 degrees Fahrenheit).
- Arrange the tiles in the oven to create the pizza stone. Make sure they fit securely together, leaving no gaps in between the tiles.
- Place the tiles in the preheated oven and let them heat up for at least 30 minutes to 1 hour. This will help the tiles to absorb and distribute heat evenly, creating a perfect pizza stone.
- Once the tiles are heated through, carefully remove them from the oven using oven mitts or heat-resistant gloves. Place them in your outdoor pizza oven, making sure they are secure and level.
- Your custom pizza stone is now ready to use! Preheat your outdoor pizza oven and start making delicious homemade pizzas.
Remember to handle the hot tiles carefully and always use heat-resistant gloves when moving them. With your custom pizza stone, you can now enjoy restaurant-quality pizza right in your own backyard.
How to reinforce the structure of an outdoor pizza oven for customization?
- Use sturdy materials: When building or customizing an outdoor pizza oven, make sure to use strong, durable materials that can withstand high heat and weather conditions. Common materials for outdoor pizza ovens include brick, concrete, and stone.
- Reinforce the base: The foundation of the pizza oven is crucial for its stability and longevity. Use reinforced concrete or brickwork to create a solid base that can support the weight of the oven and withstand the heat from the fire.
- Include additional supports: Depending on the size and design of the pizza oven, you may need to add additional supports such as metal brackets or bars to reinforce the structure and prevent it from shifting or collapsing.
- Seal any cracks or gaps: To ensure that your outdoor pizza oven is properly insulated and retains heat efficiently, seal any cracks or gaps in the structure with high-temperature mortar or caulk.
- Consider adding a metal dome: If you want to customize your outdoor pizza oven with a unique design or shape, you can consider adding a metal dome on top of the structure for added reinforcement and insulation.
- Consult with a professional: If you are unsure about how to reinforce the structure of your outdoor pizza oven for customization, it is always a good idea to consult with a professional contractor or builder who has experience with outdoor fireplace and oven construction. They can offer expert advice and guidance on how to reinforce the structure properly.
What safety precautions should be taken when customizing an outdoor pizza oven?
When customizing an outdoor pizza oven, it is important to take the following safety precautions:
- Wear appropriate protective gear, such as gloves and eye protection, to prevent injury while working with hot materials.
- Make sure the oven is completely cool before starting any customization work to avoid the risk of burns.
- Use heat-resistant materials and products that are specifically designed for outdoor use to prevent damage to the oven.
- Follow the manufacturer's guidelines and instructions for customizing the oven to ensure it remains safe and functional.
- Avoid using flammable materials or finishes that can pose a fire hazard when exposed to high temperatures.
- Take precautions to prevent any modifications from interfering with the proper ventilation and airflow of the oven.
- Regularly inspect and maintain the customized parts to ensure they are in good condition and do not pose any safety risks.
By following these safety precautions, you can customize your outdoor pizza oven while ensuring the safety of yourself and others.
What is the best way to weatherproof an outdoor pizza oven after customization?
The best way to weatherproof an outdoor pizza oven after customization is to use a high-quality weatherproofing sealant or paint specifically designed for outdoor use. Make sure to thoroughly clean and dry the surface of the oven before applying the sealant or paint. Apply multiple coats as directed by the manufacturer, making sure to cover all surfaces, seams, and joints to prevent water from seeping in. Additionally, consider investing in a protective cover to keep the oven dry and protected from the elements when not in use. Regular maintenance and touch-ups as needed will help to prolong the life of your customized outdoor pizza oven.
What is the process of adding a built-in thermometer to an outdoor pizza oven?
- Choose the right thermometer: Before adding a built-in thermometer to your outdoor pizza oven, you need to select the right thermometer that can withstand high temperatures. An oven thermometer with a temperature range of at least 500 degrees Fahrenheit is recommended for pizza ovens.
- Select the location: Decide where you want to install the thermometer on your outdoor pizza oven. Choose a spot that is easily visible and accessible while cooking.
- Drill a hole: Using a drill with the appropriate bit size, carefully drill a hole in the chosen location on the pizza oven to accommodate the thermometer probe.
- Install the thermometer: Insert the probe of the thermometer through the hole you drilled in the pizza oven. Make sure the thermometer is securely in place.
- Seal the hole: To prevent heat loss and ensure proper functioning of the thermometer, seal the hole around the probe with high-temperature silicone sealant.
- Test the thermometer: Once installed, test the thermometer to ensure it is accurately measuring the temperature inside the pizza oven. You can do this by comparing the reading on the built-in thermometer with an external thermometer placed inside the oven.
- Adjust if necessary: If the built-in thermometer is not reading accurately, you may need to calibrate it or make adjustments to ensure it provides an accurate temperature reading.
- Enjoy cooking with your new built-in thermometer: With the thermometer installed, you can now monitor and control the temperature of your outdoor pizza oven more effectively, resulting in perfectly cooked pizzas every time.