
Best Deck Boxes for Tool Storage to Buy in July 2026
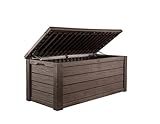
Keter Westwood 150 Gallon Deck Box Organizer, Doubles as 2-Person Bench Seat, Brown – Large Resin Outdoor Storage and Seating with Lockable Lid for Garden, Pool, and Patio
- STYLISH & FUNCTIONAL SEATING: FITS 2 ADULTS COMFORTABLY!
- STURDY 150-GALLON STORAGE: PERFECT FOR CUSHIONS AND POOL FLOATS.
- DURABLE, WEATHER-RESISTANT DESIGN: ENJOY LOW-MAINTENANCE USE!


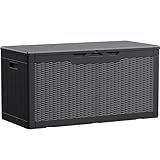
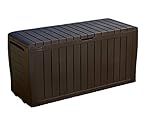
Devoko 100 Gallon Waterproof Large Resin Deck Box Indoor Outdoor Lockable Storage Container for Patio Furniture Cushions Garden Tools (100 Gallon, Black)
-
STYLISH ALL-WEATHER WICKER DESIGN ENHANCES ANY OUTDOOR SPACE.
-
GENEROUS 100-GALLON CAPACITY FOR VERSATILE INDOOR/OUTDOOR STORAGE.
-
DURABLE, WEATHER-RESISTANT MATERIALS ENSURE LONG-LASTING USE.
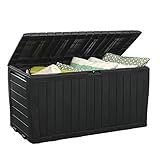
Keter Marvel Plus 71 Gallon Resin Deck Box-Organization and Storage for Patio Furniture Outdoor Cushions, Throw Pillows, Garden Tools and Pool Toys, Dark Grey
- IDEAL 71-GALLON CAPACITY FOR ALL YOUR OUTDOOR STORAGE NEEDS!
- DURABLE RESIN CONSTRUCTION: NO RUST OR PEELING LIKE REAL WOOD!
- EXTRA SEATING FOR GUESTS, HOLDS UP TO 485 LBS COMFORTABLY!
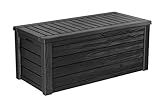
Keter Westwood 150 Gallon Resin Large Outdoor Storage Box for Patio Furniture, Outdoor Cushions, Garden Tools and Pool Floats, Dark Grey
-
VERSATILE 150-GALLON CAPACITY: STORE CUSHIONS, TOYS, AND SIT 2 ADULTS.
-
STYLISH & DURABLE DESIGN: ATTRACTIVE WOOD-PLANK LOOK WITH ROBUST RESIN.
-
ALL-WEATHER RESISTANT: LOW MAINTENANCE, RUST-FREE, AND BUILT TO LAST.
Keter Marvel Plus 71 Gallon Resin Outdoor Storage Box for Patio Furniture Cushions, Throw Pillows, Garden Tools and Pool Floats, Brown
- GENEROUS 71-GALLON CAPACITY FOR ALL YOUR OUTDOOR STORAGE NEEDS.
- WEATHER-RESISTANT RESIN ENSURES DURABILITY AND LOW MAINTENANCE.
- DUAL FUNCTION: EXTRA SEATING FOR UP TO 485 LBS WITH STYLISH DESIGN.

Keter Kentwood 92 Gallon Resin Deck Box-Organization and Storage for Patio Furniture Outdoor Cushions, Throw Pillows, Garden Tools and Pool Floats, Brown
-
SPACIOUS 92-GALLON STORAGE FOR ALL YOUR OUTDOOR ESSENTIALS!
-
DURABLE RESIN DESIGN RESISTS RUST, FADING, AND DENTS EFFORTLESSLY.
-
COMFORTABLE BENCH SEATING SUPPORTS UP TO 573 LBS FOR GATHERINGS!
Yes, you can store tools in a deck box, as it provides a convenient and organized way to keep them protected from the elements. Deck boxes are typically weather-resistant, offering a shield against rain, snow, and sunlight, which helps in preventing rust and damage to the tools. Additionally, they can help keep your outdoor space tidy and free from clutter while providing easy access to your tools whenever needed. However, it's important to ensure that the deck box is sturdy and secure enough to handle the weight and bulk of the tools you plan to store, and organizing the tools inside the box in a safe manner is also crucial to prevent any accidents or damage.
What is the average cost of a deck box?
The average cost of a deck box can vary widely depending on size, material, quality, and brand. As of the most recent data, you can expect to pay anywhere from $50 to $300 for a deck box.
- Smaller plastic deck boxes might be on the lower end of the price range, around $50 to $100.
- Mid-sized or higher-quality resin or wooden deck boxes might cost between $100 and $200.
- Larger, high-end, or designer models could range from $200 to $300 or more.
It's best to check current prices on popular retail websites or local stores to get an accurate idea, as prices can fluctuate over time and with sales.
How to label tools in a deck box?
Labeling tools in a deck box can help you keep organized and find what you need quickly. Here are some steps and tips to effectively label your tools:
- Sort and Categorize: Before labeling, sort your tools into categories. Group similar items together, like gardening tools, repair tools, cleaning supplies, etc.
- Choose a Labeling Method: Decide on the type of labels you want to use. Options include: Stick-On Labels: Write directly or use a label maker for a neat appearance. Tag Labels: Use tags tied to tools for items that don’t lend themselves to stick-on labels. Magnetic Labels: Useful if the deck box has a magnetic surface. Chalkboard or Dry Erase Labels: For labels that you might change frequently.
- Label Each Section: If your deck box has compartments or dividers, label each section. For example, label sections as “Gardening Tools,” “Cleaning Supplies,” etc.
- Use Clear Description: Be specific with your labels. Instead of just “Gardening,” list items like “Hand Trowels and Pruners.”
- Consider Color Coding: Use different colored labels for different categories to make it visually easier to identify specific tools quickly.
- Waterproof Options: Since the deck box might be exposed to moisture, choose waterproof or weather-resistant labels to prevent them from peeling or becoming illegible.
- Inventory List: Consider creating an inventory list attached or placed inside the lid of the deck box. This can help you know what should be there and identify missing items.
- Regular Updates: Periodically check and update labels as your tool collection changes. Ensure all labels remain accurate and legible.
Following these steps can help you maintain an organized system for your tools in a deck box, making your outdoor tasks more efficient and enjoyable.
How to prevent mold in a deck box?
Preventing mold in a deck box involves a combination of moisture control, proper ventilation, and regular maintenance. Here are some steps you can take:
- Choose the Right Material: Opt for a deck box made from materials that resist mold growth, such as plastic, resin, or treated wood. These materials are less prone to absorbing moisture compared to untreated wood.
- Proper Placement: Position the deck box in a location where it gets adequate sunlight and airflow, which can help reduce moisture buildup. Avoid placing it directly on the ground; instead, use a stand or place it on pavers to enhance air circulation underneath.
- Weatherproofing: If your deck box is made of wood, apply a waterproof sealant to protect it from excess moisture. Make sure the box is designed to be weather-resistant, with tight-fitting lids and sealed joints.
- Ventilation: Ensure the box has adequate ventilation. You can drill small holes (away from water exposure) to promote airflow, but ensure these do not compromise the box’s watertight integrity.
- Moisture Absorbers: Use silica gel packs, charcoal briquettes, or other moisture absorbers inside the box to help keep humidity levels down. Replace or recharge them regularly as needed.
- Regular Cleaning: Keep the deck box clean and dry. Regularly wipe the interior with a dry cloth and occasionally clean it with a mild bleach solution to kill any early mold spores.
- Cover When Not in Use: Use a waterproof cover to protect the deck box from rain but ensure it isn't sealed too tightly to prevent moisture from getting trapped inside.
- Dry Items Before Storing: Ensure that items are completely dry before placing them in the deck box. Damp or wet items can introduce moisture that promotes mold growth.
- Periodic Checks: Regularly inspect the box for signs of mold or moisture and address issues immediately if found. Early intervention can prevent more significant problems later on.
By following these tips, you can help prevent mold from developing in your deck box and ensure that it lasts longer in good condition.
How to paint a deck box?
Painting a deck box can be a great way to refresh its appearance and protect it from the elements. Here's a step-by-step guide on how to do it:
Materials Needed:
- Deck box
- Sandpaper (medium and fine grit)
- Screwdriver (if disassembly is needed)
- Drop cloth or tarp
- Painter’s tape
- Primer (suitable for the material of your deck box)
- Exterior paint (also suitable for the material)
- Paintbrushes or a paint sprayer
- Paint roller (optional)
- Respirator mask (recommended for sanding and spraying)
- Protective gloves
- Cleaning solution (mild detergent or a specialized cleaner, depending on material)
- Water hose or bucket of water
Steps:
- Preparation: Empty the Box: Remove all contents. Disassemble (if possible): Remove any hardware or components that can be taken apart easily, such as lids or wheels, to make painting easier. Clean the Surface: Wash the deck box thoroughly with a mild detergent and water to remove dirt, cobwebs, and any other debris. For stubborn stains or buildup, a specialized cleaner may be needed. Allow it to dry completely.
- Sanding: Sand the Surface: Lightly sand all surfaces of the deck box with medium-grit sandpaper to remove old paint, rough edges, and create a texture for the primer to adhere to. Finish with fine-grit sandpaper for a smooth finish. Wipe Clean: Remove any dust from sanding with a damp cloth. Ensure the box is dry before proceeding.
- Set Up the Work Area: Place a Drop Cloth: Lay down a drop cloth or tarp where you plan to paint to protect the surrounding area. Use Painter's Tape: Cover any areas you don’t want painted, such as handles or hardware, with painter’s tape.
- Priming: Choose the Right Primer: Use a primer that is appropriate for the material of your deck box, such as a wood primer for wooden boxes, or plastic primer for plastic ones. Metal boxes may require a rust-inhibiting primer. Apply Primer: Use a paintbrush, roller, or sprayer to apply an even coat of primer to the surfaces. Follow the manufacturer’s instructions regarding drying times.
- Painting: Choose the Right Paint: An exterior paint that suits the material of your deck box is recommended. For best results, look for paint with UV protection to withstand sun exposure. Apply Paint: Start by painting corners and edges with a brush, then use a roller or sprayer for larger surfaces to ensure an even finish. Multiple Coats: Depending on the color and type of paint, you may need 2-3 coats. Allow each coat to dry as per the manufacturer's recommendations before applying the next one.
- Finishing Touches: Remove Painter’s Tape: Carefully remove the painter’s tape before the final coat has fully dried to prevent peeling. Reassemble: Once the paint is fully dry, reattach any hardware or components you removed earlier. Cure Time: Allow the paint to cure fully according to the paint manufacturer's instructions before placing items back inside the deck box or exposing it to harsh weather.
By following these steps, you'll ensure a thorough and professional-looking paint job that will enhance both the appearance and durability of your deck box.
What is the best method to lock a deck box?
Locking a deck box can be done effectively using several methods, depending on the level of security you need and the materials you're working with. Here are some options:
- Padlock and Hasps: Attach hasps to the deck box if it doesn't already have them. Choose a sturdy padlock that fits the hasp. Ensure that the hasps are installed securely to prevent them from being pried off.
- Combination Lock: Some deck boxes come with built-in combination locks. If yours doesn’t, you can attach a combination padlock to hasps. This eliminates the need for a key and can be convenient if multiple people need access.
- Cable Lock: For plastic or resin deck boxes that can be easily cut open, consider using a cable lock. Loop the cable through the handles (if available) or any holes that won’t damage the contents, and secure it with a padlock.
- Built-in Locking Mechanism: Some deck boxes are designed with built-in locking mechanisms. If security is a key concern, investing in such a model could be worthwhile.
- U-Lock or D-Lock: Use a U-lock, like those used for bicycles, to secure the lid to the body of the deck box. This can be an effective deterrent against theft.
- Security Brackets or Anchor Points: Install security brackets or anchor points into the deck or patio surface. Use chains or cables to secure the deck box to these points using a padlock.
When choosing a locking method, consider factors like the material of your deck box, the risk of theft in your area, and how often you'll need to access the contents. Additionally, consult with the manufacturer's guidelines to ensure compatibility with any locking hardware you choose.