
Best Windows for Storage Sheds to Buy in July 2026
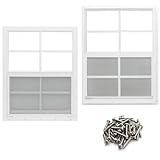
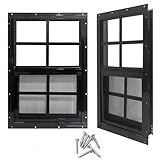
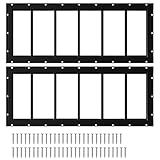
NeatiEase 2 Pack Shed Window, 24" x 36" Flush Mount Window with Tempered Glass and Fiberglass Screen for Shed, Chicken Coop, Playhouse, Household, Garage
-
DURABLE ALL-WEATHER DESIGN: SOLID ALUMINUM & TEMPERED GLASS ENSURE LONGEVITY.
-
MULTIFUNCTIONAL VENTILATION: ENJOY AIRFLOW WHILE KEEPING BUGS OUT EFFORTLESSLY.
-
EASY DIY INSTALLATION: INCLUDES MATCHING SCREWS FOR A QUICK AND SIMPLE SETUP.


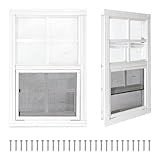
COLORPAPA 2 Pack Shed Windows,12" x 18" Small Sliding Windows,Flush Mount Windows with Tempered Glass and Fiberglass Screen for Shed, Chicken Coop, Playhouse, Household, Garage, Barns (White)
- DURABLE ALUMINUM FRAME & TEMPERED GLASS FOR ALL WEATHER CONDITIONS.
- ENJOY VENTILATION & SUNLIGHT WHILE KEEPING BUGS OUT WITH BUILT-IN SCREENS.
- SEAMLESS FLUSH MOUNT DESIGN FOR EASY INSTALLATION IN VARIOUS BUILDS.
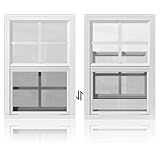
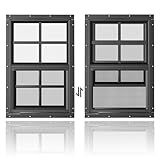
WRISIN 2 Pack Shed Windows 18" W x 27" H Flush Mount, White Household Windows for Playhouses, Barns, Chicken Coop
- STYLISH UPGRADE FOR SHEDS: ENHANCE AESTHETICS WITH OUR SLEEK DESIGNS.
- SUPERIOR VENTILATION: ENJOY ADJUSTABLE AIRFLOW AND NATURAL LIGHT EASILY.
- DURABLE TEMPERED GLASS: SHATTER-RESISTANT FOR SAFETY AND LONG-LASTING USE.
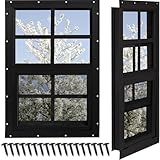
NOTASA Shed Windows 2 Pack, Chicken Coop Windows 12" x 18" with Tempered Glass and Fiberglass Screen, Flush Mounted Small Window for Shed, Barns, Playhouse, Household, Garage (Black)
- DURABLE ALUMINUM AND TOUGHENED GLASS FOR LONG-LASTING PERFORMANCE.
- BUILT-IN SCREENS ENSURE VENTILATION WHILE KEEPING BUGS OUT.
- EASY INSTALLATION WITH INCLUDED ACCESSORIES AND DETAILED INSTRUCTIONS.
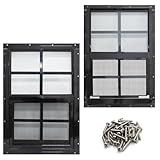
NeatiEase 2 Pack Shed Windows with Black Frame, 24 x 36 Flush Mount Small Window with Tempered Glass and Fiberglass Screen for Shed, Chicken Coop, Playhouse, Household, Garage
-
DURABLE CONSTRUCTION: BUILT WITH HEAVY-DUTY MATERIALS FOR ALL-WEATHER DURABILITY.
-
VERSATILE USE: IDEAL FOR SHEDS, COOPS, PLAYHOUSES, AND GARAGES.
-
HASSLE-FREE INSTALLATION: FLUSH MOUNT DESIGN WITH EASY DIY SETUP INCLUDED.
WRISIN 2 Pack Shed Windows 24" x 36" H Flush Mount, White Household Windows for Playhouses, Barns, Chicken Coop
- STYLISH DESIGN: ENHANCE SHED AESTHETICS WITH OUR ELEGANT SLIDING WINDOWS.
- ADJUSTABLE VENTILATION: OPTIMIZE AIRFLOW AND NATURAL LIGHT EFFORTLESSLY.
- DURABLE & SAFE: SHATTER-RESISTANT TEMPERED GLASS ENSURES LONG-LASTING USE.
COLORPAPA 2 Pack Shed Windows,12" x 18" Small Sliding Windows,Flush Mount Windows with Tempered Glass and Fiberglass Screen for Shed, Chicken Coop, Playhouse, Household, Garage, Barns (Black)
-
DURABLE ALUMINUM AND GLASS DESIGN WITHSTANDS ALL WEATHER CONDITIONS.
-
ENJOY NATURAL LIGHT AND AIR FLOW WHILE KEEPING BUGS OUT EFFORTLESSLY.
-
EASY FLUSH MOUNT INSTALLATION WITH INCLUDED SCREWS FOR QUICK SETUP.
Yuzzy 24" x 36" Shed Windows with Tempered Glass and Fiberglass Screen, 2 Pack Small Sliding Windows for Shed, Chicken Coop, Playhouse, Household, Garage, Barns (Black)
- UNMATCHED DURABILITY: LIGHTER, STRONGER TEMPERED GLASS RESISTS BREAKING.
- OPTIMAL VENTILATION: ENJOY FRESH AIR WITH BUG-PROOF SCREENED WINDOWS.
- EASY INSTALLATION: VERSATILE DESIGN FITS SHEDS, COOPS, AND GARAGES SEAMLESSLY.
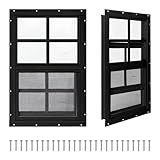
NeatiEase 2 Pack Shed Windows 10"x35", Transom Window Fixed Design with Tempered Glass for Playhouses, Sheds, Garage and Chicken Coops (Black)
- DURABLE DESIGN: WEATHERPROOF SHED WINDOWS WITH TOUGH TEMPERED GLASS.
- VERSATILE USE: IDEAL FOR SHEDS, COOPS, GARAGES, AND MORE!
- HASSLE-FREE SETUP: EASY INSTALLATION WITH ALL NECESSARY HARDWARE INCLUDED.
WRISIN 2 Pack Shed Windows 14" W x 21" H Flush Mount, Black Household Windows for Playhouses, Barns, Chicken Coop
- STYLISH DESIGN: ENHANCE YOUR SHEDS WITH ATTRACTIVE, FUNCTIONAL WINDOWS.
- ADJUSTABLE VENTILATION: ENJOY FRESH AIR AND NATURAL LIGHT IN ANY SPACE.
- DURABLE & SAFE: SHATTER-RESISTANT TEMPERED GLASS ENSURES LASTING SAFETY.
Yes, you can add windows to a storage shed, and doing so can have several benefits. Adding windows can enhance the ventilation and natural light within the shed, making it more comfortable and functional. The process involves selecting appropriate windows that fit the design and structure of your shed. You will need to cut openings into the shed's walls, ensuring they are properly framed and braced to maintain structural integrity. It's important to consider the material of the shed when choosing installation techniques-whether it's wood, metal, or plastic-as each may require different tools and methods. Proper sealing and weatherproofing around the windows are essential to prevent leaks and improve insulation. If you lack the necessary skills or tools, consulting with or hiring a professional can help ensure the windows are correctly installed and aligned with local building codes.
What is the effect of window placement on shed temperature?
The placement of windows significantly affects the temperature and overall climate inside a shed. Here are a few key ways through which window placement can impact shed temperature:
- Sunlight Exposure: South-Facing Windows: These often receive the most consistent sunlight throughout the day, which can significantly increase the internal temperature, especially in warmer months. East-Facing Windows: They capture morning sunlight, which can warm the shed early in the day. This can be beneficial for warming the space after cool nights. West-Facing Windows: These receive intense afternoon sunlight, potentially causing the shed to overheat in the late afternoon and evening. North-Facing Windows: They receive the least direct sunlight, providing more consistent, cooler lighting. They are ideal if you want to minimize heat gain.
- Ventilation and Airflow: Properly placed windows can enhance cross-ventilation, cooling the shed by allowing hot air to escape and cooler air to enter. For effective ventilation, windows should be placed on opposite sides or adjacent walls.
- Insulation and Heat Retention: Windows can be a source of heat loss during colder periods. Strategic placement and the use of double-glazed or insulated windows can help retain heat.
- Glare and UV Exposure: The intensity of sunlight through certain window placements can lead to glare and UV exposure, affecting both temperature and object durability inside the shed.
- Shading: Windows placed under the shade of trees or alongside overhangs will contribute less to heat gain. External shading devices like awnings can also be used to control sunlight exposure.
- Size and Number of Windows: Larger windows or more numerous windows increase exposure to sunlight and potential heat gain. The design should balance natural light with thermal comfort.
Optimizing window placement requires consideration of the shed’s intended use, regional climate, and sun path throughout the year. Incorporating adjustable shading or incorporating operable windows can provide flexibility to control the internal environment according to seasonal changes.
How to enhance shed security after installing windows?
Enhancing the security of a shed after installing windows involves taking several steps to deter potential intruders and protect your belongings. Here are some effective strategies to consider:
- Reinforced Glass Options: Use laminated or reinforced glass for your shed windows. These materials are more resistant to breakage compared to standard glass.
- Window Locks: Install locks on all windows to prevent them from being opened from the outside. Choose high-quality locks that are difficult to tamper with.
- Security Bars or Grilles: Consider installing metal bars or decorative grilles on the inside of your windows. These provide an additional physical barrier.
- Window Film: Apply security film to the windows. This film helps hold glass together in the event of a break, making it harder to penetrate.
- Motion Sensor Lights: Install exterior motion sensor lights around your shed. Bright lighting can deter potential intruders and increase visibility at night.
- Alarm Systems: Set up an alarm system specifically for your shed. You can choose from a variety of options, including those that integrate with smart home systems.
- CCTV Cameras: Install security cameras around your shed, focusing on entry points like doors and windows. Ensure they cover all potential access points.
- Obscuring Views: Use frosted or decorative window films to obscure the view into your shed. This prevents intruders from seeing inside.
- Keep Windows Covered: Install blinds, curtains, or shades that you can close when the shed is not in use. This prevents anyone from peeking in.
- Bushes and Landscaping: Trim any bushes or landscaping near your shed windows. This removes hiding spots and makes it harder for intruders to approach unnoticed.
- Secure the Perimeter: Install a fence or hedge around your property or at least around the shed. This creates an additional barrier that intruders must overcome.
- Neighborhood Watch: Engage with your local neighborhood watch group, if available, to keep an eye on suspicious activities.
- Regular Maintenance: Regularly check the windows and their locks for any signs of wear or damage and address any issues promptly.
By implementing these measures, you can significantly improve the security of your shed even after installing windows, providing peace of mind that your belongings are well-protected.
How to incorporate decorative window trims in a shed?
Incorporating decorative window trims in a shed can enhance its appearance and add architectural interest. Here’s a step-by-step guide to help you adorn your shed’s windows:
- Choose the Style: Consider the overall design of your shed and select trims that complement the style. Popular styles include classic, rustic, Victorian, or modern. Decide on materials such as wood, PVC, or composite materials that suit your aesthetic and weather conditions.
- Measure the Windows: Accurately measure the dimensions of each window to ensure your trims fit perfectly. Take height, width, and depth measurements, accounting for any existing frames.
- Select Your Trim Design: Design trims can include simple flat boards, ornate moldings, or layered combinations. You can add additional details such as pediments, keystones, or rosettes for a more decorative look.
- Gather Materials and Tools: Purchase the trim materials based on your measurements. Gather necessary tools such as a saw, measuring tape, nails/screws, level, caulk, paint or stain, and paintbrushes.
- Cut the Trim Pieces: Carefully cut the trim pieces to size using a miter saw for precise angled cuts, especially if creating a frame. Double-check each piece for fit before proceeding to installation.
- Assemble the Trim on a Flat Surface: Lay out the trim pieces on a flat surface to ensure they align correctly. Pre-drill any necessary holes to prevent splitting when securing the pieces together.
- Install the Trim: Start by attaching the bottom piece (sill), then the side pieces, and finally the top piece (header). Use a level to ensure each piece is straight as you attach it to the window frame using nails or screws. If the shed’s wall surface is uneven, use shims to adjust the trim alignment.
- Seal and Finish: Apply caulk along the edges of the trim to seal any gaps and protect against moisture infiltration. Sand down any rough surfaces and paint or stain the trims as desired, allowing each coat to dry thoroughly.
- Add Final Touches: If adding additional decorative elements like shutters or flower boxes, ensure they match the trim style and install them once the trim is secure. Maintain the appearance and protection of your trims by performing regular maintenance like repainting or sealing as needed.
These steps will help you create attractive, functional window trims that enhance the look of your shed while adding to its charm and character.