
Best Outdoor Storage Sheds with Windows to Buy in July 2026

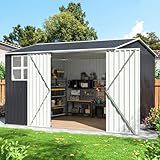
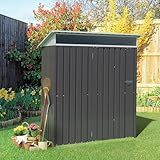
YADSUNY 10x8 FT Outdoor Storage Shed, Metal Garden Tool Shed with Updated Frame Structure and Lockable Doors, Ideal for Backyard Garden Patio Lawn, Grey
-
SUPERIOR GALVANIZED STEEL ENSURES WEATHER-RESISTANT, LONG-LASTING DURABILITY.
-
EASY ASSEMBLY: 35% EASIER SETUP FOR A HASSLE-FREE INSTALLATION EXPERIENCE.
-
EXPANSIVE 94.9D X 122.2W STORAGE: ORGANIZE TOOLS AND OUTDOOR ESSENTIALS.


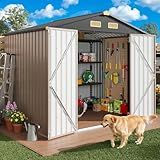
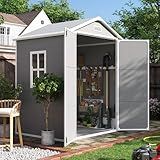
DAUSOLA 10x10 FT Outdoor Storage Shed, Metal Garden Tool Shed with Updated Frame Structure, Lockable Doors and Windows, Ideal for Backyard Garden Patio Lawn, Grey
- DURABLE GALVANIZED STEEL: RUST-RESISTANT, WATERPROOF, YEAR-ROUND USE.
- EASY ASSEMBLY WITH A REINFORCED STRUCTURE; 35% FASTER SETUP.
- AMPLE ORGANIZED STORAGE WITH SECURE DESIGN AND BUILT-IN VENTILATION.
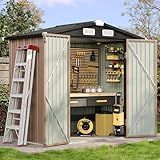
IRONCK 8x6FT Outdoor Storage Shed with Lockable Doors, 7.4x5.3FT Base Galvanized Steel Metal Garden Tool Shed with Breathable Vent for Yard Bins/Generator/Wheelbarrow Storage, Brown
-
DURABLE GALVANIZED STEEL: BUILT TO WITHSTAND ANY WEATHER CONDITIONS.
-
SPACIOUS & VERSATILE DESIGN: ORGANIZE TOOLS OR CREATE COZY PET HOMES.
-
EASY ASSEMBLY: PRE-DRILLED PARTS AND GUIDES FOR A HASSLE-FREE SETUP.
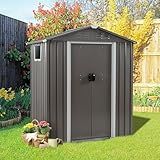
Aoxun 6.2x4 FT Shed Outdoor Storage Shed with Lockable Doors & Slooping Roof Metal Garden Tool Shed for Backyard, Patio, Poolside (Brown)
-
BUILT TO LAST: STURDY GALVANIZED STEEL CONSTRUCTION WITHSTANDS HARSH WEATHER.
-
FLEXIBLE USE: PERFECT FOR GARDEN STORAGE, PET SHELTER, OR GARBAGE ENCLOSURE.
-
EASY ASSEMBLY: CLEAR INSTRUCTIONS ENSURE A STRAIGHTFORWARD SETUP PROCESS.

Aoxun 10 x 12FT Outdoor Storage Shed with Double Hinged Large Door Utility Garden Shed with Lockable Door & Sloped Roof Metal Sheds Outdoor Storage for Garden, Backyard, Patio and Backyard, Brown
-
MAXIMIZE STORAGE: GENEROUSLY SIZED FOR SHOVELS, BIKES, AND TOYS.
-
DURABLE & SECURE: THICK-GAUGE STEEL PROTECTS YOUR VALUABLES FROM ELEMENTS.
-
VERSATILE USAGE: IDEAL FOR GARDENING TOOLS, PATIO FURNITURE, AND MORE!
Vongrasig 5 x 3 x 6 FT Outdoor Storage Shed, Metal Tool Shed Clearance Garden Steel Shed with Side Window and Lockable Door Waterproof Tool Shed for Backyard Patio, Lawn (Gray)
- WEATHER-RESISTANT DESIGN ENSURES DURABILITY AGAINST RUST AND ROT.
- BRIGHT WINDOW AND VENTS CREATE A COMFORTABLE, WELL-LIT STORAGE SPACE.
- VERSATILE SHED FOR TOOLS OR AS A COZY PET HOUSE IN YOUR BACKYARD.
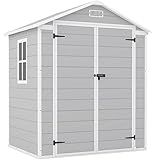
Patiowell 6x4 FT Plastic Outdoor Storage Shed, Resin Outside Shed Perfect to Store Patio Furniture, GardenTools Bike Accessories, Beach Chairs and Lawn Mower, Light Grey
-
WEATHERPROOF DURABILITY: PROTECTS YOUR BELONGINGS YEAR-ROUND WITH ROBUST RESIN.
-
SPACIOUS & VERSATILE: 6X4FT DESIGN MAXIMIZES STORAGE FOR ALL OUTDOOR NEEDS.
-
EASY MAINTENANCE: WATERPROOF AND EASY-TO-CLEAN SURFACES FOR EFFORTLESS CARE.
Vongrasig 5 x 3 x 6 FT Outdoor Storage Shed Clearance, Metal Garden Shed with Large Window and Lockable Door, Anti-Corrosion Waterproof Tool Shed for Backyard Patio, Lawn (Dark Gray)
-
WEATHER-RESISTANT STEEL DESIGN: NO RUST OR ROT, PERFECT FOR ALL SEASONS.
-
BRIGHT, AIRY INTERIOR: LARGE WINDOW AND VENTS ENSURE COMFORT AND VISIBILITY.
-
VERSATILE STORAGE SOLUTIONS: IDEAL FOR TOOLS, PETS, AND VARIOUS OUTDOOR NEEDS.
UDPATIO Outdoor Resin Storage Shed 6x4.5 FT, Plastic Garden Shed for Bike, Garbage Can, Tool, Outside Sheds with Lockable Door for Backyard, Patio, Lawn, Grey & White
- SPACIOUS 6'X4.5' DESIGN: PERFECT FOR TOOLS, GEAR, AND EVEN PETS!
- DURABLE RESIN MATERIAL: WEATHERPROOF, RUSTPROOF, ECO-FRIENDLY STORAGE.
- EASY ASSEMBLY: QUICK SETUP WITH CLEAR INSTRUCTIONS IN 3-5 HOURS!
Outdoor storage sheds with windows come in a variety of sizes to accommodate different needs and preferences. Common sizes range from small, compact units, like those around 6x8 feet, which are ideal for storing gardening tools and smaller equipment, to larger options, like 10x12 feet or even more expansive 12x16 feet models, which can store larger items including bicycles, lawnmowers, or even serve as a workshop space. Some manufacturers also offer custom sizing, allowing consumers to select dimensions that perfectly fit their available outdoor area and usage requirements. These variations provide flexibility in terms of both storage capacity and the aesthetic integration of the shed with existing outdoor spaces.
How to enhance a storage shed with landscaping?
Enhancing a storage shed with landscaping can transform it from a simple utility structure into an attractive garden feature. Here are some ideas to get you started:
- Foundation Plantings: Plant shrubs or flowers around the base of your shed to integrate it with the landscape. Choose plants that complement the style and color of your shed, considering height and bloom time for variety. Evergreen shrubs can provide year-round interest.
- Pathways: Create a pathway leading to the shed using stones, bricks, or gravel. This not only provides easy access but also makes the shed a focal point. Consider using stepping stones interplanted with groundcovers for a softer look.
- Climbing Plants: Add trellises or arbors near the shed and plant climbing vines such as clematis, wisteria, or climbing roses to soften the walls and add vertical interest.
- Window Boxes: If your shed has windows, add window boxes planted with colorful flowers or trailing plants like ivy. This can give the shed a cottage-like charm.
- Perennial Borders: Create a border of perennials around the shed for seasonal color. Use a mix of heights, colors, and textures, and include some fragrant plants to make the area more inviting.
- Mulching and Edging: Use mulch around the base of plantings to help retain moisture and reduce weeds. Define borders with edging materials like stone, brick, or metal to give a neat finish.
- Lighting: Install lighting along pathways or around the shed to highlight it in the evening and create a welcoming glow. Solar-powered lights are a convenient and energy-efficient option.
- Water Feature: If space and budget permit, consider adding a small water feature nearby, such as a fountain or birdbath, to enhance the area further and attract wildlife.
- Decorative Elements: Incorporate decorative items like garden statues, birdhouses, or a weather vane on the shed's roof to add personal touches and whimsy.
- Seating Area: If space allows, add a small patio or seating area adjacent to the shed. This can transform it into a garden retreat where you can relax and enjoy the surroundings.
- Paint and Trim: Consider painting the shed in colors that blend with your garden or make it stand out as a feature. Use contrasting trim for a polished look.
By using these strategies, you can create an appealing landscape that enhances the functionality and aesthetics of your storage shed.
How to prevent mold in outdoor storage sheds?
Preventing mold in outdoor storage sheds involves controlling moisture levels and ensuring good air circulation. Here are some tips to help prevent mold growth:
- Proper Ventilation: Ensure your shed has adequate ventilation. Install vents or windows that can be opened to allow air circulation and reduce humidity.
- Dehumidifier: If electricity is available, consider using a dehumidifier to control indoor moisture levels, especially during humid seasons.
- Moisture Barrier: Use a moisture barrier, such as a tarp or heavy plastic sheet, on the ground before placing your shed. This can help prevent moisture from the ground from seeping into the shed.
- Elevate the Floor: Position your shed off the ground by using a raised platform or concrete blocks to prevent water from pooling underneath.
- Regular Maintenance: Routinely check for leaks in the roof and walls, and repair them promptly to prevent water ingress.
- Seal Cracks and Gaps: Seal any cracks or gaps in the shed’s walls and roof to prevent water from entering, especially after rain.
- Water Drainage: Ensure proper drainage around the shed. Avoid letting water pool near the foundation by grading the area so water flows away from the shed.
- Use Mold-Resistant Products: Consider using mold-resistant paint or coating on the interior walls and ceiling of the shed.
- Limit Organic Material: Store only clean, dry items in your shed and limit materials that can feed mold, such as cardboard or paper.
- Regular Cleaning and Inspection: Regularly clean and inspect your shed for signs of mold or mildew, and address issues immediately if they are found.
Implementing these strategies will help create an environment less hospitable to mold, keeping your shed and its contents dry and in good condition.
What is the recommended maintenance schedule for sheds?
Maintaining a shed properly involves a regular schedule to ensure its longevity and functionality. Here's a recommended maintenance schedule you might consider:
- Monthly: Inspect the Interior: Check for signs of moisture, leaks, pests, or mold. Ensure ventilation is adequate. Clean the Floor: Sweep or vacuum to remove debris and prevent pests. Check Windows and Doors: Ensure they are operable and sealed against weather.
- Quarterly: Inspect the Roof: Look for damaged or missing shingles and clear any debris, such as leaves or branches. Check the Exterior Walls: Look for peeling paint, holes, or cracks that could let in moisture. Lubricate Hinges and Locks: Use a silicone-based lubricant to keep doors and windows functioning smoothly. Inspect the Foundation: Ensure it is secure and without signs of settling or damage.
- Biannually (Spring and Fall): Perform a Deep Clean: Remove everything from the shed, clean thoroughly, and reorganize. Inspect for hidden issues. Re-seal the Structure: Apply a weatherproof sealant to wood surfaces to protect against moisture. Check for Pests: Look for and address any signs of insects or rodents.
- Annually: Repaint or Stain: This helps to protect the exterior from the elements, especially for wooden sheds. Inspect and Repair the Roof: Ensure that any significant damage is repaired and water is not seeping into the shed. Evaluate Moisture Control: Ensure gutters and downspouts are directing water away from the shed.
- Seasonal Preparations: Prepare for Winter: Ensure the shed is weatherproofed and items are stored securely to prevent freeze damage. Summer Check: Ensure that ventilation is adequate for the warmer months to prevent overheating and mold growth.
Adjust the frequency based on the material of your shed (wood, metal, plastic) and your local climate conditions. Regular maintenance will ensure your shed remains in good condition for many years.
What is the difference between a small and large storage shed?
The difference between small and large storage sheds primarily involves various factors such as size, functionality, and intended use. Here are the key distinctions:
- Size & Dimensions: Small Storage Sheds: Typically range from about 6x4 feet to 8x10 feet. These sheds are suitable for storing garden tools, bicycles, small equipment, or limited seasonal items. Large Storage Sheds: Generally range from 10x12 feet and upwards. They can accommodate larger items such as lawn mowers, multiple bicycles, patio furniture, and even serve as workshops or hobby spaces.
- Capacity & Purpose: Small Sheds: Offer limited storage capacity and are best for homeowners with minimal storage needs. They are often used for organizing smaller outdoor tools and supplies. Large Sheds: Have a greater capacity, making them suitable for more extensive storage needs. They are often utilized by those requiring space for larger equipment, projects, or even additional room for work or relaxation.
- Construction & Cost: Small Sheds: Often made from lighter materials such as vinyl, resin, or metal, which can make them more affordable. They require less material and labor, thus the lower cost. Large Sheds: Made from more durable materials like wood or high-grade metal, reflecting their increased cost. Construction is typically more complex, potentially involving more features like windows, electrical wiring, and insulation.
- Placement & Aesthetics: Small Sheds: Easy to fit into most backyards without overwhelming the space; they can blend discreetly into landscaping. Large Sheds: Require more planning for placement as they take up more space and can dominate the view, possibly necessitating permits or adherence to local zoning laws.
- Functionality: Small Sheds: Primarily storage-focused with limited additional functionality. Large Sheds: Often designed with extra features such as shelving, workbenches, or windows, and can double as workshops, studios, or outdoor rooms.
When choosing between a small and large storage shed, it’s crucial to consider your storage needs, available space, budget, and any specific functions you intend for the shed.
How to install windows in an outdoor storage shed?
Installing windows in an outdoor storage shed can enhance natural lighting and ventilation. Here’s a step-by-step guide on how you can do this:
Materials and Tools Needed:
- Window(s) of appropriate size
- Measuring tape
- Circular saw or jigsaw
- Level
- Drill
- Screws
- Hammer
- Nails
- Pry bar
- Wood shims
- Flashing tape or flexible flashing
- Caulk and caulking gun
- Utility knife
- Safety goggles
- Work gloves
Steps for Installation:
- Select the Location: Choose a spot for the window that is free of structural obstructions and provides the desired amount of light and ventilation.
- Purchase the Window: Buy a window that complements the size and style of your shed. Make sure it is designed for outdoor use.
- Prepare the Area: Clear the working area inside and outside the shed. Make sure you have enough room to work comfortably.
- Mark the Cutout: Measure the size of the window and mark the dimensions on the shed wall where you want to install it. Use a level to ensure the lines are straight.
- Cut the Opening: Use a circular saw or jigsaw to cut along the marked lines. Wear safety goggles and work gloves when cutting. If your shed has siding, you’ll need to remove the siding in the marked area. A pry bar can help with gently removing nails and siding.
- Frame the Opening: Build a frame within the cutout using 2x4s or other suitable lumber. This provides structural support and a secure place to attach the window. Ensure the frame is level and square. Use wood shims to adjust as necessary.
- Install the Window: Place the window into the framed opening. Use shims to ensure it is level and plumb. Secure the window with screws or nails as recommended by the window manufacturer. Do not overtighten, as this can distort the window frame.
- Add Flashing: Apply flashing tape or flexible flashing around the window to prevent water intrusion. Start at the bottom and overlap as you work your way upward to ensure water is directed away from the window.
- Seal the Edges: Use caulk around the edges of the window to seal any gaps between the window frame and the shed wall. Ensure the caulk is suitable for outdoor use and weather-resistant.
- Reattach Siding (if applicable): If you removed any siding, reattach it around the new window. Cut pieces as needed to fit around the frame snugly.
- Finish the Interior: On the inside of the shed, you may wish to add trim to cover gaps and give a polished appearance.
Tips:
- Double-check all measurements before cutting to avoid mistakes.
- Consider the weather and time of day when planning your install. Ideally, work on a calm, clear day.
- If you’re installing a very large window or in a shed with significant electrical wiring, consider consulting a professional.
By following these steps, you should be able to successfully add a window to your outdoor storage shed, significantly enhancing both its functionality and aesthetic appeal.