
Best Closet Shelves for Small or Walk-In Closets to Buy in July 2026
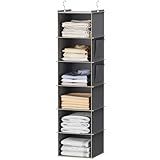
YOUDENOVA Hanging Closet Organizer and Storage, 6-Shelf Closet Hanging Storage Shelves, Grey
- STURDY BUILD: DURABLE NON-WOVEN FABRIC WITH BAMBOO SUPPORTS FOR LONGEVITY.
- SMART DESIGN: SAVES SPACE WITH CUBBIES AND SIDE POCKETS FOR EASY ACCESS.
- TIME SAVER: ORGANIZE OUTFITS FOR THE WEEK, SIMPLIFYING YOUR MORNINGS.


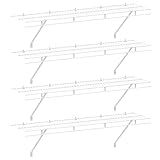
HAUSHOF Closet Shelves Wall Mounted 4-Pack, 4 ft x 12in White Wire Shelving for Laundry Room, Closet, Basement Organization and Storage
-
STURDY QUALITY: SUPPORTS 40 LBS; RUST-RESISTANT FOR LASTING DURABILITY.
-
FRESH & ORGANIZED: VENTILATED DESIGN KEEPS ITEMS FRESH AND TIDY.
-
HASSLE-FREE SETUP: EASY INSTALLATION WITH DETAILED INSTRUCTIONS INCLUDED.
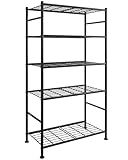
Sakugi Storage Shelves - 5 Tier Shelf Organizer, Heavy Duty Garage Shelving Unit with Leveling Feet, Stable Metal Shelves Organizer for Pantry, Kitchen and Closet, 33.0" W x 12.6" D x 72.0" H, Black
- HEAVY-DUTY CONSTRUCTION SUPPORTS 1,000 LBS-STORE BULKY ITEMS SAFELY.
- PREMIUM METAL FINISH IS WATERPROOF, RUSTPROOF, AND EASY TO CLEAN.
- QUICK ASSEMBLY WITH DETAILED INSTRUCTIONS ENSURES HASSLE-FREE SETUP.
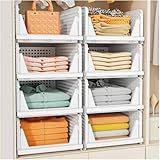
SNSLXH 5 Pack Stackable Closet Storage Basket, Multifunctional & Foldable Closet Organizer for Bathroom Kitchen Laundry Room Wardrobe Storage, Space-Saving Clothes Storage Drawer Organizer, White
-
STYLISH VERSATILITY: ORGANIZE CLOTHES, TOYS, AND FILES IN ANY SPACE.
-
SPACE-SAVING DESIGN: STACKABLE BINS ALLOW CUSTOM, EFFICIENT STORAGE.
-
DURABLE QUALITY: WATERPROOF, STURDY PLASTIC ENSURES LONG-LASTING USE.
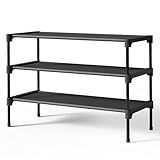
Kitsure Shoe Rack - Non-Woven Shoe Rack Shelf, Shoe Organizer for Closet, Entryway, Garage & Corridor, Stackable Shoe Shelves, 27.5" Wide - 3 Tier, Black
-
MAXIMIZE SPACE WITH A SPACIOUS SHOE RACK FOR ALL FOOTWEAR TYPES!
-
DURABLE DESIGN KEEPS SHOES CLEAN AND SCUFF-FREE WITH FABRIC SHELVES.
-
TOOL-FREE ASSEMBLY IN 4 EASY STEPS FOR A HASSLE-FREE SETUP!
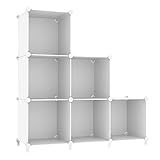
AWTATOS Cube Storage Organizer, Storage Cubes Shelves Bookshelf, 6 Cube Closet Organizers and Storage, DIY Stackable Plastic Clothes Organizer Shelving for Bedroom, Home, White
- VERSATILE STORAGE: ACCOMMODATES BOOKS, TOYS, CLOTHES, AND MORE!
- STURDY DESIGN: HOLDS UP TO 11 LBS PER CUBE WITH HIGH STABILITY.
- CUSTOMIZABLE LAYOUT: EASILY CREATE YOUR OWN UNIQUE STORAGE SETUP!
When selecting the best closet shelves for small or walk-in closets, consider adjustable shelving units that can be tailored to fit various items and maximize space efficiently. Wire shelving systems are often a popular choice due to their versatility, allowing for air circulation and easy customization. Solid wood or laminate shelves can add a touch of elegance and strength, often preferred for their durability and ability to support heavier items. Consider floating shelves for a minimalist and modern look, especially useful for displaying decor or storing shoes and accessories. For a more modular approach, cubby shelving can be incredibly practical, offering individual compartments to organize different items like handbags, shoes, or seasonal wear. Utilizing corner shelves can help optimize unused corners of your closet, providing additional space for storage. Notice the installation process as well; some systems come with easy installation features or require minimal tools, which could be advantageous in terms of time and effort. Finally, consider incorporating pull-out shelves or bins for easy access to items stored deeper in the closet, enhancing functionality and accessibility.
What is the role of lighting in a walk-in closet?
Lighting plays a crucial role in a walk-in closet, serving both functional and aesthetic purposes. Here are some key roles lighting plays:
- Visibility and Functionality: Proper lighting ensures that you can see clothes, accessories, and shoes clearly, making it easier to select and match outfits. It helps in identifying colors correctly and distinguishing between similar items.
- Aesthetic Appeal: Good lighting enhances the visual appeal of the closet. It can highlight certain areas, such as display shelves or specific sections, making the space look more inviting and luxurious.
- Atmosphere: Different lighting styles and intensities can create various moods. Soft lighting might provide a cozy, intimate feel, while bright lighting can give a fresh, clean look.
- Task Lighting: Focused lighting, like in dressing areas or near mirrors, assists with specific tasks like applying makeup or getting dressed, providing ample light where precision is needed.
- Accent Lighting: This type of lighting highlights particular elements, such as artwork, or to illuminate darker corners, contributing to a more organized and tidy appearance.
- Energy Efficiency: Modern lighting solutions, like LED lights, are energy-efficient and can reduce long-term costs while providing ample illumination.
- Safety: Adequate lighting reduces the risk of accidents by illuminating potential obstacles and ensuring safe navigation within the closet space.
By thoughtfully planning and installing appropriate lighting, a walk-in closet can be both highly functional and stylishly designed.
How to transition from seasonal to year-round closet organization?
Transitioning from seasonal to year-round closet organization can make your wardrobe more functional and accessible. Here are some steps to help you make the switch:
- Declutter Regularly: Start by decluttering your closet. Go through each item and decide if it's something you really need and wear. Donate or sell items that no longer fit your style or needs.
- Invest in Versatile Pieces: Focus on building a wardrobe with versatile, multi-seasonal pieces. Layering basics, like cardigans, turtlenecks, and neutral tees, can be worn in multiple seasons.
- Organize by Type: Instead of organizing clothes by season, organize them by type-tops, bottoms, dresses, outerwear, etc. This way, you can easily mix and match pieces for any weather.
- Use Storage Bins and Baskets: For items you don't wear often, like heavy winter coats or summer swimsuits, use storage bins or baskets on higher shelves. Clear bins allow you to easily see what's inside.
- Incorporate Adjustable Shelving: If possible, install adjustable shelving in your closet. This will allow you to easily change the height of shelves to accommodate different types of clothing and accessories throughout the year.
- Rotate Items to Front: Keep current season essentials easily accessible by rotating them to the front of your closet. As the weather changes, gradually rotate the next season's items forward.
- Utilize Dual-Purpose Furniture: Make use of furniture that offers additional storage space, like a bed with drawers or an ottoman with storage. This can help store out-of-season clothes or accessories.
- Store Strategically: Keep frequently worn items at eye level for easy access, and store less-used items in less accessible places. Use vacuum-sealed bags to save space for bulky items.
- Use Hooks and Hangers Wisely: Use hooks on the back of doors for accessories like hats, scarves, or bags. Use thin, non-slip hangers to maximize hanging space.
- Label Everything: Label shelves, bins, and boxes to quickly find what you're looking for and maintain organization.
- Create a Capsule Wardrobe: Consider creating a capsule wardrobe with a limited number of pieces that can be easily mixed and matched. This reduces clutter and focuses on quality over quantity.
By following these steps, you can create a closet that is well-organized, functional, and ready for any season. Adjust the organization as needed to fit your personal style and living space.
How to install closet shelves yourself?
Installing closet shelves yourself can be a rewarding and cost-effective project. Here are steps to guide you through the process:
Materials and Tools Needed:
- Shelves (wood, wire, or laminate)
- Brackets or shelf supports
- Screws and wall anchors
- Drill
- Screwdriver
- Level
- Measuring tape
- Pencil
- Stud finder
- Saw (if you need to cut shelves to size)
Steps:
- Measure Your Closet: Use a measuring tape to measure the width, height, and depth of your closet. Determine how many shelves you need and their placement.
- Choose Shelf Material: Decide on the type of shelves (wood, wire, or laminate) that best suit your needs and closet design.
- Plan the Layout: Sketch a rough plan of how you want the shelves to be arranged. Consider spacing depending on what you plan to store.
- Find Wall Studs: Use a stud finder to locate the wall studs where you'll secure the shelf brackets. Mark their location on the wall with a pencil.
- Mark Shelf Placement: With a level and pencil, draw a horizontal line at the height you want your first shelf. Repeat for all shelves.
- Cut Shelves (if necessary): If your shelves need cutting, use a saw to trim them to the correct length.
- Install the Brackets: Starting with the first shelf, align the bracket with the marked line. Drill pilot holes into the wall at the stud locations, then secure the bracket with screws. Use wall anchors if not attaching to studs.
- Attach Shelves: Place the shelf on the brackets. Adjust as necessary to ensure the shelf is level.
- Secure the Shelves: For additional stability, especially with heavier items, screw the shelves into the brackets.
- Repeat for Additional Shelves: Continue this process for each shelf, ensuring they are evenly spaced and level.
- Adjust and Finish: Make any necessary adjustments. Ensure all screws are tight and the shelves are secure.
Tips:
- Safety First: Always wear safety goggles when using power tools.
- Surface Preparation: Sand and paint or finish wooden shelves before installation.
- Load Capacity: Consider the weight capacity of your shelves when deciding on the type and number of brackets.
- Spacing: When planning spacing, allow enough room for larger items and consider adding adjustable brackets for more flexibility.
By following these steps, you can have sturdy and functional shelves in your closet, tailored to your specific storage needs.