
Best Tools to Winterize Leaf Blowers to Buy in July 2026
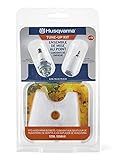
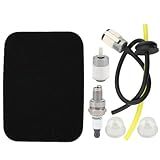
Husqvarna 599332501 Leaf Blower Maintenance Kit for 125B and 125BVX Blowers
- BOOST PERFORMANCE WITH OUR OFFICIAL TUNE-UP KIT FOR HUSQVARNA.
- ESSENTIAL PARTS: FUEL FILTER, AIR FILTER, AND SPARK PLUG INCLUDED.
- PREMIUM-QUALITY COMPONENTS ENSURE RELIABILITY FOR YOUR BLOWER.


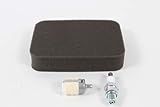
Husqvarna 590849001 OEM Leaf Blower Tune Up Kit 150BT 350BT 560BT
- GENUINE OEM HUSQVARNA PART ENSURES TOP-NOTCH QUALITY AND FIT.
- BULK PACKED FOR COST-EFFECTIVE PROCUREMENT AND CONVENIENCE.
- CONSULT MANUAL FOR ACCURATE COMPATIBILITY AND EASY INSTALLATION.
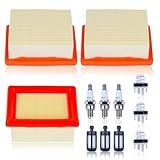
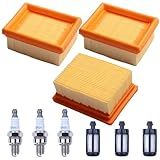
Hyceker 3 Pack BR800X Air Filter Tune Up Service Kit for Stihl BR800 BR800X BR800C C-E Magnum Backpack Blower Parts with BR 800 800X C Spark Plug Primer Bulb Fuel Filter 4283-141-0300A, 4283-141-0300B
- COMPLETE MAINTENANCE KIT FOR STIHL BR800 SERIES BLOWERS INCLUDED.
- LOWERS OVERALL COSTS WITH ESSENTIAL PARTS FOR EASY UPKEEP.
- HIGH-QUALITY FILTERS AND SPARK PLUGS ENSURE OPTIMAL BLOWER PERFORMANCE.
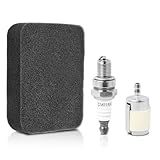
Gfdoso 590849001 Handheld Leaf Blower Service Kit Compatible with Husqvarna 150BT, 350BT, 560BT – Includes Air Filter, Spark Plug & Fuel Filter – Replacement Parts for Husqvarna Handheld Blowers
-
EXACT FIT FOR HUSQVARNA MODELS: HASSLE-FREE INSTALLATION, OPTIMAL PERFORMANCE.
-
DURABLE COMPONENTS: BUILT TO RESIST WEAR, ENSURING LONG-LASTING RELIABILITY.
-
QUICK IGNITION SPARK PLUG: CONSISTENT PERFORMANCE FOR EASY STARTS & EFFICIENCY.
Hipa 502844401 Air Filter for Husqvarna 150BT 350BT BT150 560BTS 350BF 560BFS 560BT 150BF Leaf Blower Husqvarna 150BT Tune Up Kit
-
99% FILTRATION EFFICIENCY: CAPTURES AIRBORNE PARTICLES FOR OPTIMAL PERFORMANCE.
-
EASY, TOOL-FREE INSTALLATION: SEAMLESS DIY REPLACEMENT FOR ANY USER.
-
ALL-IN-ONE TUNE-UP KIT: SAVE TIME AND MONEY WITH COMPLETE MAINTENANCE SOLUTION.

Adefol PB2520 Air Filter Tune Up Kit for Echo PB-2520 PB 2520 Leaf Blower, PB-2520 Air Filter with Primer Bulb Spark Plug Fuel Filter Spart Part Replace A226002160 90183Y
-
COMPLETE MAINTENANCE KIT: INCLUDES AIR FILTER, PRIMER BULB, FUEL FILTER, SPARK PLUG.
-
ENGINE EFFICIENCY BOOST: HIGH-EFFICIENCY FILTRATION PREVENTS ENGINE DEBRIS.
-
RELIABLE QUALITY: ENGINEERED WITH RIGOROUS TESTING FOR GUARANTEED PERFORMANCE.
Hyceker 3PCS BR800 Air Fuel Filters Spark Plug Kit for Stihl BR800 BR800C BR800X Magnum Backpack Leaf Blower, Stihl BR800 Blower Tune up Kit, Stihl BR800 BR800C BR800X Air Filter Cleaner 42831410300A
- COMPREHENSIVE 3-PACK KIT FOR ALL BR800 MODELS-ULTIMATE MAINTENANCE!
- INCLUDES ESSENTIAL FILTERS AND SPARK PLUGS FOR PEAK PERFORMANCE.
- COMPATIBLE WITH MULTIPLE PART NUMBERS-EASY REPLACEMENT GUARANTEED!
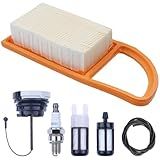
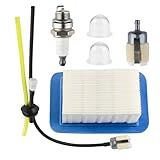
Hyceker 545112101 125B Air Filter Tune Up Kit for Husqvarna 125B 125BX 125BVX Redmax HB280 HB281 Handheld Leaf Blower, 599332501 Maintenance Kit with 581798001 Fuel Line Kit and 597797901 Air Filters
- COMPREHENSIVE TUNE-UP KIT FOR PEAK PERFORMANCE IN GAS BLOWERS.
- COMPATIBLE WITH MULTIPLE BRANDS: HUSQVARNA, JONSERED, REDMAX, CRAFTSMAN.
- ESSENTIAL REPLACEMENT PARTS FOR EASY MAINTENANCE AND LONGER LIFESPAN.
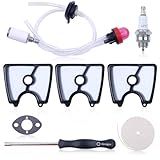
Hyceker BR600 Air Filter Tune-Up Kit for Stihl BR500 BR550 BR600 BR700 BR 500 550 600 700 Magnum Backpack Leaf Blower Service Kit Parts with Spark Plug Gas Fuel Cap Filter 4282 141 0300, 4282 007 1801
- FULL SERVICE KIT: EVERYTHING NEEDED FOR STIHL LEAF BLOWER MAINTENANCE.
- COMPATIBLE WITH MULTIPLE STIHL MODELS FOR HASSLE-FREE REPLACEMENTS.
- HIGH-QUALITY FILTERS AND SPARK PLUG ENSURE OPTIMAL BLOWER PERFORMANCE.
A226000032 PB-580T Fuel Line Air Filter Kit for Echo PB580H PB580T Tune Up Kit PB 580T PB-580H Backpack Leaf Blower Parts Fuel Filter Primer Bulb Spark Plug
- COMPATIBLE WITH ECHO PB-580T/H FOR OPTIMAL PERFORMANCE BOOST.
- KEEPS ENGINE CLEAN BY TRAPPING DIRT FOR LONGER MACHINE LIFE.
- COMPLETE TUNE-UP KIT FOR EFFICIENT, RELIABLE LEAF BLOWER OPERATION.
Winterizing a leaf blower before storing it is essential to ensure its proper functioning and longevity during the cold months. Here are the necessary steps to follow:
- Clean the leaf blower: Start by removing any dirt, debris, or leaves that may have accumulated on the unit. Use a brush or a cloth to carefully clean the blower, both externally and internally. Make sure to pay attention to the air intake and exhaust areas.
- Empty the fuel tank: Empty the fuel tank completely to avoid the fuel from deteriorating over time. Turn on the blower and let it run until it runs out of fuel. This step helps prevent the fuel from clogging the carburetor and other internal components.
- Remove the spark plug: Locate and remove the spark plug wire, which should be disconnected from the spark plug. Unscrew the spark plug using a socket wrench and inspect it for any signs of wear or damage. If necessary, clean it or replace it with a new spark plug.
- Lubricate engine components: Adding a small amount of motor oil to the cylinder will help prevent rusting and corrosion during storage. Rotate the starter cord a few times to distribute the oil within the cylinder. Keep in mind that this step is not required for four-stroke engines, as they have a separate oil reservoir.
- Check the air filter: Remove the air filter and inspect it for any dirt or debris. Clean or replace the filter as needed to ensure optimal air intake during operation. A clogged air filter can affect the blower's performance.
- Store the leaf blower: Find a clean, dry, and well-ventilated area for storing the leaf blower. It is recommended to keep it in a shed or garage to protect it from extreme temperatures and humidity. Ensure that the storage location is secure and inaccessible to children or pets.
Remember, it is always a good idea to consult the manufacturer's manual for specific instructions, as different leaf blower models may have slightly different requirements for winter storage. Following these steps will help safeguard your leaf blower and prepare it for a trouble-free start in the spring.
How do I prepare a leaf blower for winter?
Preparing a leaf blower for winter involves a few simple steps to ensure its proper storage and protection during the cold months. Here's a guide on how to do it:
- Clean the Leaf Blower: Before storing the leaf blower for winter, it's important to clean it thoroughly. Remove any debris or leaves stuck in the machine. Use a brush or toothbrush to clean the air vents, cooling fins, and the entire exterior. This prevents any clogs or damage caused by debris left over time.
- Empty Fuel and Oil: Dispose of any remaining fuel from the tank by running the machine until it is out of gas. It is essential to remove fuel to prevent it from aging, separating, or leaving deposits that may clog the system. If your leaf blower has a two-stroke engine, empty and replace the fuel mix according to the manufacturer's instructions. Additionally, drain the oil if your leaf blower has a four-stroke engine or a separate oil reservoir.
- Remove the Spark Plug: To prevent accidental startup and protect the engine during storage, remove the spark plug from the leaf blower. This ensures that the machine won't start accidentally, and it also allows for easier maintenance come springtime.
- Clean or Replace the Air Filter: Inspect the air filter and clean or replace it if necessary. A dirty air filter restricts airflow and reduces the performance of the leaf blower. Cleaning it ensures optimum engine efficiency when you start using the leaf blower again.
- Inspect and Lubricate: Check all moving parts and lubricate them according to the manufacturer's instructions. Pay attention to the impeller, fan blades, drive shaft, and other critical areas. Proper lubrication prevents rust and helps maintain the leaf blower's performance.
- Store in a Dry Location: Find a dry and sheltered location to store your leaf blower over winter. Ideally, it should be a cool, dry area like a garage or shed. Protect the machine from moisture, extreme temperatures, and dust to ensure it remains in good condition during the winter months.
By following these steps, you can properly prepare your leaf blower for winter storage and ensure it's ready for use when the next season comes around.
What materials do I need to winterize a leaf blower?
To winterize a leaf blower, you will need the following materials:
- Fuel stabilizer: This helps to prevent the fuel from deteriorating and clogging the carburetor during storage. It also protects the engine from ethanol-related damage.
- Fresh fuel: If your leaf blower has old fuel in it, it is recommended to drain the tank and add fresh fuel before storage.
- Air filter: If the air filter is dirty or worn out, it should be replaced before winterizing.
- Spark plug: Inspect the spark plug and replace it if necessary. A fresh spark plug will ensure easy starting when you need to use the leaf blower again.
- Lubricating oil: Check the manufacturer's instructions to see if they recommend any specific lubricating oil for the blower's engine. If required, make sure you have the appropriate lubricating oil.
- Clean cloth or rag: Use a clean cloth or rag to wipe down the leaf blower and remove any dirt or debris.
- Storage container: If the leaf blower does not come with a storage case, you may want to have a suitable container or bag to store it in.
- Owner's manual: It is always beneficial to have the leaf blower's owner's manual on hand for reference and to ensure you follow the manufacturer's specific instructions for winterizing.
Remember to consult the leaf blower's specific owner's manual for any additional materials or steps recommended by the manufacturer.
What types of fuel can be used for winterizing a leaf blower?
To winterize a leaf blower, you typically don't need to change the type of fuel you use. However, there are a few different types of fuel commonly used in leaf blowers:
- Gasoline: Most leaf blowers are powered by gasoline. It is important to use the correct gasoline-oil mixture if your leaf blower requires it (typically a 2-stroke engine). Make sure to use fresh, high-quality gasoline with the appropriate octane rating for your specific model.
- Propane: Some leaf blowers are designed to run on propane, which can be a cleaner-burning fuel option. Propane-powered leaf blowers often require a separate propane tank, and it's essential to follow the manufacturer's instructions for refilling and safety precautions.
- Electric-powered: Electric leaf blowers, either corded or battery-operated, don't require fuel. They are powered by electricity from an outlet or rechargeable batteries. For winter storage, it is important to properly store and maintain the battery, as extreme cold temperatures can affect its performance.
Regardless of the fuel type, it's crucial to follow the manufacturer's guidelines for winterizing your leaf blower, which typically includes steps like removing or stabilizing fuel, cleaning the unit, and storing it in a dry place.