
Best Soundproofing Solutions for Mini Fridges to Buy in July 2026
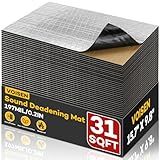
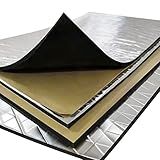
VOISEN Sound Deading Material for Cars,197 mil(5mm) 31 sqft Sound Deadening,Aluminum Foil Foam Automotive Soundproofing Material,Noise Insulation and Vibration Dampening Material 28 Pcs
-
EASY DIY CUT FOR CUSTOM FIT: TAILOR SOUND MATS TO ANY SIZE!
-
BLOCKS 98% RADIANT HEAT: KEEP YOUR VEHICLE COOLER AND SAVE FUEL!
-
SUPERIOR NOISE REDUCTION: ENJOY A COMFORTABLE, QUIET DRIVING EXPERIENCE!


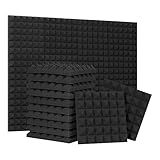
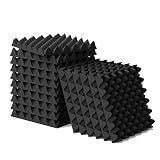
24 Pack Black 12 x 12 x 2 Inches Pyramid Designed Acoustic Foam Panels, Sound Proof Foam Panels for Walls, High Density and Flame-Retardant Acoustic Panels, Sound Panels for Recording and Home Studio
- ACHIEVE CRYSTAL-CLEAR SOUND WITH HIGH NRC ABSORPTION PANELS.
- DURABLE, FLAME-RETARDANT FOAM THAT MEETS SAFETY STANDARDS.
- MODERN PYRAMID DESIGN ENHANCES AESTHETICS AND SOUND QUALITY.
Geynnple 1 Pcs Sound Proof Foam Panels |48"×24"×2" Quick-Recovery Soundproof Wall Panels | High Density Sound Dampening Panels for Home Studio,(Black)
-
TRANSFORM SPACES WITH SUPERIOR SOUNDPROOFING FOR ANY ENVIRONMENT.
-
EASY, DIRECT INSTALLATION: JUST ADD YOUR PREFERRED ADHESIVE!
-
PERFECT FOR STUDIOS AND OFFICES-OPTIMIZE ACOUSTICS EFFORTLESSLY.
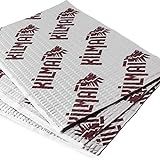
KILMAT 80 Mil (2 mm) 36 Sqft (3.4 Sqm) Car Sound Deadening Mat, Alubutyl Automotive Sound Deadener, Audio Noise Insulation and Dampening
- 1.5X THICKER FOR ENHANCED SOUND INSULATION PERFORMANCE!
- USER-FRIENDLY DIY INSTALLATION WITH SPECIAL EMBOSSING INDICATOR!
- LIGHTWEIGHT 80 MIL SELF-ADHESIVE FOR OPTIMAL EFFICIENCY!

Trademark Soundproofing Mass Loaded Vinyl 1lb - MLV Soundproofing for Wall Sound Barrier - Sound Insulation - Made in USA - 4' x 25' Covers 100 sf - Made in USA
- ACHIEVE PEACE WITH 27 STC-RATED HIGH-EFFICIENCY SOUND BARRIERS!
- ECO-FRIENDLY, NON-TOXIC MASS-LOADED VINYL FOR ULTIMATE SOUNDPROOFING.
- QUICK, EASY INSTALLATION-PERFECT FOR HOMES, STUDIOS, AND MORE!
Car Sound Deadening Material Mat - 197 mil 8.7 sqft Auto Audio Deadener Foam, Sound Dampening and Heat Insulation for Truck, Vehicle
- CUSTOMIZABLE COVERAGE OPTIONS FOR EVERY PROJECT SIZE!
- DRAMATIC NOISE REDUCTION UP TO 50% FOR A QUIETER RIDE!
- HEAT-REFLECTIVE FOIL FOR ENHANCED COMFORT AND INSULATION!
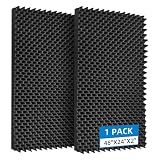
6 Pack 1.5"X12"X12" Acoustic Foam, Sound Proof Egg Crate Foam(Most Soundproofing Design), Upgraded Acoustic Panels, Fire-Retardent Sound Proof Foam Panels for Walls, Doors, Sound Foam Made by WVOVW
- EGG-CRATE DESIGN: MAXIMIZES SOUNDPROOFING EFFICIENCY!
- FIRE-RESISTANT & NON-TOXIC: SAFE FOR INDOOR USE!
- 1.5 THICK: OPTIMAL SOUND ABSORPTION, EASY DIY SETUP!
If your mini fridge is making excessive noise, there are a few steps you can take to try and quiet it down. First, make sure the fridge is level by adjusting the feet underneath. This can help reduce vibrations that may be causing the noise. Next, check the coils at the back of the fridge and make sure they are clean and free of debris. Dust and dirt can cause the fridge to work harder and create more noise. Additionally, try placing a rubber mat or padding underneath the fridge to absorb some of the vibrations. Lastly, check the fan inside the fridge and make sure it is not obstructed. If none of these solutions work, it may be time to call a professional to diagnose and fix the issue.
How to soundproof a mini fridge?
- Move the mini fridge away from walls: Keep the mini fridge at least a few inches away from walls to reduce vibrations and sound transmission.
- Use soundproofing materials: Use soundproofing materials such as acoustic foam, mass loaded vinyl, or soundproofing curtains to reduce noise from the mini fridge.
- Place the mini fridge on a soundproofing mat: Place the mini fridge on a soundproofing mat or rubber mat to absorb vibrations and reduce noise.
- Check for loose parts: Tighten any loose parts such as doors, handles, or shelves that may be causing excess noise.
- Install a soundproofing enclosure: If the above methods do not work, consider building a soundproofing enclosure around the mini fridge using sound-absorbing materials.
- Use a noise-reducing appliance mat: Place a noise-reducing appliance mat underneath the mini fridge to further reduce vibrations and noise transmission.
- Avoid overstocking the mini fridge: Keep the contents of the mini fridge organized and avoid overstocking it, as this can cause the compressor to work harder and produce more noise.
What is the ideal temperature for a mini fridge?
The ideal temperature for a mini fridge is typically between 36-40 degrees Fahrenheit (2-4 degrees Celsius). This range will ensure that perishable items are kept at a safe temperature to prevent spoilage while also maximizing energy efficiency. It is important to monitor and adjust the temperature settings as needed to maintain the desired temperature range.
How to clean the condenser coils on a noisy mini fridge?
- Unplug the mini fridge and move it away from the wall to access the back panel.
- Locate the condenser coils on the back of the fridge. They are usually located near the bottom or top of the unit.
- Use a vacuum cleaner with a brush attachment to gently remove dust, dirt, and debris from the condenser coils. Be careful not to bend or damage the coils during cleaning.
- If the dust and debris are stubborn and difficult to remove with a vacuum, you can use a coil cleaning brush or a soft bristle brush to scrub the coils gently.
- Once the coils are clean, plug in the mini fridge and move it back against the wall.
- Switch on the mini fridge and listen for any noises. If the noise persists, you may need to check other components such as the compressor or fan.
- If the noise continues after cleaning the condenser coils, it may be a sign of a faulty component that needs to be repaired or replaced. Consider contacting a professional appliance repair technician for further assistance.
How to inspect the door seals on a noisy mini fridge?
If your mini fridge is noisy, it could be due to worn or damaged door seals. Here’s how you can inspect the door seals to determine if they need to be replaced:
- Begin by visually inspecting the door seals for any visible signs of wear or damage, such as cracks, tears, or gaps. Make sure to check the entire perimeter of the door seals.
- Next, perform a simple test to check the effectiveness of the door seals. Close the door of the mini fridge and place a dollar bill or a piece of paper between the door and the fridge cabinet. Try to pull out the dollar bill or paper without opening the door. If it easily slides out, then the door seals are likely not creating a proper seal.
- If the door seals are not sealing properly, you will need to replace them. You can purchase replacement door seals from the manufacturer or from a hardware store.
- To replace the door seals, carefully remove the old seals from the door and clean the surface where the new seals will be installed. Then, attach the new door seals following the manufacturer’s instructions.
- Once the new door seals are installed, perform the dollar bill test again to ensure that the seals are creating a tight seal and that there are no gaps.
By inspecting and replacing the door seals on your mini fridge, you should be able to reduce the noise level and improve the energy efficiency of the appliance.
What is causing my mini fridge to be so loud?
There are several possible reasons why your mini fridge may be loud:
- The compressor may be running more frequently or struggling to maintain the desired temperature, causing it to make more noise.
- The refrigerator may be improperly leveled, causing it to vibrate or make loud noises.
- The evaporator fan may be dirty or damaged, causing it to make loud noises.
- The condenser coils may be dirty or blocked, causing the fridge to work harder and make more noise.
- The fan motor may be malfunctioning, causing it to make loud noises.
To determine the exact cause of the noise, it is recommended to unplug the fridge, remove any obstructions, clean the condenser coils, and check the fan motor for any issues. If the noise persists, it may be necessary to contact a professional technician for further assistance.
What are the signs of a failing compressor in a mini fridge?
- Excessive noise - If the compressor is making loud or unusual noises, such as clicking or banging, it could be a sign that it is failing.
- Inadequate cooling - If the mini fridge is not maintaining the desired temperature or is not cooling properly, it could be due to a failing compressor.
- Constant running - If the compressor is running constantly, it could be a sign that it is struggling to maintain the desired temperature, which may indicate a failing compressor.
- Leaking refrigerant - If you notice any leaks or puddles of refrigerant near the compressor, it could be a sign of a failing compressor.
- Hot exterior - If the exterior of the mini fridge feels excessively hot to the touch, it could indicate that the compressor is working harder than usual and may be failing.
- Tripped circuit breaker - If the compressor is causing the circuit breaker to trip frequently, it could be a sign of a failing compressor.