
Best Ground Preparation Tools for Outdoor Shed Installation to Buy in July 2026
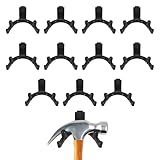
LITGURU Tool Hook for Lifetime Shed Accessories: 12 Pcs ABS Storage Shed Hooks for Electric Hand Gardening Tools - Does Not Work on Horizontal Siding Sheds - Black
-
PERFECT FIT FOR LIFETIME SHEDS: CHECK MODEL COMPATIBILITY BEFORE BUYING!
-
DURABLE & AFFORDABLE: HIGH-QUALITY TOOL HOOKS AVAILABLE IN PACKS OF 6 OR 12.
-
EASY INSTALLATION: SIMPLY SLIDE INTO PLACE FOR A SECURE FIT!


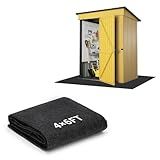
Outdoor Storage Shed Floor Mat,6x4Ft Non-Slip Carport Garage Mat,Dustproof Patio Furniture Protector,Washable Anti-Slip Pad for Shed,Garage,Moto&Car Flooring Protection
- UNMATCHED WATERPROOFING: KEEPS SHED FLOORS DRY AND DAMAGE-FREE.
- NON-SLIP SAFETY: TEXTURED DESIGN GRIPS SURFACES, PREVENTING DANGEROUS SLIPS.
- VERSATILE USE: IDEAL FOR SHEDS, PATIOS, GARAGES, AND GARDEN PROTECTION.
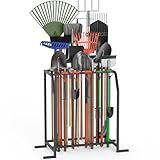
Trieez Extra Large Garden Tool Organizer for Garage, NEVER FALL OVER - Yard Tool Organizer Garage for Organization and Storage, Tool Rack for Shed, Outdoor, Tool Stand
-
NEVER FALL OVER AGAIN! EXPERIENCE A STABLE, DURABLE DESIGN FOR TOOLS.
-
HOLD HEAVY TOOLS WITH EASE! ENLARGED SLOTS SUPPORT ALL YOUR GARDEN GEAR.
-
EXTRA STORAGE SPACE! UNIQUE DESIGN ACCOMMODATES VARIOUS TOOLS AND HOOKS.
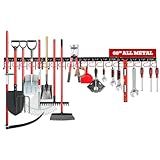
68" All Metal Garden Tool Organizer - Sturdy Garage Wall & Shed Organization System - Hooks for Shovel, Broom, Rake & More
- QUICK SETUP WITH INCLUDED ABS NAILS AND SCREWS FOR INSTANT USE!
- HEAVY-DUTY HOOKS SUPPORT 44LBS FOR RELIABLE TOOL STORAGE.
- ANTI-SLIP DESIGN SECURES TOOLS WHILE PROTECTING THEM FROM SCRATCHES.
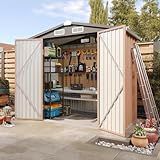
Aoxun 6'x4' Outdoor Metal Storage Shed with Lockable Door- Ideal for Tools, Garden Equipment & Bikes, Perfect for Patio Placement(Base Included/Brown)
-
DURABLE STEEL BUILD: WATERPROOF, WIND-RESISTANT, AND LONG-LASTING!
-
SECURE & FUNCTIONAL: LOCKABLE DOORS AND SLOPING ROOF FOR EASY USE!
-
VERSATILE DESIGN: PERFECT FOR GARDENING, PET SHELTER, AND MORE!
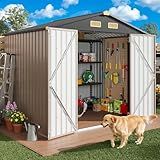
IRONCK 8x6FT Outdoor Storage Shed with Lockable Doors, 7.4x5.3FT Base Galvanized Steel Metal Garden Tool Shed with Breathable Vent for Yard Bins/Generator/Wheelbarrow Storage, Brown
-
DURABLE GALVANIZED STEEL ENSURES LONG-LASTING WEATHER RESISTANCE.
-
DOUBLE DOORS AND TOP VENT FOR EASY ACCESS AND AIRFLOW!
-
SPACIOUS DESIGN SUITS TOOLS, PETS, RECYCLING, AND MORE!
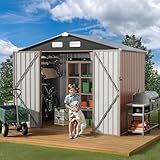
GVDV 8x6 FT Outdoor Metal Storage Shed, 7.3x5.3 FT Base Durable Garden Shed with Updated Frame Structure for Backyard, Patio, Tool Storage, All-Weather Shelter for Bike, Gardening Tools, No Floor
-
AMPLE STORAGE SPACE: FITS LARGE TOOLS, BIKES, AND SEASONAL ITEMS EASILY.
-
DURABLE & WEATHERPROOF: BUILT WITH GALVANIZED STEEL FOR LASTING PROTECTION.
-
VERSATILE DESIGN: DOUBLES AS A PET HOUSE OR BIKE SHED FOR ENHANCED UTILITY.
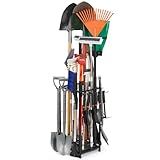
Garden Tool Organizer Holds 50 Long-Handled Tools/Rakes/Brooms/Shovles for Garage Organization and Storage, Shed, Outdoor, Lawn, Heavy-Duty Steel, Black, Easy Assembly (Corner Tool Organizer)
- ORGANIZES UP TO 50 TOOLS, MAXIMIZING SPACE IN ANY GARDEN OR SHED.
- DURABLE STEEL FRAME ENSURES LONG-LASTING, RUST-RESISTANT PERFORMANCE.
- EASY ASSEMBLY WITH INCLUDED INSTRUCTIONS FOR HASSLE-FREE SETUP.

Sttoraboks Garden Tool Organizer Rack Up to 50 Tools, Heavy-Duty Steel Yard Tool Organizer for Garage Storage with 11 Hooks, Broom Holder & Garden Tool Rack for Shed, Patio, Outdoor Use, Black
- ORGANIZE 50 TOOLS WITH TIERED SHELVING FOR MAXIMUM EFFICIENCY.
- PERFECT DESIGN FOR HASSLE-FREE STORAGE OF GARDEN TOOLS.
- QUICK ASSEMBLY ALLOWS FOR IMMEDIATE OUTDOOR OR GARAGE USE.
To prepare the ground for an outdoor storage shed installation, start by choosing a level area in your yard that is free from any obstructions like trees or large rocks. Clear the area of any debris, grass, or weeds, and ensure that the ground is level by using a shovel or a rake to even out any bumps or dips.
Next, lay down a solid foundation for the shed to sit on. This can be done by using a base of gravel or crushed stone, or by pouring a concrete slab. Make sure the foundation extends slightly beyond the dimensions of the shed to provide a stable base.
Once the foundation is in place, assemble the shed according to the manufacturer's instructions. Be sure to secure the shed to the foundation to prevent it from shifting or being damaged by the elements.
Finally, add any finishing touches to the area around the shed, such as landscaping or paths, to create a visually appealing outdoor storage space. By properly preparing the ground for your storage shed installation, you can ensure that it will be secure, stable, and long-lasting.
How to mark the perimeter of the shed location?
- Measure the dimensions of the shed using a tape measure. This will give you an idea of the size of the perimeter that needs to be marked.
- Use wooden stakes or flagging tape to mark the corners of the shed location. Hammer the stakes into the ground at each corner, making sure they are level and secure.
- Attach a string or rope to each stake, creating a perimeter around the shed location. Make sure the string is taut and straight, and adjust as needed to ensure the perimeter is accurate.
- Use spray paint or chalk to mark the ground along the perimeter line. This will make it easier to see and follow as you prepare the site for the shed.
- Double check the measurements and alignment of the marked perimeter before proceeding with any construction or site preparation. Adjust as needed to ensure accurate placement of the shed.
How to prevent water damage to the shed foundation?
- Properly slope the ground surrounding the shed to ensure that water drains away from the foundation. This can help prevent water from pooling and causing damage.
- Install gutters and downspouts on the shed to direct water away from the foundation. Make sure that the gutters are clean and free of debris that could block water flow.
- Use a waterproof sealant or coating on the foundation to protect it from moisture. This can help prevent water from seeping into the foundation and causing damage over time.
- Ensure that the shed is properly ventilated to prevent condensation build-up, which can lead to moisture damage in the foundation.
- Consider installing a French drain or other drainage system around the shed to help channel water away from the foundation.
- Regularly inspect the foundation for any signs of water damage, such as mold, mildew, or cracks. Address any issues promptly to prevent further damage.
- Consider raising the shed on a concrete or elevated foundation to prevent direct contact with the ground and reduce the risk of water damage.
How to insulate the shed from the ground?
There are a few ways to insulate a shed from the ground:
- Install a vapor barrier: Lay down a vapor barrier (such as plastic sheeting) on the ground before laying any insulation material. This will prevent moisture from seeping through the ground and into the shed.
- Use rigid foam insulation boards: Cut rigid foam insulation boards to fit the dimensions of the shed floor, then place them on top of the vapor barrier. This will create a barrier between the shed floor and the cold ground.
- Build a raised floor: Construct a raised floor inside the shed using pressure-treated wood or concrete blocks. This will elevate the shed floor off the ground, reducing contact with moisture and cold temperatures.
- Fill the space with insulation material: Once the shed floor is insulated and raised off the ground, fill the space between the floor and the ground with insulation material such as fiberglass batts or spray foam insulation.
By insulating the shed from the ground, you can help regulate the temperature inside the shed and prevent moisture issues.
How to create a sturdy base for the shed?
- Choose a level location for the shed. Use a level and compact the soil to create a flat surface. You may need to remove any rocks, roots, or other debris from the area.
- Measure and mark out the dimensions of the shed's base using stakes and string. Make sure the area is square by measuring diagonally from corner to corner.
- Dig a trench around the perimeter of the base area. The trench should be about 4-6 inches deep and wide enough to accommodate the size of the shed's base.
- Fill the trench with a layer of gravel or crushed stone. This will help with drainage and prevent water from pooling around the base of the shed.
- Use a tamper or compactor to compact the gravel layer and create a solid foundation for the shed.
- Add a layer of landscape fabric on top of the gravel to prevent weeds from growing up through the base of the shed.
- Pour a concrete slab or lay paving stones on top of the gravel and compacted base. Make sure the surface is level and smooth.
- Allow the concrete to cure or the paving stones to set before building the shed on top of the base.
By following these steps, you can create a sturdy and stable base for your shed that will help protect it from shifting or settling over time.