
Best DIY Cooler Stands to Buy in July 2026
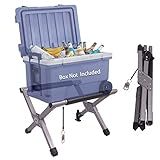
Ablazer Folding Cooler Stand Frame with Carry Bag, Anti-Slip for Camping Hiking BBQ Cooking Picnic Outdoor, Light Weight Foldable Fridge Ice Box Holder, Portable Luggage Stand, 19.7" x 13" x 13.4"
- STABLE & ADJUSTABLE: NON-SLIP BASE ENSURES BALANCE ON ANY TERRAIN.
- DURABLE & LIGHTWEIGHT: RUST-RESISTANT FRAME SUPPORTS UP TO 300LBS EASILY.
- VERSATILE USE: PERFECT FOR COOLERS, TOOLS, GRILLS, AND MORE.


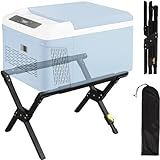
LIWSHWZ Folding Cooler Stand with Carry Bag,Cooler Holder Leg Adjustable,Portable Box Stand,Anti-Slip for Camping Hiking BBQ Cooking Fishing Picnic Outdoor,Light Weight Ice Box Holder(Without Cooler)
- DURABLE & STURDY: HOLDS UP TO 300 LBS WITH LIGHTWEIGHT ALUMINUM ALLOY.
- SPACE-SAVING DESIGN: FOLDABLE AND COMES WITH A CARRYING BAG FOR EASY TRANSPORT.
- VERSATILE USE: PERFECT FOR CAMPING, PICNICS, AND OUTDOOR ACTIVITIES.
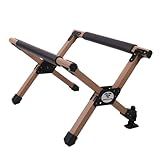
JUNGLELAND Portable Cooler Stand for Camping,Fishing,Outdoor Picnic ,Light Weight Folding Frame Wood Grain Color
- LIGHTWEIGHT ALUMINUM FOR ULTIMATE PORTABILITY AND CONVENIENCE.
- COMPACT DESIGN SIMPLIFIES STORAGE AND ON-THE-GO USE.
- EFFORTLESSLY OPENS FOR QUICK ACCESS ANYTIME, ANYWHERE.

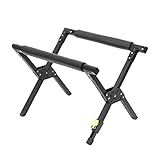
VINGVO Camping Cooler Stand, Adjustable Strong Load Bearing Stable Folding Cooler Stand Frame Aluminum Alloy for Camping Hiking BBQ Cooking Fishing Picnic Outdoor, Light Weight Ice Box Holder (Black)
-
DURABLE ALUMINUM ALLOY: STURDY, WEATHER-RESISTANT CONSTRUCTION FOR OUTDOOR USE.
-
COMPACT & FOLDABLE DESIGN: EASY TO STORE AND TRANSPORT ANYWHERE YOU GO.
-
STABLE NON-SLIP BASE: ENSURES BALANCE ON UNEVEN TERRAINS FOR RELIABLE SUPPORT.
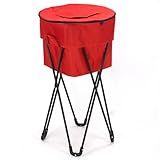
Household Essentials 2170-1 Standing Ice Cooler, Red
- DURABLE DESIGN HOLDS UP TO 20 LBS FOR VERSATILE STORAGE.
- FULLY ZIPPERED LID FOR EASY ACCESS AND FILLING CONVENIENCE.
- CONVENIENT GRAB-FLAP FOR QUICK ACCESS ON-THE-GO.
Naroote Folding Cooler Stand Frame, Camping Cooler Stand Aluminum Alloy Adjustable Outdoor Cooler Stand for Camping, BBQ, Fishing, Luggage Stand for Guest Room Foldable
-
STABLE NON-SLIP BASE: ENSURES BALANCE ON RUGGED TERRAINS FOR OUTDOOR FUN.
-
VERSATILE FIT: ADAPTABLE FOR COOLERS, TACKLE BOXES, AND CAMPING GEAR.
-
CONVENIENTLY FOLDABLE: LIGHTWEIGHT DESIGN SAVES SPACE AND ENHANCES PORTABILITY.
Making a DIY cooler stand for outdoor events is a simple and practical project that can improve the convenience and functionality of your outdoor gatherings. Here is a step-by-step guide on how to create your own cooler stand:
- Gather materials: Start by collecting all the necessary materials for this project. You will need a sturdy wooden pallet, four wood blocks or bricks, screws, a power drill, a measuring tape, and a saw.
- Prepare the pallet: Place the pallet on a flat and stable surface. Determine the desired height of your cooler stand and mark the pallet accordingly. Use the saw to cut the pallet into two sections, one for the base and one for the top.
- Attach the blocks or bricks: Take the wood blocks or bricks and place them on each corner of the pallet base. Make sure they are centered and evenly spaced. The blocks will serve as the legs of your cooler stand.
- Secure the blocks: Once the blocks are in position, use screws and a power drill to attach them firmly to the pallet base. Make sure the screws go through both the blocks and the pallet, ensuring a sturdy connection.
- Attach the top section: Place the cut pallet top section onto the blocks or bricks, aligning it with the base. Double-check that everything is leveled and centered.
- Secure the top section: Using screws and a power drill, secure the top section to the blocks or bricks. Make sure to position the screws around the edges of the pallet top for additional stability.
- Optional: Add hooks or shelves: If you want to maximize storage space or add hooks for hanging utensils or towels, now is the time to do so. You can attach hooks or shelves to the sides or back of the cooler stand as per your preference.
- Stain or paint (optional): If desired, you can stain or paint the cooler stand to protect the wood and make it more visually appealing. Choose a finish that is suitable for outdoor use.
- Insert the cooler: Once everything is securely assembled and finished, place your cooler on top of the stand. Make sure it fits snugly and is centered on the pallet top.
With these easy steps, you can create your own DIY cooler stand for outdoor events. This stand will elevate your cooler, making it easily accessible while also keeping it off the ground. Enjoy your outdoor gatherings with added convenience and functionality!
How do I ensure that the DIY cooler stand is level?
To ensure that your DIY cooler stand is level, you can follow these steps:
- Select a flat and stable surface: Start by choosing a level area in your desired location for the cooler stand. Ensure that the surface is flat and stable, such as a patio, deck, or concrete area.
- Use a level tool: Place a level tool, such as a carpenter's level or a smartphone level app, on top of the cooler stand surface. This will help you identify any unevenness.
- Adjust the stand legs: If the level tool indicates that the cooler stand is not level, you can adjust the legs to achieve balance. For adjustable legs, loosen the fasteners and adjust the length of each leg until the stand is level. If your cooler stand does not have adjustable legs, you can use shims or wedges under the legs to level it.
- Check in multiple directions: While adjusting the legs or adding shims, make sure to check the level of the cooler stand from multiple directions. This will ensure that it is level in all orientations.
- Test stability: After leveling the cooler stand, ensure that it is stable and does not wobble or tip when the cooler is placed on it. Make any additional adjustments to maintain stability.
- Repeat periodically: Over time, the ground or the cooler stand may shift, causing it to become unlevel. Therefore, it is a good practice to periodically check the level of the cooler stand and make any necessary adjustments.
By following these steps, you can ensure that your DIY cooler stand remains level and stable.
What type of wood is best for a DIY cooler stand?
When choosing the type of wood for a DIY cooler stand, several factors should be considered. The wood should be sturdy, weather-resistant, and able to withstand outdoor conditions. Common woods used for outdoor projects include:
- Cedar: Cedar is highly recommended for outdoor projects as it is naturally resistant to rot, decay, and insect damage. It also has a pleasant aroma and an attractive appearance.
- Pressure-treated wood: Pressure-treated wood is treated with chemicals to resist rot, decay, and insects. It is commonly used for outdoor structures and can be an affordable option.
- Redwood: Redwood is naturally resistant to decay, rot, and insects. It has a beautiful appearance with a rich reddish color. However, it may be more expensive compared to other options.
- Teak: Teak is a durable and weather-resistant wood that is commonly used in outdoor furniture. It is resistant to rot, decay, and insects, making it a good choice for a cooler stand. However, teak tends to be more expensive.
When selecting the wood, make sure it is untreated or properly sealed to withstand moisture and weather exposure. Additionally, ensure that the wood is thick and strong enough to support the weight of the cooler and provide stability for the stand.
How do I weatherproof a DIY cooler stand?
If you are looking to weatherproof a DIY cooler stand, here are some steps you can follow:
- Choose the right materials: Opt for weather-resistant materials such as pressure-treated lumber, cedar, or plastic composite materials that can withstand outdoor elements better than untreated wood.
- Seal the wood: If you are using wood, apply a weatherproof sealant or outdoor wood stain to protect it from moisture, UV rays, and other weathering effects. Make sure to follow the instructions provided by the manufacturer on how to properly apply and cure the sealant.
- Add a waterproof lining: Consider using a waterproof liner material, such as a rubber mat or a thick plastic sheet, on the inside of the cooler stand. This liner will create a barrier between the cooler and the wood, preventing any moisture or condensation from reaching the wood surface.
- Use weatherproof hardware: Make sure to use rust-resistant screws, bolts, and other hardware that can withstand exposure to moisture and other outdoor elements. Stainless steel or galvanized hardware are ideal choices.
- Elevate the stand: If possible, elevate the DIY cooler stand slightly off the ground to prevent direct contact with water or moisture. You can use basic wooden blocks or plastic feet to provide some clearance.
- Provide proper drainage: Ensure that your cooler stand has adequate drainage to avoid any water build-up or potential water damage. Incorporate drainage holes or slots at the bottom of the stand to allow any water to escape easily.
- Use a cover or shelter: Consider using a cover or shelter to protect the DIY cooler stand when it is not in use. This will help shield it from rain, snow, and excessive sunlight, ultimately prolonging its lifespan.
Remember, while these steps can help weatherproof your DIY cooler stand, it's crucial to regularly inspect it for any signs of wear or damage. By maintaining and addressing any issues promptly, you can ensure your cooler stand remains in good condition for a longer period.
How do I assemble the different parts of a DIY cooler stand?
Assembling a DIY cooler stand involves a few steps. Here is a general guide to help you put together the different parts:
- Gather all the necessary materials and tools: A cooler, PVC pipes (varying sizes depending on your design), PVC connectors (elbows, tees, crosses, etc.), a saw or pipe cutter, sandpaper, PVC glue, measuring tape, and a marker.
- Plan your design: Determine the dimensions and layout of your cooler stand. Sketch out a diagram if needed.
- Cut the PVC pipes: Measure and mark the pipe sections according to your design. Use a saw or pipe cutter to cut the pipes to the required lengths. Ensure the cuts are straight and smooth.
- Prepare the pipes: Use sandpaper to remove any burrs or rough edges from the cut ends of the PVC pipes. This will prevent any leaks and make it easier to fit the connectors.
- Dry-fit the pieces: Assemble the pipes and connectors without glue to ensure everything fits correctly. Align the pipes according to your design, and check for stability and levelness. Make any necessary adjustments before proceeding.
- Glue the pipes and connectors: Disassemble the dry-fit components and apply PVC glue to each joint. Follow the instructions on the glue for the proper application. Quickly fit the pieces together, ensuring they are fully seated in the connectors. Hold the joints firmly for a few seconds to allow the glue to set.
- Let it cure: Allow the glued joints to cure for the duration specified on the glue's instructions. This typically takes a few hours.
- Attach the cooler: Depending on your design, you may need to secure the cooler to the stand with bungee cords, straps, or brackets. Make sure the cooler is stable and cannot tip over or slide off.
- Test the stability: Once the glue has fully cured, test the stability of your DIY cooler stand. Shake it gently to verify the joints are secure and can support the weight of the cooler.
Remember to refer to any specific instructions or plans you have for your DIY cooler stand. Ensure personal safety by wearing appropriate protective gear, such as gloves or goggles, when working with tools or glue.